
Save This Recipe
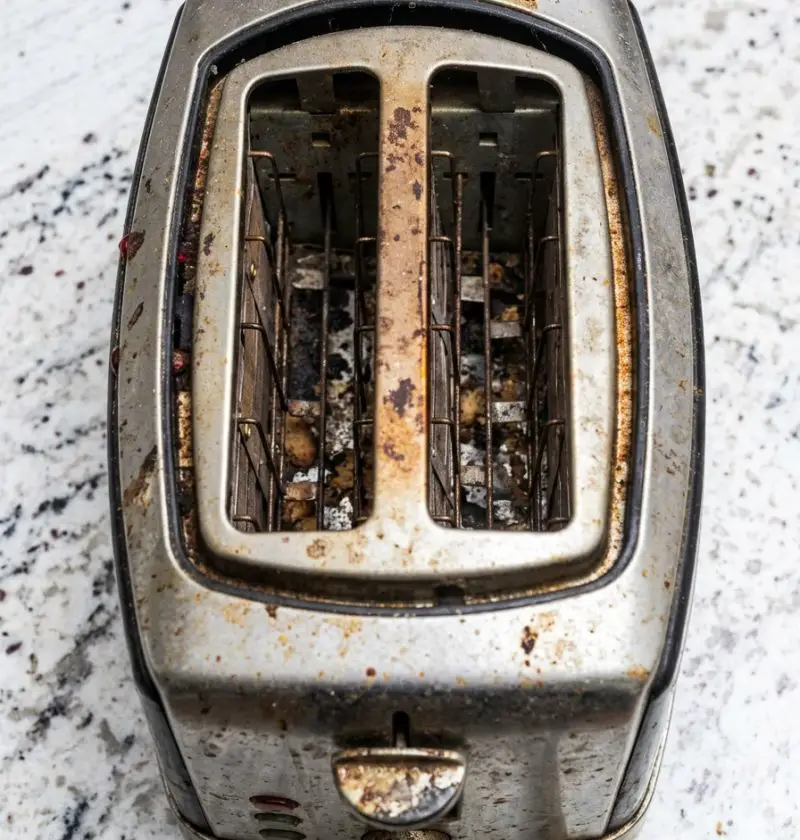
I don’t know when exactly it happens, but there’s always a moment—you’re making toast, maybe rushing through a weekday morning—and you notice it.
That thin layer of grease on the sides.
A few crumbs that clearly didn’t fall there yesterday.
Maybe even that faint “something’s burning… but nothing’s burning?” smell.
And suddenly your toaster, this tiny dependable appliance, looks… Tired.
Honestly, it’s one of those things we all mean to clean but keep putting off. It’s small, it’s awkward, and it’s not exactly obvious how to do it without feeling like you might break something. So we ignore it. For weeks. Sometimes longer.
But here’s the thing—once you know a simple trick, it goes from ugh, I’ll deal with that later to okay, that took five minutes.
And yes, this is where Nana comes in.
Nana Was Right (Again, Somehow)
My nana had this quiet confidence in simple solutions. No fancy sprays, no “specialty cleaners,” none of that. Just things you already have, used the right way.
Her go-to combo?
White vinegar and baking soda.
You’ve seen them before. Probably sitting in your kitchen right now. Maybe pushed to the back behind spices you forgot you bought.
Individually, they’re useful. Together? They handle grease like it’s not even a problem.
- Vinegar breaks down that sticky, oily film
- Baking soda gently scrubs without scratching anything
No harsh smell lingering. No weird residue. Just clean.
And the best part? It doesn’t feel like a whole production.
Let’s Start Simple: Prep First, Always
Before anything else—unplug the toaster.
I know, obvious. But also the kind of thing people skip when they’re in a hurry. Don’t.
Once it’s unplugged and cool, slide out the crumb tray. If you’ve never done this before, you might be a little surprised by what’s in there. It happens.
Give the toaster a gentle shake over the sink or trash. Not aggressive—just enough to loosen the crumbs.
Nana used to say, “Don’t fight the toaster, it’s not fighting you.”
Weird advice, but… it sticks.
The Part That Feels Like Magic
Now mix equal parts white vinegar and warm water in a bowl. Nothing exact here—just eyeball it.
Dip a soft cloth in, wring it out, and start wiping the outside.
You’ll see it almost immediately—that dull, greasy look starts lifting. It’s subtle, but satisfying.
For stubborn spots (and there’s always one), sprinkle a little baking soda onto your cloth and gently scrub. Not hard. Let the texture do the work.
It’s kind of like cleaning a pan that looks worse than it actually is. Once you start, it goes faster than you expect.
The Annoying Little Corners (Don’t Skip These)
This is where things usually get abandoned halfway through. Those tiny edges around buttons and seams?
Yeah. They collect everything.
Grab an old toothbrush or even a cotton swab. Dip it lightly into the vinegar mix and go over those areas.
It’s not glamorous. But it makes a difference.
For the crumb tray, soak it in warm water with a splash of vinegar for about 10–15 minutes. When you come back, most of the grime will wipe off easily. Add a little baking soda if needed.
No aggressive scrubbing. Just patience.
A Quick Polish (Optional… but Worth It)
Once everything’s clean, wipe the toaster down with a damp cloth to remove any leftover residue.
Now, here’s a small trick that feels unnecessary—but really isn’t.
If your toaster is stainless steel, take a tiny bit of olive oil on a microfiber cloth and wipe in the direction of the grain.
That’s it.
Suddenly it doesn’t just look clean—it looks new. Like you just bought it and haven’t used it yet.
And weirdly, it stays cleaner longer too. Fewer fingerprints.
Why This Works (Without Getting Too Science-y)
You remember those baking soda volcano experiments from school?
Same idea, just less dramatic.
Vinegar is acidic—it breaks down grease and grime. Baking soda is slightly abrasive—it helps lift what’s stuck.
When they meet, there’s a light reaction that helps loosen dirt in places you can’t easily scrub.
It’s simple. And that’s kind of the point.
No complicated steps. No overthinking.
The Unexpected Perks
Once you try this method, a few things stand out right away:
- You didn’t need to buy anything new
- There’s no chemical smell hanging in the air
- It took less effort than you expected
- And somehow… it feels a little satisfying
Also, it’s safer around food prep areas, which matters more than we usually admit.
So… Why Don’t We Do This More Often?
Honestly? Because we think it’s harder than it is.
We assume it’ll take forever. Or require tools we don’t have. Or just feel like one more chore at the end of a long day.
But once you’ve done it once, it changes your mental “cost” of the task.
It’s not a big deal anymore. It’s just something you do when you notice it.
A Small Reset That Feels Bigger Than It Is
There’s something oddly comforting about cleaning small things like this.
It’s quick. Visible. Immediate.
And suddenly your kitchen feels just a little more put together—even if everything else is still… a work in progress.
So next time you glance at your toaster and think, yeah, I should probably clean that—
You know what? Just do it.
Nana would.