
Save This Recipe
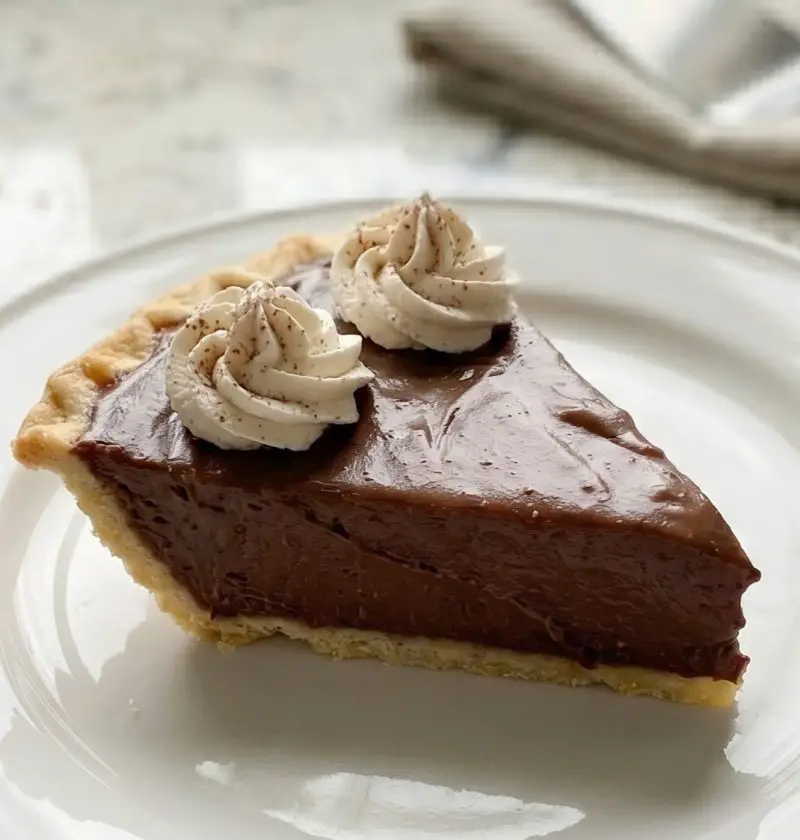
This Chocolate cream pie filling is the real deal — rich, glossy, deeply chocolaty, and made entirely from scratch with pantry staples. Once you make it this way, the boxed stuff just won’t cut it anymore. The hardest part is waiting for it to set.
Why You’ll Love It
No eggs required — cornstarch does the thickening, making this a great dessert option for anyone with an egg allergy.
Richer than anything from a box — real cocoa, real butter, real vanilla. You’ll taste the difference immediately.
Simple ingredients, big payoff — nothing fancy, nothing hard to find, just a Classic chocolate filling done right.
Make-ahead friendly — the fridge does the work while you do other things. Make it in the morning, slice it after dinner.
Works with any crust — store-bought or homemade, pastry or graham cracker, it’s all good here.
Ingredient Notes
The crust — I used store-bought this time and I’m not ashamed. Sometimes you want to make the crust from scratch and sometimes you’ve already been in the kitchen for two hours doing other things. Both are valid. If you do go store-bought, bake it according to the package and let it cool completely. A warm crust will just absorb the filling weird and you’ll be sad.
Cocoa powder — Hershey’s. That’s it. I know there are fancier options and I have nothing against them. But this recipe was built around Hershey’s and I don’t mess with the formula.
The butter — real butter, full fat, none of that margarine business. My mother used margarine for everything and it’s taken me thirty years to undo most of that. Three tablespoons. Don’t skip it.
Vanilla — see above. One and a half teaspoons. Maybe a little more if you’re feeling generous, but don’t go wild.
Ingredients
1 9-inch pie crust, baked and cooled (scratch or store-bought, I won’t judge)
½ cup Hershey’s cocoa powder
1⅛ cup granulated sugar — I always double-check this measurement because I can never remember if it’s 1 cup or more
⅓ cup cornstarch
¼ teaspoon salt
3 cups milk
3 tablespoons real butter
1½ teaspoons pure vanilla extract
Sweetened whipped cream for the top
Chocolate shavings or sprinkles — optional, but why wouldn’t you

Instructions
Start with your crust situation. Bake it, cool it, set it aside. Don’t rush this part — a hot crust is a problem you don’t want. If you’re making scratch crust, good for you. Roll it out, get it in the pan, bake it until it’s golden, let it cool on the counter. If you’re using store-bought, follow the package. Simple.
Now the filling. This is the part people get nervous about and I want you to relax. Take a medium saucepan — not small, you need room — and add all your dry ingredients: cocoa, sugar, cornstarch, salt. Whisk them together until they’re combined. This matters because if you dump the milk in before the dry stuff is mixed, you’ll get little clumps of cocoa that don’t want to dissolve. I’ve done it. It works out but it’s annoying.
Gradually — and I do mean gradually — pour in the milk while you whisk. Slow and steady. You’re building a smooth base.
Now turn the heat to medium-high and just… stay there. Don’t walk away. Don’t go check your phone. This filling will go from loose to thick and it happens kind of fast once it gets going. Keep whisking and stirring, scraping the bottom and the sides. It will start to bubble and thicken — you’ll see it change. Let it come to a full boil and then boil for one full minute. That minute matters. It’s what finishes cooking the cornstarch so you don’t get that raw, chalky taste.
Pull it off the heat. Add the butter and vanilla. Whisk until the butter is completely melted and everything looks glossy and smooth and frankly gorgeous. It will be thick. It should be thick. It should coat a spoon and hold its shape a little.
Pour the filling into your cooled crust. It will look like too much — it’s not. Smooth the top if you want, or don’t. Cover it with plastic wrap pressed right against the surface so you don’t get a skin forming on top, then refrigerate for at least four to six hours. Overnight is better. I made mine this morning and I’m writing this post and the pie is sitting in my fridge and I am not going to touch it until after dinner. That’s the deal I made with myself.
When it’s set — really set, firm when you press the plastic wrap gently — take it out, add your whipped cream, top it with chocolate shavings or sprinkles, and cut into it.
Variations
A graham cracker crust instead of a traditional pastry crust is genuinely delicious here. I made it that way once for a summer thing and I actually preferred it — the crunch is nice against the silky filling. Though now I’m thinking maybe I should just always do it that way… or maybe not. Both are good.
If you want to try it with a non-dairy milk, it can work — expect the filling to set slightly thinner and the flavor to shift a little. I stick with whole milk because that’s what I buy. You could probably do 2% without any issue, but I wouldn’t go lower than that.
Storage
Cover it well and keep it in the fridge. It’ll last three or four days if everyone manages to stay out of it, which in my house has never once happened. The whipped cream on top will start to weep a little after day two, so if you’re making this ahead for something, keep the cream separate and add it before serving.