
Save This Recipe
because every table needs one jaw-dropping dessert
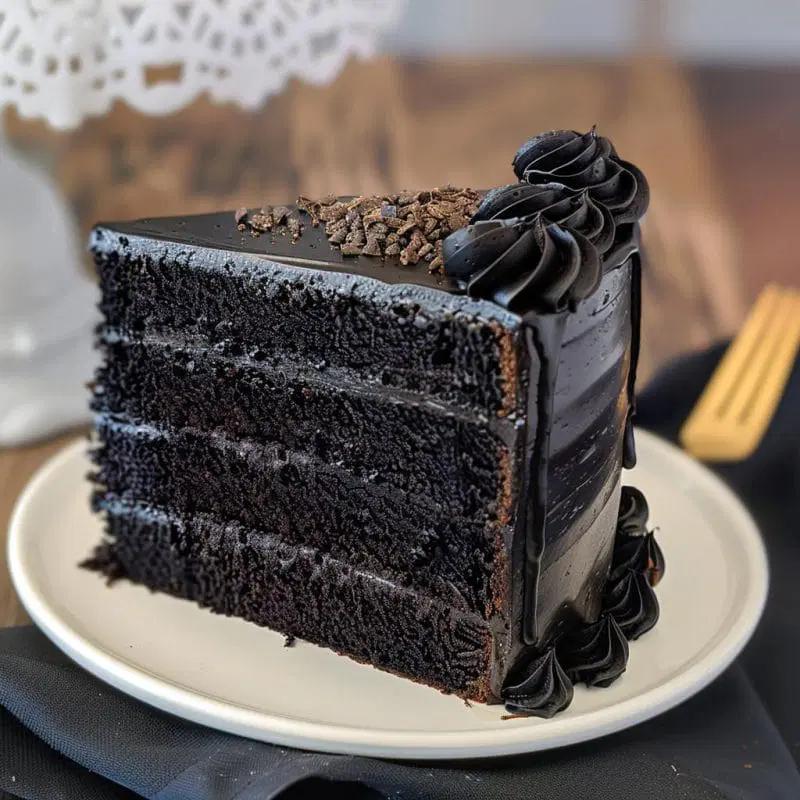
Let’s be honest—some Cakes are made to impress. Others are made to comfort. This one? It does both… and it does it in heels.
The first time I made this Black Velvet Cake, I didn’t expect it to be such a show-off. I was just curious about black cocoa powder (yes, the same stuff they use in Oreo Cookies). What I ended up with was the kind of dessert that makes people pause mid-bite, look up from their plate, and ask what is this magic?
It’s rich, but not heavy. Dramatic in color, but totally mellow in flavor. And the texture? Oh, the texture—it’s what every boxed cake wishes it could be: plush, moist, almost creamy. I’m telling you, this isn’t your average Chocolate cake. It’s got a secret weapon. Actually… a few.
What Makes It “Black Velvet”? Let Me Explain
Ever tried red velvet cake? This is its badass cousin. While red velvet teases you with a hint of Chocolate, Black Velvet slaps you with the real deal.
I started using black cocoa powder (yeah, the Oreo stuff) on a whim and holy crap – it’s a game-changer. The cake comes out almost midnight black but tastes like chocolate had a makeover. Not bitter, just deep. Like switching from pop music to jazz.
The buttermilk and vinegar thing sounds weird but don’t skip it. That’s what gives you that melt-in-your-mouth texture that’ll make you close your eyes when you take a bite. And mixing both black cocoa with regular cocoa? That’s where the magic happens. One’s smoky, one’s rich – together they’re basically cake perfection.
Trust me, once you try this, regular chocolate cake will feel like settling.

Let’s Talk Ingredients (Or What You Need from the Pantry)
Now, I know ingredient lists can get a little long—but this isn’t anything wild. Think of it like dressing for a fancy party using clothes you already have. With a few key upgrades.
-
Flour – All-purpose, the reliable backbone. You’ll want to spoon and level, not scoop—trust me, that makes a difference.
-
Black cocoa powder – This is where the cake gets its broody, inky color and grown-up chocolate taste. You can usually find it online or in specialty stores. It’s worth it.
-
Regular cocoa powder – Adds balance. All-black cocoa can be too intense or dry on its own.
-
Buttermilk – It makes the cake moist and tangy, and reacts with baking soda for fluffiness.
-
Butter and oil – Butter gives flavor; oil gives that dreamy, next-day softness.
-
Eggs – Room temp, please. They do a lot of heavy lifting.
-
Vinegar – A tiny bit that reacts with the baking soda. Don’t worry—you won’t taste it.
-
Black food coloring – Optional but recommended. The black cocoa gets you 90% of the way there, but a touch of gel coloring pushes it into true obsidian territory.
Full ingredient list with amounts and instructions is located in the recipe card below.
Instructions
First things first — preheat your oven.
Set it to 350°F (175°C). Grease and flour two 9-inch round cake pans, or just line them with parchment paper if you hate stuck cakes (been there).
Cream your butter and sugar.
Grab a big bowl. Beat the softened butter and sugar together until it’s light, fluffy, and basically begging to be eaten with a spoon (don’t, though — patience). This part’s important because it gives the cake its soft, airy texture.
Mix in the oil.
Pour in the vegetable oil and mix until it looks smooth and a little glossy. The oil’s your secret weapon for a cake that stays moist, even if you forget about it in the fridge for a day or two.
Add the eggs and a few extras.
Crack the eggs in one at a time, beating after each. Then stir in the vanilla and a splash of white vinegar. (Trust me on the vinegar — it reacts with the baking soda later and makes the crumb super tender.)
Sift and whisk your dry stuff.
In another bowl, sift together the flour, black cocoa, regular cocoa, baking powder, baking soda, and salt. Sifting sounds fussy, but it makes a difference. You don’t want a lumpy cake, right?
Bring it all together.
Add the dry ingredients to the wet, a little at a time, alternating with the buttermilk. Start and end with dry ingredients. Stir just until it’s combined—overmixing is basically how you end up with a sad, tough cake.
Make it black.
Now’s the fun part: add your black food coloring a little at a time until it’s as dark as you want. Gel or paste food coloring works way better than the watery kind.
Divide and smooth.
Pour the batter evenly into your pans. Give the tops a little smoothing with a spatula—no need to go crazy, just make it roughly even.
Bake!
Slide the pans into the oven and bake for about 25–30 minutes. Check a little early just in case; ovens have a mind of their own. If a toothpick comes out clean, you’re golden.
Cool down time.
Let the cakes cool in their pans for about 10 minutes (they’re delicate when hot), then gently flip them out onto a wire rack to cool completely. Try not to sneak a bite—try.
Frosting: Now We’re Talking
This cake’s intense, in a good way. So what you put on top? It matters.
-
Cream cheese frosting is my go-to. That slight tang cuts the richness perfectly.
-
Vanilla buttercream makes the black color pop—like a tuxedo shirt under a black jacket.
-
Chocolate ganache if you want to lean all the way in.
-
Mascarpone frosting if you’re feeling fancy but low-effort.
Honestly, you could just dust it with powdered sugar and call it a minimalist masterpiece.
Add a Little Flair
Here’s where you can have some fun:
-
Garnish with gold leaf or edible glitter for a Halloween glam vibe
-
Top with fresh raspberries or blackberries to cut the richness
-
Serve it with vanilla ice cream if you’re feeling nostalgic (hello, birthday party vibes)
Leftovers? Freeze It. Hide It. Eat It Cold.
Once frosted, this cake keeps well in the fridge for up to 5 days (just let it sit a bit before serving so it’s not fridge-firm). Want to make it ahead? Bake the layers, wrap tightly, freeze up to 2 months, and frost the day-of.
Also… hot tip: a slice eaten cold from the fridge, no fork, standing over the sink? Life-changing.
A Few Fun Twists
-
Black Velvet Cupcakes – Bake in liners, 18–20 minutes. Easy for parties.
-
Bundt Cake – Grease your pan like you mean it and bake 45–50 min. Drizzle with glaze.
-
Mocha Version – Add espresso powder to the dry mix. Game changer.
-
Spiced Version – A dash of Cinnamon and cayenne for a Mexican hot chocolate vibe.
-
Marble Effect – Half black, half red velvet. Swirl them together. Artsy and delicious.
Final Thoughts (a.k.a. Just Bake the Cake Already)
This Black Velvet Cake isn’t just dessert—it’s an experience. It’s a little mysterious, a little romantic, and somehow… cozy? Like a black cashmere sweater you wear to a fancy dinner but also curl up in afterward.
Whether you’re baking for a Halloween party, an elegant birthday, or just want something that feels a little extra—this cake gets it. It looks like midnight and tastes like chocolate dreams.
So yeah, maybe it’s just cake. But maybe it’s the cake that makes your weekend feel a little more magical.
Black Velvet Cake
Ingredients
- 2 cups all-purpose flour for structure
- 1 cup granulated sugar adds sweetness
- 1 cup buttermilk for moisture and tang
- 1/2 cup unsalted butter softened, adds creaminess
- 1/4 cup vegetable oil for moistness
- 2 large eggs binds ingredients
- 2 tbsp black cocoa powder for color and intense chocolate flavor
- 1 tbsp unsweetened cocoa powder additional chocolate flavor
- 1 tsp baking powder leavening agent
- 1/2 tsp baking soda reacts with buttermilk
- 1/2 tsp salt balances flavors
- 1 tbsp white vinegar adds tenderness
- 1 tsp vanilla extract flavor enhancer
- black food coloring gel or paste for desired shade
Instructions
- Preheat oven to 350°F (175°C). Grease and flour two 9-inch round cake pans or line with parchment paper.
- In a large mixing bowl, beat softened butter and granulated sugar until light and fluffy, incorporating air.
- Add vegetable oil and beat until well combined to ensure moisture.
- Add eggs one at a time, then mix in vanilla extract and white vinegar.
- In a separate bowl, sift flour, black cocoa powder, unsweetened cocoa powder, baking powder, baking soda, and salt.
- Alternate adding dry ingredients and buttermilk, beginning and ending with dry ingredients, mixing until just combined.
- Add black food coloring a few drops at a time until desired shade is reached.
- Divide batter evenly between prepared pans and smooth tops with a spatula.
- Bake in preheated oven for 25-30 minutes or until a toothpick inserted into the center comes out clean.
- Cool cakes in pans for 10 minutes, then transfer to a wire rack to cool completely.
