
Save This Recipe
If you ever find yourself dreaming of Hawaiian breezes but all you’ve got is a Tuesday night and some Chicken thighs in the fridge, then pull up a chair, friend. I’ve made this Baked Huli Huli Chicken more times than I can count for family get-togethers, neighborhood potlucks, and last-minute dinners where “something crowd-pleasing” is all I can muster. Every time, it’s a hands-down, can-I-get-the-recipe favorite. There’s just something about that sticky-sweet pineapple-soy glaze clinging to perfectly roasted chicken that instantly lifts your spirits (even if the closest you’re getting to the tropics this week is standing near your space heater with a piña colada mocktail).
The best part? This recipe is impossibly easy and delivers big, bold flavor on a weeknight schedule and a family-style budget. Serve it straight from the pan, sprinkle with a few tropical toppings, and maybe—just maybe—channel that relaxed island feeling, even with piles of laundry in the next room.

Why You’ll Love This Recipe
- Tropical flavors but with pantry simplicity: The bold, sweet, tangy sauce comes together with mostly fridge-and-cupboard stuff—hello, pineapple juice and soy sauce!
- Family-favorite vibes: Even picky kids (and picky adults, let’s be real) love this—it’s saucy, not spicy, and the chicken comes out juicy every time.
- One-dish wonder: Bake everything in one big pan. Clean-up gets bonus points!
- Versatile sides: It’s perfect with fluffy rice, roasted veggies, or even scooped over a fresh salad if you’re into that.
- Meal prep hero: Make extra sauce and use it to marinate grilled chicken later (or just spoon it on everything).
Key Ingredients (and Some Handy Swaps)
- Chicken Thighs: I’m always a bone-in, skin-on gal for weeknight comfort, but boneless or drumsticks totally work—just adjust the cooking time.
- Pineapple Juice: This one’s non-negotiable for those signature vibes, but in a pinch? Use fresh OJ, or the juice from canned pineapple (trust me, nobody’s judging).
- Soy Sauce: Regular or low-sodium is fine. Want it gluten-free? Tamari is your friend!
- Brown Sugar: I love the way it caramelizes, but you can sub honey or coconut sugar if your pantry’s looking a little sparse.
- Ketchup: Adds brightness—tomato paste plus a splash of vinegar or even BBQ sauce works, too.
- Ginger & Garlic: Fresh makes it sing, but powder is fine on a busy weeknight (no judgment here, really).
- Sesame Oil: Don’t skip this if you love that subtle, nutty hint. If you’re out, a splash of olive oil or avocado oil will still do the job.
- Cornstarch Slurry: The magic for thickening the sauce into a gorgeous glaze. Arrowroot or tapioca starch swap in fine.
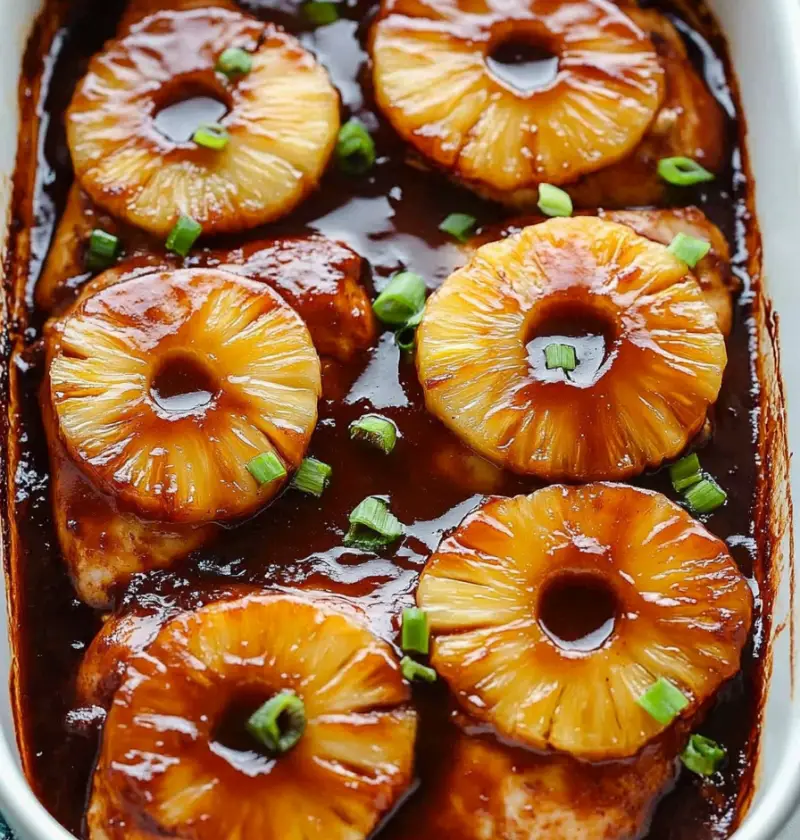
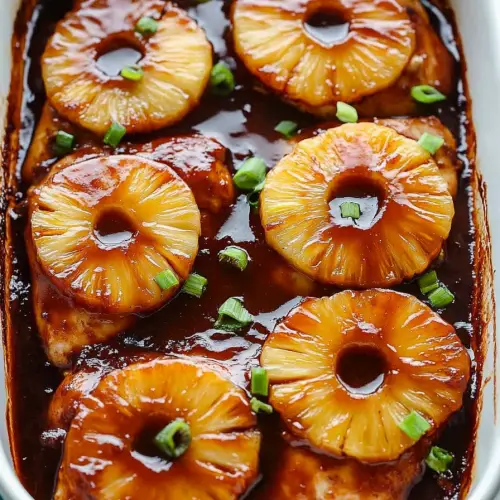
- Garnishes: Fresh pineapple, scallions, and toasted sesame seeds make it extra-pretty and fun to eat.
Check your recipe card for all quantities and details—this is just the sneak peek!
Instructions
Step 1: Preheat & Chicken Prep
Preheat your oven to 375°F (190°C)—this sweet spot gets you sticky caramelized edges without drying things out. Lay your chicken thighs in a big baking dish (cast iron is dreamy, but any 9×13 will do). One layer, no stacking, so everyone gets to soak up that luscious sauce. You want every single piece to feel extra loved.
Step 2: Stir Up That Sauce
In a saucepan over medium heat, whisk together:
- 1 cup pineapple juice
- ½ cup soy sauce
- ½ cup packed brown sugar
- ⅓ cup ketchup
- ¼ cup chicken broth (or water—don’t stress it)
- 2 tablespoons freshly grated ginger
- 2 minced garlic cloves
- 2 teaspoons sesame oil
Bring it up to a gentle simmer so your sugar dissolves and everything starts making friends. Breathe in—it smells incredible and you might find people wandering into the kitchen “just to see what’s up.”
Step 3: Thicken the Magic
Simmer that sauce for about 10 minutes on low heat, letting it reduce just a bit. Now, make your slurry: 1 tablespoon cornstarch mixed with 1 tablespoon water. Whisk this in slowly to the bubbling sauce. Keep stirring as it thickens to the point where it coats the back of a spoon. (Don’t leave it unattended—sugar burns fast and you want glossy, not scorched.)
Step 4: Drench & Baste the Chicken
Pour your gorgeous thickened sauce evenly over those chicken thighs. Give them a little nudge so the sauce gets under the skin and in every nook. I love to swirl each piece a bit in the sauce—messy is more than fine!
Pop the dish in your oven, bake for about 45 minutes to 1 hour, basting (just spooning sauce over the top) halfway through. Chicken is ready when it’s 165°F inside and sticky-caramelized around the edges. Those crispy brown bits? They’re the cook’s bonus, I promise.
Step 5: Rest, Garnish, and Serve
Let your chicken rest 5-10 minutes so the juices settle (the hardest part, since everyone’s already circling the kitchen). Now’s your chance to add sliced green onions, rings of fresh pineapple, and a sprinkle of sesame seeds. Serve hot with fluffy rice, veggies, or honestly, just right from the pan. No judging—sometimes a “direct-to-plate” shortcut is the best.
Serving Suggestions
Okay, you’ve got the main event, but what about sides? Here’s how we do it in my house:
- Steamed rice (white or brown): It soaks up every last drop of that sauce. Don’t skip it—or do, and use bread to mop up instead!
- Roasted or grilled veggies: Zucchini, peppers, or asparagus if you feel fancy. Even broccoli works if that’s what you’ve got in the crisper.
- Hawaiian macaroni salad: Creamy, a little tangy, and so satisfying. Kids and grown-ups both inhale it.
- Tropical slaw: Shredded cabbage with pineapple and mango, for that sweet bite (it’s like salad, but more fun).
- Sweet potatoes: Roasted or mashed—sweet plays so well with savory here.
And if you want that full island feeling? Pour a glass of pineapple iced tea or whip up a coconut mocktail. No sand required, just a bit of imagination.
Storage Tips (and Leftover Love)
Got leftovers? (Lucky you!) Pop everything into an airtight container and stash in the fridge for up to 3 days. When you’re ready for round two, reheat covered in the oven at 350°F until hot and bubbly, or zap it in the microwave in 30-second bursts. I like to drizzle any extra sauce over the top to keep it moist and super craveable.
Want to freeze it? Once totally cool, wrap tightly and freeze for up to 2 months. Thaw overnight in the fridge before reheating. Let me say, there is nothing quite like finding a stash of Huli Huli Chicken in your freezer on a busy weeknight! Your future self will thank you later.
Pro Tip: Save that extra sauce for spooning over rice, tossing with noodles, or marinating your next round of grilled chicken (trust me, it’s gold). You may even catch yourself sneaking a spoonful straight from the fridge—it’s that good.
Fun Variations
- Chicken cuts: Swap for drumsticks, wings, or boneless thighs/breasts. Just keep an eye on cook time—boneless cooks faster! (I’ve been known to sneak in a few wings for late-night snacks.)
- Grilled Huli Huli Chicken: Fire up the grill for some smoky char. Baste generously and get those irresistible grill marks. Throw some pineapple rings on there too, while you’re at it.
- Make it spicy: Add chili flakes or a swirl of Sriracha to the sauce before baking for a kicky twist. If you live with spice-lovers, they’ll thank you.
- Vegetarian option: Sub thick slices of tofu or cauliflower florets. Roast until golden, basting with that fabulous sauce. My veggie friends absolutely love this version!
- Extra pineapple: Tuck chunks or rings of pineapple in with the chicken before baking for even more tangy sweetness.
- Gluten-free: Use tamari or gluten-free soy sauce so everyone can snag a piece!
Conclusion
Baked Huli Huli Chicken is one of those cozy, colorful dishes that instantly makes any night feel special—whether you’re lighting tiki torches in the backyard, or just using paper plates at your kitchen table. The sweet-and-savory flavors, juicy chicken, and lick-the-spoon glaze mean you’ll absolutely fall in love (and probably find yourself going back “just for one more taste”). Get creative with the sides and garnishes, and don’t forget: a messy pan and sticky fingers are part of the fun!
If you end up making this for your family, I’d love to hear how it turned out—or what twists you tried. Drop a comment below or shoot me a message, and let’s keep spreading that laid-back, tropical comfort, one happy dinner at a time!
Garlic Steak and Potato Foil Packs
Ingredients
- 2 pounds steak cubed, sirloin or your favorite cut
- 2 pounds red potatoes cut into bite-size pieces
- 2 jalapeños finely chopped
- 6 tablespoons butter salted, softened
- 2 tablespoons parsley chopped
- 2 teaspoons salt
- 2 teaspoons black pepper
- 2 teaspoons granulated garlic
- 1 tablespoon Worcestershire sauce
- 4 sprigs rosemary optional
Instructions
- Cube the steak and dice the potatoes. Par-cook the potatoes by boiling for 5 minutes or microwaving for 5 minutes.
- Place steak, potatoes, and jalapeños evenly on 4 sheets of foil. Spoon garlic butter sauce and place rosemary sprigs on top.
- Wrap foil packs tightly and cook in a preheated oven at 375°F for 25-30 minutes or on a grill at 400°F for 15-20 minutes.
- Open the foil packs carefully to avoid steam. Garnish with parsley and serve hot.
