
Save This Recipe
This Slow Cooker potato and onion bake is Depression-era cooking at its most satisfying — just four humble ingredients that somehow turn into something deeply savory, buttery, and impossible to stop eating. Thin layers of potatoes and onions, a little flour, a little butter, a long slow cook. That’s it. The kind of recipe that proves you don’t need much to make something really good.
Why You’ll Love It
Only 4 ingredients — potatoes, onions, butter, and flour. That’s the whole list.
Practically no prep work — slice, layer, set the timer, walk away.
Makes the whole house smell incredible — butter and onions slow-cooking all afternoon does something to a Kitchen that no candle can replicate.
Tastes like it took way more effort than it did — deep, savory, almost roasty flavor from the simplest pantry staples.
One pot, minimal cleanup — Slow Cooker, cutting board, done.
Ingredient Notes
Potatoes — I go back and forth between russet and Yukon Gold depending on what’s on sale. Russets get a little softer and more yielding, which I actually like. Yukons hold their shape better and have a naturally buttery flavor that works beautifully here. Either one is right. Don’t use red potatoes; the texture is wrong and they release too much moisture.
Onions — Yellow. Not sweet onions, not red. Yellow. They caramelize in a way that gets almost jammy in the slow cooker, and that’s what you want. I’ve made this with sweet onions when that’s all I had and it was fine but slightly too sweet — I missed the sharpness.
Butter — Real butter, please. This is not the place to use margarine or a butter substitute. The whole dish is built around what butter does to potatoes over a long slow cook. It’s three tablespoons. It’s not going to hurt you.
Flour — All-purpose. This is just to add a little body and help the juices thicken into something almost gravy-like between the layers. You won’t taste it. It just does its quiet job.
Ingredients
About 2½ pounds russet or Yukon Gold potatoes — peeled and sliced thin, roughly ⅛ inch (I use a mandoline but a sharp knife works if you’re patient)
2 large yellow onions, sliced into thin half-moons
3 tablespoons unsalted butter, plus a little extra to grease the crock — maybe 4 tablespoons total, I usually just use more
3 tablespoons all-purpose flour
1 teaspoon kosher salt — or a generous pinch more, taste as you go
½ teaspoon black pepper (optional, I always add it)

Instructions
Start by buttering the inside of your slow cooker. A 4- to 6-quart works well. I just take a cold pat of butter and rub it around the bottom and partway up the sides — it helps prevent sticking and I think it contributes to those golden edges you’ll get on the bottom layer. Worth doing. Don’t skip it.
Peel your potatoes and slice them thin. I mean it about the thin part — ⅛ inch or close to it. If they’re too thick they’ll still be a little firm in the center even after hours of cooking, and that’s not what you want here. You want them soft all the way through with some browned spots on the top. I keep the sliced potatoes loosely covered with a damp dish towel while I work on the onions so they don’t start to turn gray. They will turn gray if you leave them sitting out too long in the air. It doesn’t affect the flavor but it looks unappetizing and then I stand there convincing myself it’s fine when I could have just covered them.
Slice your onions into thin half-moons. Try to keep them roughly the same thickness as the potatoes — it matters for even cooking.
In a small bowl, stir together the flour, salt, and pepper. That’s your magic dust. Set it aside.
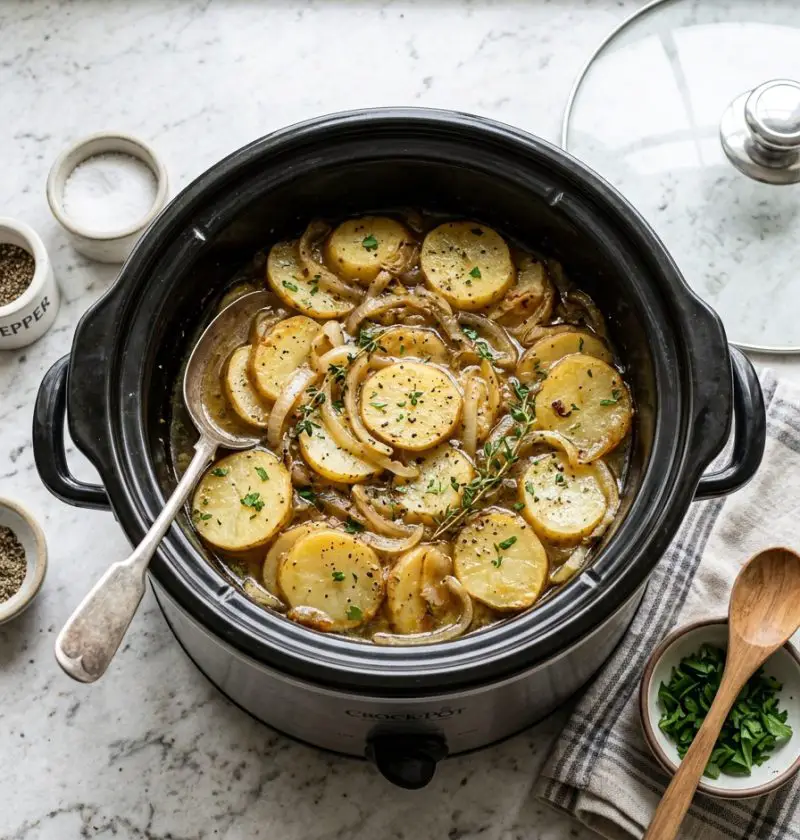
Now you layer. Potato slices on the bottom, overlapping slightly like shingles on a roof. A layer of onions on top of that. A light sprinkle of the flour mixture — just a teaspoon or so, you’re distributing it evenly over about four or five layers. Dot a few small pieces of butter over the top. Repeat. Potatoes, onions, flour, butter. Keep going until you run out of vegetables, and try to end with a layer of potatoes on top. Dot the remaining butter all over the surface.
Put the lid on. Cook on HIGH for about 3½ to 4 hours, or LOW for 6 to 7. Don’t lift the lid. I know it’s tempting — the smell is going to be very persuasive — but the heat and steam need to stay trapped inside to do their thing.
When the potatoes are completely tender when you poke them with a fork, you’re close. Take the lid off and let it sit on WARM or LOW with the lid slightly ajar for another 15 minutes or so. This is when the top gets those golden crispy spots. Don’t skip this part.
Scoop it out in big spoonfuls, making sure to get all the way down through the layers so everyone gets some of the caramelized onion and buttery bottom. Taste for salt before you serve. I almost always add a pinch more at the table.
Variations
Some people drizzle evaporated milk over the top layer before cooking. It makes it creamier — more of a scalloped potato situation, which is lovely but different. The original is drier, almost more savory and concentrated. I prefer it without the milk but I’ve made it both ways.
Adding a layer of thinly sliced garlic between every other layer is very good. That’s not Depression-era, but it’s good.
If you want a faint smokiness — not overwhelming, just a whisper — add a pinch of paprika to the flour mixture. Hungarian paprika if you have it.
Storage & Reheating
It keeps in the fridge for about four days, covered. I usually just put the whole insert in the fridge with plastic wrap on top, which I know is not the most elegant solution. Reheat it in a skillet over medium-low with a tiny bit of butter until warmed through and the edges get a little crispy again — that’s actually my favorite way to eat the leftovers, honestly better than the first Night sometimes.
I’ve frozen it. It works okay. The texture of the potatoes softens a lot after freezing, so it ends up more like a mash. Still tasty but different.
Don’t leave it sitting out on the counter for more than a couple hours. I once forgot about a batch — it was a chaotic holiday situation, everyone was in and out — and I ended up throwing the whole thing out, which was sad. Just refrigerate it when dinner’s done.