

Save This Recipe
These old-fashioned date bars are soft, chewy, and made with just 5 simple pantry ingredients. The dates cook down into a thick, caramel-like filling tucked between two layers of buttery oat crust — they’re the kind of homey, no-fuss dessert you’ll want to keep on repeat.
Why You’ll Love These
Only 5 ingredients — pantry staples you likely already have on hand
That jammy date filling — rich, deeply sweet, and almost caramel-like against the buttery oat crust
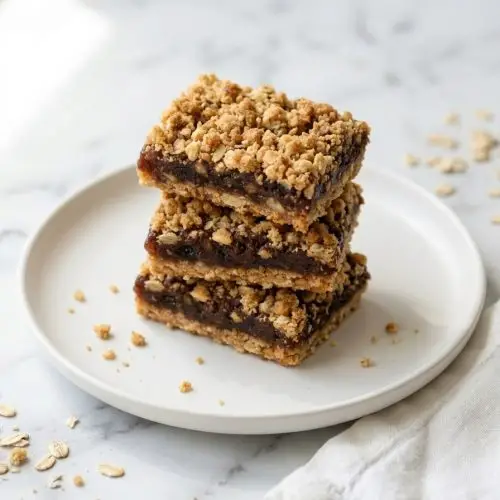
Perfect texture in every bite — crumbly on top and bottom, soft and chewy in the middle
Great for sharing — they slice cleanly, stack well, and travel beautifully
Easy to customize — add walnuts, cinnamon, or a splash of orange juice and they feel completely different

A Few Notes on What Goes In
The dates. You want pitted dates, obviously, but beyond that — I’ve used Medjool when I have them and the cheap store-brand ones when I don’t, and honestly the cheap ones work just fine here because you’re cooking them down anyway. The whole point is softness. If your dates are a little dried out, that’s fine, just add a bit more water and let them sit in the pan longer.
The oats — old-fashioned, not quick. I made that mistake once, years ago, and the texture was all wrong. Kind of mushy. Quick oats have their place, but it’s not here.
Butter. I use unsalted because I like to control the salt, but I’ve used salted in a pinch and it’s fine, just ease up a little on what the recipe calls for. And melt it — don’t try to work with it cold or softened, the melted butter is what helps the oat mixture press into that cohesive crust.
Brown sugar — packed. I sometimes forget to pack it and then the bars are a little less sweet than I want them to be. Just pack it.
Ingredients
2 cups pitted dates, chopped (I usually do this with kitchen scissors, it’s faster than a knife)
1 cup water
1½ cups old-fashioned rolled oats
1 cup all-purpose flour
¾ cup unsalted butter, melted — plus a little extra for the pan
½ cup brown sugar, packed
½ teaspoon salt
How to Make Them
Preheat your oven to 350°F. Grease an 8×8 pan or, if you want cleaner bars and easier lifting, line it with parchment and leave some overhang on the sides. I started doing the parchment Thing about ten years ago and I will never go back. Why did I ever not do this.
Start the date filling first. Put the chopped dates and the cup of water into a small saucepan and turn the heat to medium. Stir it as it heats up. What you’re waiting for is for the dates to go soft and start falling apart — this takes maybe five to eight minutes, and you’ll know it’s happening when the mixture looks thick and jammy and the dates are basically melting into each other. If it’s sticking or looks too stiff, just splash in a little more water. Don’t walk away from it. I have walked away from it. It’s not a disaster, but it’ll scorch on the bottom if you’re not careful, and then the whole batch has that faint burnt note that you notice and no one else admits they notice. Set it aside to cool while you do the crust.
In a medium bowl — and I mean a proper-sized bowl, not one of those small ones where everything ends up on the counter — stir together the oats, flour, brown sugar, and salt. Use your fingers to break up any brown sugar clumps. Then pour the melted butter over everything and stir until it’s evenly damp and crumbly. It should hold together when you press a bit between your fingers. If it seems dry, you can add another tablespoon of butter, though I’ve never needed to.
Press about two-thirds of the oat mixture into the bottom of the pan. Really press it — use your palm, the back of a spoon, whatever works. You want a solid base, not just oats laying there loosely. Then spread the date filling evenly over it. It’ll be thick, so use a spatula and take your time getting it to the corners. Sprinkle the rest of the oat mixture on top and press it just lightly — you want some texture up there, a little roughness. Don’t flatten it completely.
Bake for 25 to 30 minutes. The top should be golden, not dark. You’ll smell it before you see it.
This is the hard part: let them cool completely before you cut them. I know. I have cut into them too early more times than I’d like to admit, and you get crumbles and a mess and a filling that’s still a little runny. Give them at least an hour on a rack. If you can get them in the refrigerator for thirty minutes after that, the bars will slice much more cleanly.
If You Want to Change Things Up
You can stir a little orange zest or juice into the date filling — it gives the whole thing a brightness that’s really lovely and unexpected. Cinnamon in the oat mixture is a nice touch too, just a pinch, or nutmeg if that’s your thing. Adding walnuts folded right into the crust and topping gives the bars more crunch and heft. Swapping half the all-purpose flour for whole wheat is worth trying — it tastes a little earthier, nuttier, and feels right at home with the oats and dates.
For less sweetness, pull the brown sugar back to a third of a cup. The dates carry plenty of sweetness on their own.
Keeping Them
They stay good on the counter for a few days if you cover them. They’re actually a little better on day two, after everything has settled. If you’re making them ahead, the fridge is fine — they firm up nicely in there, though you might want to let them come back to room temperature before you serve them to guests.
Freezing works well. Stack them in layers with parchment between and put the whole thing in a zip bag. I’ve pulled them out months later and they were perfectly fine. I’ve also completely forgotten I had them in there, which, honestly, is just how freezers go.
5-Ingredient Date Bars
Ingredients
- 2 cups pitted dates chopped
- 1 cup water
- 1 1/2 cups old-fashioned rolled oats
- 1 cup all-purpose flour
- 3/4 cup unsalted butter melted, plus extra for pan
- 1/2 cup brown sugar packed
- 1/2 tsp salt
Instructions
- Preheat oven to 350°F (175°C) and grease or line an 8x8-inch pan with parchment paper.
- In a saucepan over medium heat, cook chopped dates and water for 5–8 minutes until thick and jam-like, stirring frequently. Set aside to cool.
- In a bowl, mix oats, flour, brown sugar, and salt, breaking up any clumps.
- Add melted butter and stir until the mixture is evenly crumbly and moist.
- Press two-thirds of the mixture firmly into the bottom of the pan.
- Spread the cooled date filling evenly over the base.
- Sprinkle remaining oat mixture on top and press lightly.
- Bake for 25–30 minutes until the top is lightly golden.
- Cool completely before slicing, optionally chilling for cleaner cuts.
