
Save This Recipe
aka the one thing everyone grabs before the football even starts.
You ever show up to a get-together and think, Please, Lord, let there be something besides sad chips and grocery store cookies? I have. Too many times. So a while back, I started bringing these Italian Sub Bites to potlucks, tailgates, even my neighbor Carol’s backyard wine night (don’t ask, she Gets real rowdy with rosé).
Let me tell you—these things disappear. Every. Single. Time.
And the best part? You don’t need an oven. You don’t need fancy tools. Heck, you barely need a reason to make them. They’re just that good.
Why You’ll Love These (even if you’re over cold appetizers)
-
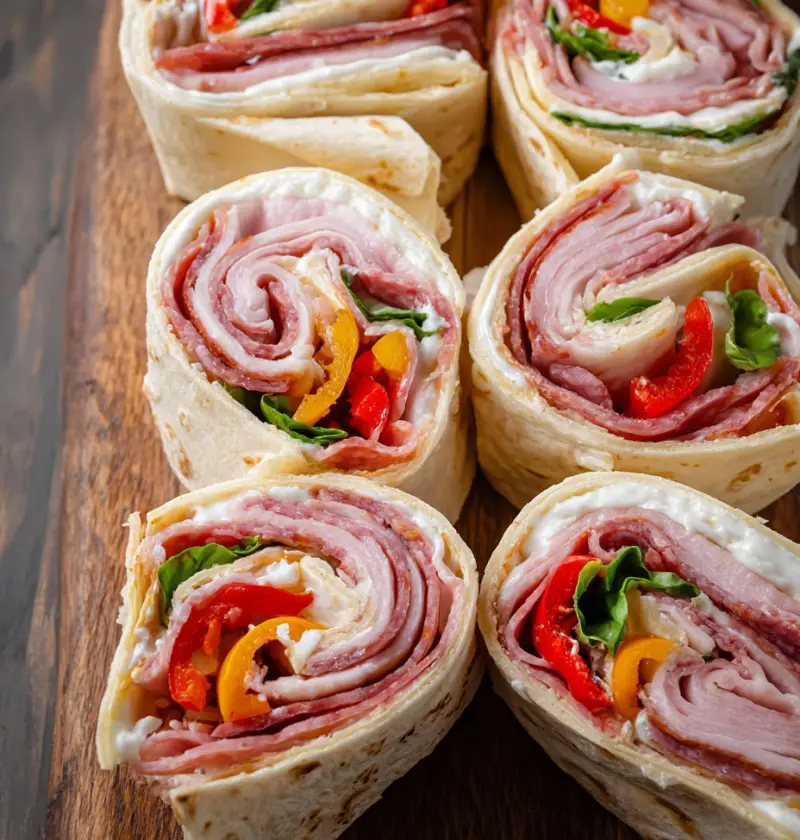
Totally snackable: They’re basically Little meat-and-cheese burritos in disguise.
-
No oven drama: No baking, broiling, or praying your cheese melts evenly.
-
Easy on the clock: Done in about 20 minutes—unless your kids distract you.
-
Crowd-pleasing: They hit that sweet spot between salty, creamy, crunchy, and just enough tang.
-
Fridge-friendly: Make ’em ahead, chill, slice, snack. Rinse and repeat.
Let’s Talk Ingredients (and swaps, because life happens)
Here’s what I used—and what you could use if you’re feeling wild or forgot something at the store (we’ve all been there).
-
Cream Cheese: Room temp makes it easier to spread. If it’s too cold, it’ll shred your tortilla like a bad mood.
-
Italian Seasoning, Garlic Powder, Salt & Pepper: Classic flavor boosters. Don’t overthink it.
-
Flour Tortillas: The big ol’ burrito-sized ones. Whole wheat works too, if you’re trying to feel virtuous.
-
Ham & Salami: Go for thin slices. If you’ve got prosciutto, pepperoni, turkey, whatever—you’re golden.
-
Mozzarella Cheese: I used slices, but shredded is fine too. Provolone or Swiss? Also yum.
-
Roasted Red Peppers & Peperoncinis: These give it that zippy, juicy bite. Drain them well or your roll-ups will be soggy drama queens.
-
Fresh Basil: Optional but delicious. Gives it that fancy, fresh kick—like a garden party in your mouth.

How to Make Italian Sub Bites (in your yoga pants, no judgment)
Alright, let’s roll—literally.
-
Mix up that dreamy spread.
In a bowl, mash together your cream cheese, Italian seasoning, garlic powder, salt, and pepper. Get it nice and smooth. Taste it. Try not to eat it all with a spoon (but if you do, I won’t judge). -
Lay out your tortilla runway.
Overlap two tortillas on a big cutting board so you’ve got a nice long rectangle. This makes it easier to roll everything up tight. Trust me—don’t skip this part. -
Spread the cream cheese like you mean it.
Go edge to almost-edge, leaving just a little border. Like peanut butter on a school sandwich—neat, but generous. -
Layer it up.
First the ham, then the salami, then the cheese. Try to keep it even, but don’t overthink it. No one’s grading you. -
Add the good stuff.
Scatter the peppers, peperoncinis, and fresh basil over the lower two-thirds. This helps everything stay in place when you roll. -
Roll it like a tight pair of jeans.
Start from the bottom, roll upward, keeping it snug but not squished. Pretend you’re wrapping a baby burrito. A very flavorful one. -
Secure with toothpicks & slice.
Pop in a few toothpicks along the seam (about 1½ inches apart), then slice between them with a sharp knife. Wipe the blade if it gets messy—you’ll thank me. -
Repeat with the rest.
You’ll get a bunch of bites out of this. Enough to feed a small crowd or keep for sneaky fridge snacks.
Want to Mix It Up? Here’s How
Listen, recipes are just suggestions with good manners. Feel free to do your thing:
-
Add some heat: Throw in spicy capicola or banana peppers.
-
Go veggie: Sub in grilled zucchini, spinach, and provolone. Maybe a swipe of pesto if you’re feelin’ fancy.
-
Try different wraps: Spinach tortillas, sun-dried tomato, or even low-carb if you’re watching carbs (I’m usually watching carbs go into my mouth, but you do you).
-
Kid version: Leave out the peppers, keep it mild, and cut into fun shapes with cookie cutters.
Storage Tips (so they don’t turn into soggy sadness)
-
Make-Ahead: Wrap ‘em up tight in plastic wrap before slicing. Chill for up to 24 hours.
-
Slice When Ready: Cutting them right before serving keeps them looking cute and fresh.
-
Leftovers: Good in the fridge for about 2 days. After that, they start looking tired.
-
Travel Friendly: Pack ‘em snug so they don’t roll around. Perfect for picnics or road trips.
Before You Head to the Kitchen…
I really hope you try these. They’re the kind of recipe that feels like a win even when the rest of the day is bananas. They work for game day, book club, Tuesday nights when you don’t feel like cooking—whatever.
If you give them a go, I’d love to hear how they turned out! Did you go rogue with the ingredients? Add something unexpected? Did the kids love them or just pick out the cheese like mine used to?
Leave me a note below or tag me on Instagram (I do check every tag while snacking on these).
Thanks for being here. Stay hungry, stay cozy, and don’t forget the napkins.
With love and a little red pepper on my shirt,

Italian Sub Bites
Ingredients
- 8 oz cream cheese
- 1/2 teaspoon Italian seasoning
- 1/2 teaspoon garlic powder
- 1/2 teaspoon salt
- 1/4 teaspoon black pepper
- 4 large flour tortillas
- 1 12 oz jar roasted red pepper slices, drained
- 1 12 oz jar peperoncinis, drained
- 1/2 lb ham, sliced thin
- 1/2 lb salami, sliced thin
- 1/2 lb mozzarella cheese, sliced
- 1/2 cup fresh basil, chopped
Instructions
- In a small bowl, mix cream cheese, Italian seasoning, garlic powder, salt, and pepper until smooth.
- Place two tortillas side by side with slight overlap. Spread half the cream cheese mixture over them, leaving a border.
- Layer ham, salami, and mozzarella over the cream cheese. Add peppers and basil to the lower two-thirds.
- Roll up tightly toward the top. Secure with toothpicks and slice into bite-size pieces.
- Repeat with remaining ingredients. Serve chilled or at room temperature.
