
Save This Recipe
You know that moment when you drop a steak into a hot pan and expect that confident sizzle, the kind that makes your kitchen smell like a cozy bistro? And instead… nothing dramatic happens. A few minutes later, you flip it and see gray. Flat. Sad gray.
Honestly, it feels like betrayal.
Cooking meat well isn’t rocket science, but it’s also not pure luck. There’s a little chemistry, a little timing, and a handful of habits that quietly shape your results. Once you understand what’s actually happening in the pan, things start clicking. And suddenly, that golden-brown crust stops feeling like a mystery prize.
Let me explain.
The Real Reason Meat Turns Brown (It’s Not Just Heat)
That beautiful brown color comes from something called the Maillard reaction. Fancy name, simple idea. When proteins and natural sugars heat up together at higher temperatures, they create new flavor compounds and rich color. It’s why toasted bread smells amazing and why roasted coffee beans taste complex.
For meat, this reaction starts kicking in once the surface gets hot enough and dry enough. If the surface stays wet or the pan never truly heats up, the reaction stalls. No browning. No savory depth. Just pale protein wondering what went wrong.
So yeah, color equals flavor. Not just looks.
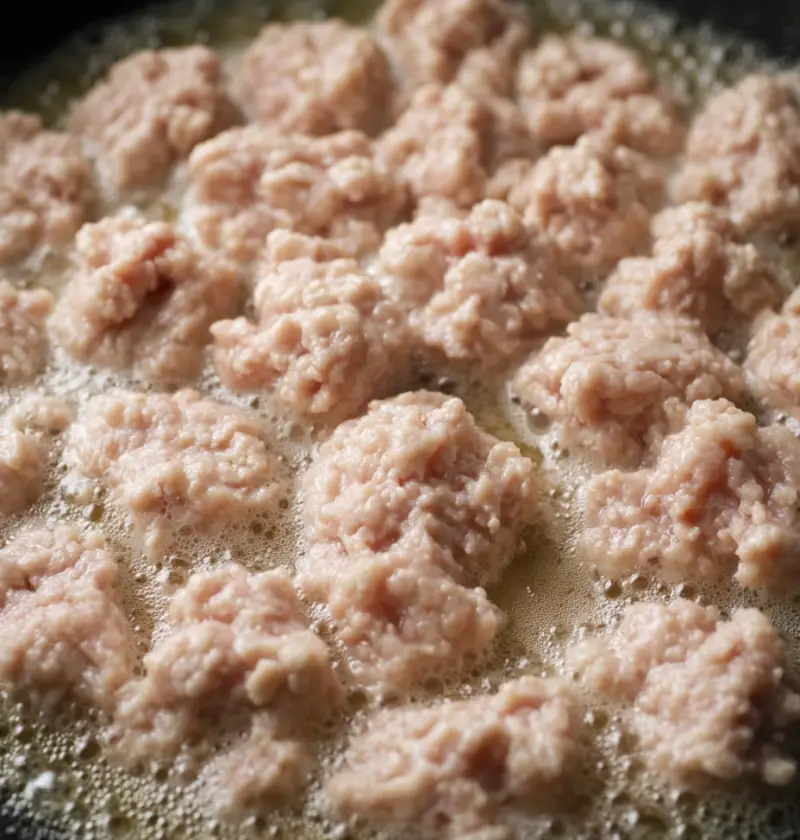
Steam: The Quiet Saboteur Nobody Talks About
Here’s the thing. Most gray meat isn’t burned, underseasoned, or cursed by bad cookware karma. It’s steamed.
When too much meat hits a pan at once, all that moisture releases at the same time. Instead of sizzling against metal, your meat sits in a cloud of steam. Steam cooks gently. Gently means gray.
Crowding also drops the pan’s temperature fast, especially on home stoves that don’t have restaurant-level burners. Suddenly your pan is playing catch-up instead of delivering steady heat.
If you’ve ever wondered why cooking in batches feels annoying but works better… this is why.
Dry Surfaces Make Happy Crusts
Water has to evaporate before browning can begin. That evaporation steals heat and time. If your steak is damp from packaging juices, marinades, or defrosting, the pan spends precious minutes drying it instead of browning it.
A quick pat-down with paper towels sounds boring, but it changes everything. Think of it like drying off before stepping into the sun. You warm up faster. Same idea here.
It’s especially helpful with chicken, pork chops, and anything that’s been sitting in liquid.
Small step. Big payoff.
Why “Medium Heat” Can Be Misleading
Recipes love saying “medium heat” like every stove behaves the same. They don’t. Not even close.
One stove’s medium is another stove’s barely warm. Cast iron holds heat like a champ, while thinner pans cool down quickly when food hits them. Electric burners take longer to recover than gas.
If your pan doesn’t feel properly hot before the meat goes in, browning struggles to start. A light shimmer in the oil or a faint wisp of smoke is usually a good sign you’re ready.
You don’t want reckless heat, but timid heat won’t give you crust either.
Your Pan Choice Actually Matters
Nonstick pans are convenient for eggs and pancakes. For serious browning, they’re not always your friend. Many nonstick coatings don’t love high heat, and they don’t hold temperature as steadily.
Stainless steel and cast iron shine here. They build and maintain heat more reliably, letting the meat stay in direct contact with a hot surface. That contact is where flavor forms.
If your pan feels heavy when you lift it, that’s usually a good sign.
Oil: Helpful, But Easy to Overdo
Oil helps transfer heat and prevents sticking, but too much oil creates a shallow fry situation. The meat floats slightly instead of pressing firmly against the pan, which slows browning and encourages steaming.
A thin coating is usually enough. Choose oils that tolerate higher temperatures, like avocado oil, canola oil, or grapeseed oil. Butter alone burns quickly, though adding a little later for flavor works beautifully.
Balance matters here.
Stop Touching the Meat Every 20 Seconds
We’ve all done it. Flip. Peek. Wiggle. Flip again.
Constant movement interrupts crust formation. Browning needs uninterrupted contact with heat. Give the meat a chance to settle and build color before you disturb it. You’ll often feel it naturally release from the pan once a crust forms.
Patience feels boring in the moment. It tastes fantastic later.
Cold Meat Cools Your Pan Fast
Placing fridge-cold meat straight into the pan can drag the surface temperature down. That slows browning and encourages moisture buildup.
Letting meat sit out for about 15 to 20 minutes takes the chill off without risking safety. The pan holds its heat better, and the surface browns more evenly.
This tiny pause often improves texture and color more than people expect.
Not All Cuts Behave the Same Way
Thin cuts brown fast but can dry out quickly. Thicker cuts take longer but develop deeper crusts if managed well.
Fat content matters too. Fat helps conduct heat and supports flavor development. That’s why ribeye browns differently than a lean sirloin, and why chicken thighs behave differently than chicken breasts.
Once you notice these patterns, you naturally adjust timing and heat without thinking much about it.
Marinades, Sugars, and Timing Trouble
Marinades add flavor, but they often add moisture and sugars too. Sugars brown quickly and can burn before the meat itself finishes cooking. Excess liquid interferes with surface heat.
If you’re marinating, wipe the surface dry before cooking. Save sticky sauces for the final moments in the pan or brush them on after browning.
Flavor doesn’t need to rush.
Stove Power: The Reality Check
Gas stoves heat quickly and respond fast when you adjust the flame. Electric stoves often lag and recover more slowly when cold food hits the pan.
Neither is wrong, but understanding your setup helps you adapt. On electric burners, preheating longer and cooking in smaller batches often improves browning. On gas, controlling flare-ups and heat spikes becomes the main game.
Every kitchen has its own personality.
Social Media Hacks: Fun, But Not Always Smart
You’ve probably seen viral cooking clips showing sugar tricks, blowtorches, or odd shortcuts. Some work in niche cases. Others create uneven results or weird flavors.
There’s nothing wrong with experimenting, but consistent results usually come from solid fundamentals, not flashy tricks. Heat control, dry surfaces, space in the pan. Boring stuff that quietly wins.
Gray Meat and Food Safety: Let’s Clear This Up
Gray color doesn’t automatically mean unsafe. It usually means the meat cooked without proper browning.
Safety depends on internal temperature, not surface color. A thermometer removes all guesswork. Poultry should reach 165°F. Most whole cuts of beef and pork are safe around 145°F with resting time.
If it’s cooked properly inside, gray outside isn’t dangerous. Just disappointing.
A Simple Game Plan That Actually Works
If you want a repeatable system, try this:
-
Take meat out of the fridge about 15 minutes before cooking.
-
Pat the surface dry thoroughly.
-
Heat a heavy pan until it’s properly hot.
-
Add a thin layer of high-heat oil.
-
Place meat in with space between pieces.
-
Leave it alone until a crust forms.
-
Flip once or twice only.
-
Finish to desired doneness.
-
Let it rest before slicing.
Nothing fancy. Just steady habits stacked together.
Final Thoughts (Because Cooking Should Feel Good)
Cooking is part science, part rhythm, part gut instinct. Some nights you nail it. Some nights the pan wins. That’s normal.
Once you understand why meat turns gray, though, the frustration fades. You start spotting small adjustments in real time. You notice steam. You hear the sizzle. You feel the pan heat. It becomes intuitive, almost conversational.
And honestly? That first perfect crust you pull off after fixing these habits feels ridiculously satisfying. Like you finally cracked a quiet kitchen code.
You’ve got this.