

Save This Recipe
There are some smells that just stop you in your tracks. Coffee brewing. Bacon in a skillet. And cinnamon drifting through the house when the oven’s on. That last one? That’s the kind that makes people wander into the kitchen pretending they just needed a glass of water.
Sourdough cinnamon swirl Bread has that effect. It’s a little showy, sure, with those pretty ribbons of cinnamon sugar tucked inside, but it’s also comforting in the best possible way. Toast it, add butter, and suddenly the morning feels softer around the edges.
And the nicest part? You don’t have to wrestle cinnamon into the dough early on. The swirl comes later, right when the dough is being shaped, which keeps your fermentation happy and your loaf full of life.
If you enjoy baking sourdough and you’ve ever wished your everyday loaf had a bit more flair, this one’s worth your time.
What makes this different from regular cinnamon bread?
Most cinnamon breads rely on commercial yeast and tend to be soft, cake-like, and sweet all the way through. Delicious, yes, but different.
Sourdough cinnamon swirl bread is still very much a bread bread. Crusty on the outside. Chewy and open inside. The sweetness shows up in pockets, not everywhere, so each slice has contrast. A little tang here, a little cinnamon there. It keeps your taste buds awake.
It’s also sturdy enough for toast, French toast, and even bread pudding, which is something softer cinnamon loaves don’t always manage without falling apart.
So you get the best of both worlds: bakery-style sourdough structure with bakery-window sweetness woven through it.
Why cinnamon waits until shaping time
Here’s a small but important detail. Cinnamon doesn’t play nicely with yeast. The main compound in cinnamon, cinnamaldehyde, has antifungal properties. And wild yeast? It’s a fungus. Sounds odd, but that’s the science of it.
If you mix cinnamon straight into your dough, fermentation slows down. Sometimes a lot. That can leave you with dense bread and a lot of head scratching.
So instead of adding cinnamon early, it gets sprinkled on during shaping. That way, your dough gets to ferment freely, build structure, and puff up the way it should. The cinnamon stays where it belongs, in pretty swirls, not interfering with the rise.
It’s the same reason cinnamon rolls add spice in the filling, not the dough. Bakers figured this out long before most of us ever heard the word “cinnamaldehyde,” and honestly, thank goodness for that.

The look that makes people think you worked harder than you did
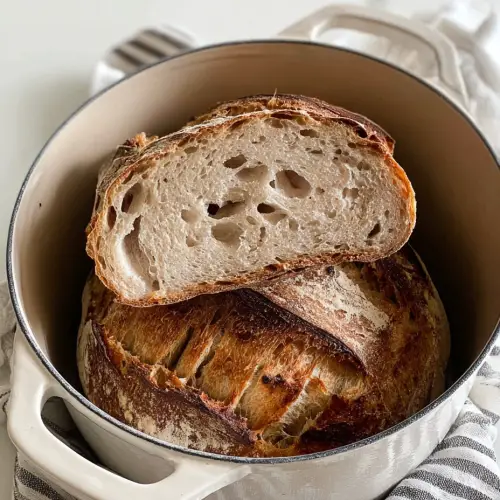
When you slice into this loaf, you see soft layers of cinnamon sugar winding through the crumb. Not perfectly even, not too neat. Just natural and inviting.
The crust gets those gentle blisters from the long cold rest, and the crumb stays open and light, even with the added filling. It’s one of those loaves that looks like it came from a bakery shelf, but it was made in your own oven.
And yes, you may feel a little proud when you cut into it. You should.
Flavor that doesn’t shout, but definitely speaks up
This isn’t dessert bread. It’s breakfast bread, brunch bread, snack-with-coffee bread.
The sourdough brings a mild tang that balances the sweetness. The cinnamon sugar adds warmth without turning the whole loaf into a sugar bomb. Together, they behave nicely, which is exactly what you want at eight in the morning.
It’s rich enough to feel special, but not so sweet that you can’t eat it alongside eggs or fruit. That balance is what makes people keep reaching for another slice.
A few tools that make things easier
You don’t need a professional setup, but a couple of basics help, especially once you start baking regularly.
-
Kitchen scale (bread likes precision)
-
Dough scraper (for mixing and lifting sticky dough)
-
Bench scraper (for shaping and handling)
-
Banneton or bowl with floured towel
-
Dutch oven for baking
Nothing fancy. Just practical helpers that keep dough where it belongs and off your sleeves.
Starter readiness, without the guesswork
Your starter should be active, bubbly, and recently fed. That usually means it’s at its peak or just starting to fall after doubling in size.
If it smells clean and slightly sweet, you’re good. If it smells sharp or looks sleepy, give it another feeding and wait a bit.
Think of the starter as your main engine here. Everything else depends on it being in a good mood.
Mixing and that quiet rest that does more than you think
The dough begins with starter, water, flour, and salt mixed just until there’s no dry flour left. It won’t look smooth. It shouldn’t.
Then comes the autolyse, which is just a fancy word for letting the flour soak up water while you do something else. Thirty minutes to an hour is plenty.
This rest makes the dough easier to handle later and helps gluten form with less effort. It’s like letting rice soak before cooking. Small step, big payoff.
Forming the dough without working up a sweat
After the rest, you’ll pull the dough together into a smooth ball using gentle stretches around the bowl. No kneading marathon required.
At first, it’s sticky and loose. Then, slowly, it tightens and shines a little. That’s what you’re watching for.
Once it’s smooth, it rests again. Bread making has a lot of resting. That’s not laziness. That’s strategy.
Stretch and folds that build strength quietly
Over the next couple of hours, you’ll stretch and fold the dough a few times. Lift, fold over, turn the bowl, repeat.
Each set takes less than a minute. Then the dough rests again. During these pauses, gluten keeps developing, and the dough becomes more elastic.
By the last fold, you’ll feel the difference. The dough will hold its shape better and feel less like a puddle.
Bulk fermentation and trusting your eyes
After the folds, the dough rests until it’s grown about half again in size. Not doubled. Just fuller and airy.
Time depends on temperature, starter strength, and the mood of your kitchen that day. Instead of watching the clock, watch the dough. When it jiggles and looks alive, it’s ready.
Bread teaches patience, but it also teaches observation. And that skill pays off with every loaf.
Mixing the cinnamon sugar (and optional raisins)
While the dough finishes its bulk rise, stir together brown sugar and cinnamon. That’s it. Simple and perfect.
If you like cinnamon raisin bread, this is also when you grab a handful of raisins. They’ll get added during shaping right along with the sugar.
No soaking needed unless your raisins are especially dry. They’ll plump up just fine inside the dough.
Shaping day: where the swirl is born
Turn the dough out gently, sticky side up. Pull it into a rough rectangle, short side facing you.
Sprinkle on some cinnamon sugar. Fold the dough, sprinkle again. Fold, sprinkle. Then roll it up into a batard or boule, tucking everything inside.
This layering creates the swirl. No complicated techniques. Just folding and rolling, like you’re packing up a soft blanket.
Some sugar may peek out. That’s fine. It adds character and a little caramelized crunch on the crust.
Banneton, bowl, and the magic of flour
Place the shaped dough into a well-floured banneton or a towel-lined bowl. Seam side up if you want those pretty rings on top.
Flour matters here. Be generous. Cinnamon can make dough stickier, and nobody wants to pry bread out of a basket.
Handle the dough gently. Those air bubbles you built earlier? You want to keep as many of them as you can.
Cold rest and why slow makes better bread
Into the fridge it goes, anywhere from five hours to a day and a half.
This cold rest deepens flavor, improves crust, and makes scoring easier. It also gives you flexibility. Bake when it suits your schedule.
And yes, longer usually means better flavor. Not always, but often enough to make patience worth it.
Baking in a Dutch oven and why cold dough helps
A hot oven and a hot Dutch oven create steam, which helps the bread rise before the crust sets. Cold dough hitting that heat gives you even more lift.
Score the loaf, lower it into the pot using parchment as handles, cover, and bake.
First part with the lid on to trap steam. Second part uncovered to brown the crust.
When it comes out golden and fragrant, that’s when the waiting gets hard.
Cooling, slicing, and that first look inside
Let it cool. I know. It’s tough.
But cutting too soon lets steam escape and can leave the crumb gummy. Give it time to finish setting.
When you finally slice in and see those cinnamon ribbons, it’s a small kitchen victory worth savoring.
How to serve it (and why leftovers never last long)
This bread shines with very little effort.
-
Toasted with butter for breakfast
-
Thick slices for French toast
-
Cubed for bread pudding
-
Lightly toasted with cream cheese and fruit
It also freezes beautifully. Slice first, freeze, and toast straight from frozen on busy mornings.
Future you will be very grateful.
A few common questions, answered gently
Can I add raisins?
Absolutely. Add them with the cinnamon sugar during shaping for even distribution.
Can I bake it in a loaf pan?
Yes, shape it and place it in a greased pan before the fridge rest. It works nicely for sandwich-style slices.
Why isn’t my swirl very visible?
Use a bit more filling and be sure to layer it during folding, not just at the start.
What makes great sourdough bread overall?
A strong starter, proper fermentation, and gentle shaping. It’s less about tricks and more about timing and care.
Why this loaf keeps earning its place on the counter
Sourdough cinnamon swirl bread feels like a treat, but it’s still everyday bread. It fits into quiet mornings and lazy brunches, and it holds up just as well at dinner with soup.
It teaches good sourdough habits without being intimidating. It rewards patience with flavor and texture that feel generous and familiar.
And maybe that’s why people keep baking it again and again. It’s comforting, a little special, and always welcome at the table.
So if you’ve got an active starter and a bit of time, this loaf is a fine way to spend a weekend. And if a slice disappears before it even cools? Well, that’s just part of the story.
Cinnamon Swirl Sourdough Bread
Ingredients
- 500 g Bread Flour
- 350 g Water
- 50 g Sourdough Starter
- 10 g Salt
- 50 g Brown Sugar
- 5 g Cinnamon
Instructions
- Weigh out your sourdough starter and water into a large ceramic or glass bowl. Glass is always good as you can see what's happening underneath your dough. This recipe is based on you having an active starter that you have fed a few hours before starting your bake. Mix the water and starter together briefly. Then add your flour and salt and mix whole lot together to form a shaggy dough. I find a dough scraper the easiest way to mix it as you can keep the sides of bowl clean. The dough will be fairly shaggy and only just brought together. You might wonder how this will turn into bread, but just wait, time is your friend and the dough will change in around an hour. Cover your bowl with cling film or a damp tea towel and let it sit for around 1 hour.
- After the dough has been through autolyse you need to bring it together into a ball. Work your way around the bowl, grabbing the dough from the outside, stretching it up and over itself, into the centre, until a smooth ball is formed. You shouldn't need more than about 20-30 stretches to form the ball. You'll notice that the dough is fully hydrated after soaking all the water up. It will be fairly sticky but as you bring it into a ball, it will become smoother and shinier. Once the dough has formed into a smooth ball, pop the cling film back on and let it rest for 30 minutes.
- Over the next few hours you need to create some structure for your dough by "stretching and folding". Aim to do around 4-6 sets of stretches and folds. For each set, stretch the dough up and over itself 4 times. Leave around 15 minutes in between each set. Again you do not have to be exact with time, but you need to do at least 4 sets over 2 hours.
- Once you've finished your stretch and folds, place the cling film or damp tea towel back over your dough and let it rest and ferment. While the dough is resting and fermenting, mix the brown sugar and cinnamon powder together in a small bowl. Set aside ready for when you're ready to shape the dough.
- Once your dough has finished its first ferment, it's time to shape it into either a boule or a batard. This is also when we add the cinnamon swirl to the dough. Flip your dough out onto the counter, sticky side up. Gently pull the dough outwards to form a rough rectangle. Sprinkle some of the cinnamon sugar mixture over the dough. Each time you fold the dough during shaping, sprinkle some of the cinnamon sugar mixture over the exposed dough. When you roll the dough up into a batard or boule, the cinnamon sugar should be safely tucked inside the dough. You might find a little pops out when you flip it into the banneton - that's ok!
- Once the dough is shaped, place it into your banneton smooth side down, so your seam is on the top. If you're using a cloth or tea towel in a bowl it's ok to put your dough with the smooth side up. Just make sure the dough is tight. Lift your dough around the edges to pop a little more rice flour if you feel it needs it. Just try to handle the dough as little as possible and be really gentle as you really want to preserve all the gases and air bubbles that have formed during your bulk ferment.
- Now the dough is in its shaping container, cover it loosely with a plastic bag or damp tea towel and place into the fridge. Try to leave it in the fridge for a minimum 5 hours up to a maximum of around 36 hours. The longer you leave it the better your bread will be! A longer cold ferment creates beautiful blisters on your crust and a deeper sourdough flavour.
- Once you're ready to bake your sourdough, you'll need to preheat your oven to 230C/450F. Place your Dutch Oven into the oven when you turn it on so it gets hot. Try to preheat for around 1 hour. Leave your dough in the fridge until the very last minute - placing a cold dough into a hot oven will give you a great oven spring.
- When your oven is at temperature, take your sourdough out of the fridge. Gently place it onto a piece of baking paper. Make sure that you make the baking paper big enough to use the edges as a handle to lower to dough into your Dutch Oven. Gently score your bread with a lame, clean razor blade or knife. Carefully take your dutch oven out of the oven. Place the sourdough into the pot using the baking paper as a handle. Put the lid on and place into the hot oven. If you want to you can spritz your dough with extra water before you put the lid on.
- Bake 30 minutes with the lid on at 230C/450F, plus 10-15 minutes with the lid off at 210C/410F.
- When you remove your dough from the oven, carefully remove it from the Dutch oven as soon as possible and place on a wire rack to cool.
Notes
Nutrition