
Save This Recipe
If you’ve ever stood in a bakery line, staring at those big, flour-dusted rolls and thinking, I wish I could make those at home, you’re in good company. Ciabatta has that bakery charm. A little messy. A little dramatic. And somehow always calling your name when you’re already holding a basket and swore you weren’t buying more bread.
Here’s the thing, though. Sourdough ciabatta rolls sound fancy, but they’re not fussy. They’re patient. They’re relaxed. And once you get comfortable with sticky dough and a little waiting, they settle right into your baking routine like they’ve always belonged there.
Honestly, if you’ve got a sourdough starter bubbling away on the counter, these rolls are a natural next step.
So, what’s the big deal with ciabatta anyway?
Ciabatta comes from Italy, and its name means “slipper.” Not the glass kind, thank goodness, but the cozy kind you kick off by the door. The shape makes sense once you see it. Flat. A little long. Not perfectly neat, and that’s part of the charm.
It showed up in the 1980s as Italy’s answer to baguettes, and it stuck around because people loved the chewy bite and all those airy pockets inside. Those holes aren’t just pretty. They catch olive oil, soup, and sandwich fillings like little flavor hammocks.
Traditional versions use commercial yeast, but sourdough brings something extra to the table. A deeper taste. A softer crumb. And that gentle tang that makes butter taste even better. (Is that possible? Somehow, yes.)
The flavor and texture that keep folks coming back
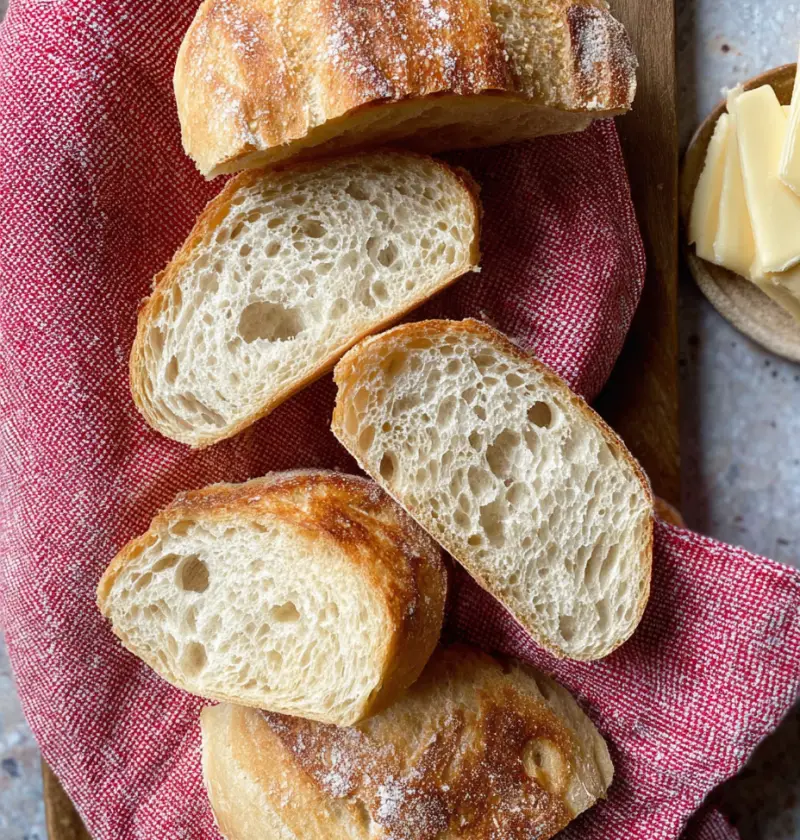
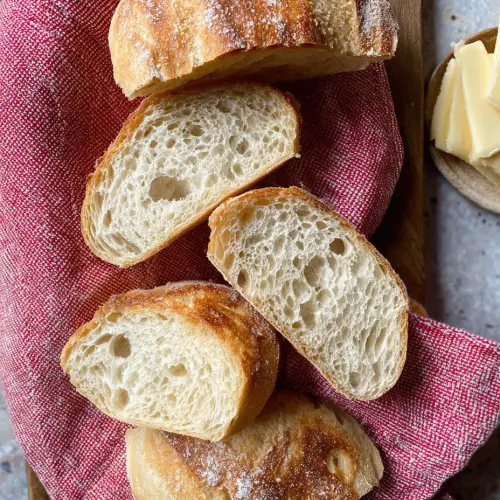
Let’s talk about that first bite. The crust crackles just a bit when you tear it open. Inside, it’s soft and stretchy, with those uneven holes that tell you the dough had plenty of time to rest and do its thing.
That long fridge stay gives the bread a fuller taste, not sharp or sour, just rich and comforting. It’s the kind of bread you don’t rush through. You slow down. Maybe add a swipe of butter. Maybe stand there eating it over the sink. We’ve all done it.
And because the crumb is sturdy without being heavy, these rolls handle fillings beautifully. Roast chicken, fresh mozzarella, grilled veggies, or even a humble ham and cheese all feel right at home here.
Yes, they take time. No, they don’t take much effort.
People see “overnight ferment” and think they’ll be babysitting dough all day. Not so. Most of the time is hands-off. Mix. Rest. A few gentle folds. Then the fridge does the heavy lifting while you get on with your life.
It’s a lot like letting soup simmer. You don’t stir constantly, but you know something good is happening.
And if you’re newer to sourdough, this is a friendly place to build confidence. The dough is wet, yes. A little wild, sure. But it’s forgiving, and rustic bread doesn’t ask for perfection.
A few tools that save your sanity
You don’t need a professional kitchen, but a couple of simple tools make sticky dough less stressful.
-
Kitchen scale — accuracy matters with bread
-
Silicone dough scraper — great for coaxing dough out of bowls
-
Metal bench scraper — perfect for cutting and lifting dough
-
Pizza peel or baking peel — helps slide rolls into the oven
-
Baking stone or pizza stone — gives you that strong oven spring
None of this is fancy. It’s just practical. And once you start baking more, you’ll reach for these tools without thinking twice.

Let’s talk starter for a minute
Your starter doesn’t need to be dramatic, but it does need to be awake and happy. Feed it earlier in the day, and use it when it’s bubbly and smells clean and slightly sweet.
If it floats in water, great. If it’s doubled and full of bubbles, also great. What matters most is that it’s active and not sluggish.
Think of it like inviting a friend over for dinner. You want them well-rested and ready to contribute, not half-asleep on the couch.
Mixing the dough (it won’t look pretty yet)
This dough starts as a shaggy mess. Starter, water, flour, salt. Stir until there’s no dry flour left, then stop. No kneading marathons here.
Cover it and let it sit. This quiet rest lets the flour soak up the water and makes the next steps easier. The dough will relax, and you’ll notice it already feels smoother when you come back.
Let me explain why this matters. Flour needs time to hydrate, and giving it that time means less work for you later. Always a good deal, right?
Gentle folds that build strength
Over the next couple of hours, you’ll stretch and fold the dough a few times. Wet hands, lift one side, fold it over itself, turn the bowl, and repeat.
It’s more like tucking in a blanket than wrestling bread. You’ll feel the dough change. It starts slack, then slowly gains structure. Still soft, but less wild.
These folds help trap air and build gluten without beating the dough up. That’s what gives you those lovely holes later on.
Watching the dough, not the clock
After the folds, the dough rests again. You’re waiting for it to rise about halfway. Not double. Just puffy and alive.
Kitchen temperatures vary. Starters behave differently. So instead of setting a strict timer, keep an eye on the dough. When it looks fuller and jiggles when you nudge the bowl, it’s ready for the fridge.
Here’s where patience pays off. That cold rest deepens the flavor and makes the dough easier to handle the next day.
The overnight rest that does the magic
Eight to twelve hours in the fridge is the sweet spot for many home kitchens. You can stretch it longer, but flavor and texture seem happiest around that range.
And let’s be honest, waking up knowing bread is already halfway done feels pretty nice.
The dough will be firm but still soft when it comes out. Give it a few minutes on the counter while you dust your surface with plenty of flour. And yes, plenty means plenty.
Shaping without popping all those bubbles
Tip the dough out gently, sticky side up. You’ll see big bubbles. Try not to chase them away.
Pull the dough into a loose rectangle, dust the top, then cut it into pieces with your bench scraper. Six rolls, two long loaves, whatever suits your mood that day.
No tight shaping. No rolling. Just lift and place. Rustic is the goal.
And if one looks a little wonky? That’s fine. They all taste the same in the end.
Final proof and that soft, pillowy look
Once the rolls are on your floured peel, let them rest until they puff up and look airy. Because the dough was cold, this can take a bit longer than other breads.
They should look alive, not dense. When you gently press the side, it should slowly spring back.
I don’t cover mine, but if your kitchen is dry, a light cloth won’t hurt. Just make sure it doesn’t stick.
Baking day and that smell everyone loves
Your oven should be hot. Really hot. A baking stone helps give the bread a strong rise right away, which keeps the crumb open.
Slide the rolls onto the stone and close the door. Then comes the waiting. About twenty minutes, give or take, until they’re golden and sound hollow when tapped.
And that smell? That’s the kind that makes people wander into the kitchen asking questions.
The hardest part: letting them cool
Fresh bread is tempting, but cooling matters. Steam inside the rolls finishes the crumb as they rest. Slice too soon and you risk a gummy center.
Once they’re cool, though, have at it. Butter, olive oil, soup on the stove, or sandwich fillings waiting on the counter. This is good bread. It doesn’t need much.
Everyday ways to enjoy them
These rolls aren’t just for fancy meals.
-
Split and toast for breakfast with jam
-
Pile high with leftovers for lunch
-
Tear into chunks for soup night
-
Brush with olive oil and grill for summer dinners
They freeze well too, which makes future you very happy on busy days.
A few common worries (and easy answers)
“My dough is too sticky.”
That’s normal. Use more flour on your hands and surface. The dough itself should stay wet.
“My rolls spread out.”
That happens with high-hydration dough. They’ll still puff in the oven, and the crumb will be just fine.
“They’re not very sour.”
That mild flavor is typical of ciabatta. If you want more tang, extend the fridge time a bit next round.
“The crust is too soft.”
Try baking a few minutes longer, or let them cool fully before storing.
Bread teaches patience. And humility. But mostly patience.
About flour and hydration
Bread flour gives you a bit more chew and strength, which helps with open crumb. All-purpose works too, just watch the water. Some brands absorb less, and you might need to hold a little back at first.
Hydration matters because wetter dough makes those lovely holes. It also makes handling trickier, but that’s part of the deal with this style of bread.
Once you get used to sticky dough, you stop fighting it and start working with it. That’s when baking gets more fun.
Why rustic always wins in my book
I used to worry about perfect shapes and neat edges. Then I realized the best bread I’d ever eaten didn’t look perfect at all. It looked honest.
Ciabatta celebrates that. No tight seams. No polished tops. Just flour, bubbles, and a little chaos.
And isn’t that comforting? Food that doesn’t ask for perfection, just care and time.
A final word of encouragement
If you’ve been feeding a starter and wondering what else to make besides round loaves, sourdough ciabatta rolls are a lovely next step. They fit into real life. They work with busy schedules. And they reward patience with flavor that feels generous and familiar all at once.
You don’t need fancy skills. Just decent flour, an active starter, and a willingness to let the dough be what it is.
And when you tear one open and see that airy crumb staring back at you, you’ll know exactly why these rolls keep finding their way back into home kitchens.
Go on. Make a batch. Your soup pot and sandwich plate will thank you. And if a warm roll disappears before dinner, well… I won’t tell.
Sourdough Ciabatta Rolls
Ingredients
- 100 g sourdough starter
- 360 g water
- 12 g salt
- 450 g bread flour or all-purpose flour
Instructions
- Ensure your sourdough starter is active and at room temperature. Feed it within 6 to 8 hours of making the dough.
- In a large bowl, mix 100g of sourdough starter and 360g water until dissolved. Add 450g flour and 12g salt. Stir into a shaggy dough.
- Cover and let the dough rest (autolyse) for 30 minutes to 1 hour.
- Stretch and fold the dough 2 to 4 times over a 2-hour period. Wet your hands, lift and stretch one side of dough, then fold over. Repeat all sides.
- Let the dough rise at room temperature until it increases about 50%. Then gently pull edges to form a sticky ball, cover, and refrigerate 8–12 hours.
- Flour a clean surface generously. Flip dough out with sticky side up. Stretch into a rough rectangle, flour top, and divide into 6 even rolls.
- Place rolls on a well-floured baking peel. Allow them to proof at room temperature until visibly puffed and slightly airy.
- Preheat oven to 475°F (245°C) with a baking stone in the middle rack. No steam needed unless desired.
- Transfer rolls onto hot baking stone and bake for 20 minutes, until golden and crisp.
- Cool rolls on a wire rack before serving. Enjoy fresh or use for sandwiches.
Notes
Nutrition