
Save This Recipe
There’s something about a baguette that feels… fancy. Maybe it’s the long shape, maybe it’s the way bakeries stack them in tall baskets like they’re showing off. Or maybe it’s just that word — baguette — which sounds like you should say it with your pinky finger slightly raised.
But here’s the thing. Baguettes don’t need to be intimidating. Not even the sourdough kind.
If you’ve ever stood in your kitchen, hands a little dusty with flour, wondering if you’re in over your head, you’re in good company. Most of us start that way. And honestly, that’s half the fun.
Let me walk you through why sourdough baguettes are not only doable for beginners, but actually a lovely place to build confidence.
But Aren’t Baguettes Supposed to Use Yeast?
Traditionally, yes. Classic French baguettes rely on commercial yeast, simple ingredients, and very skilled hands. And I have nothing but respect for that craft. Truly.
That said, home kitchens play by gentler rules.
Using sourdough starter gives you:
-
Deeper flavor (a little tang, a little warmth)
-
A softer chew inside
-
And that crisp, crackly crust we all chase
Plus, if you’re already keeping a starter alive on your counter, it just makes sense to put it to work.
And if anyone tells you that using sourdough means you’re “breaking the rules,” well… they don’t have to eat your bread, do they?
Why This Baguette Recipe Feels Friendly
Some baguette recipes are built for experienced bakers. High hydration, complicated schedules, extra steps that make you check your watch every ten minutes. That’s not what we’re doing here.
This recipe keeps things approachable:
-
Lower hydration (about 67%) so the dough behaves itself
-
No separate levain — your fed starter does the job
-
Simple mixing and folding instead of heavy kneading
-
Flexible timing, especially once the dough goes in the fridge
Lower hydration alone makes shaping far less stressful. Sticky dough can be wonderful, but it can also make beginners feel like they’re wrestling an octopus. We’re not doing that today.

About That Starter (Don’t Overthink It)
You’ll hear people say your starter needs to be “active and bubbly,” which can sound vague until you’ve seen it a few times.
What you’re looking for is:
-
It’s been fed within the last few hours
-
It has risen noticeably
-
It smells fresh and slightly tangy, not sharp or tired
If your starter has been sluggish lately, a few extra feeds over a day or two can perk it right up. Think of it like giving it a good night’s sleep and a decent breakfast. Works for people, works for starter.
No levain here, no extra containers. Just starter, water, flour, salt. Nice and clean.
The Calm Start: Mixing and Letting Things Rest
Once you mix your starter and water, then stir in the flour and salt, the dough will look… well, rough. Shaggy is the polite word. Lumpy is also accurate.
And that’s perfectly fine.
Cover it and walk away for about an hour.
This rest is called autolyse, which sounds technical, but really it just means the flour is soaking up the water and starting to relax. Gluten begins forming on its own, which saves you effort later.
When you come back, the dough will already feel smoother and more stretchy. Like it did some of the work while you were off doing laundry or answering emails. We love a helpful dough.
Building Strength Without Wearing Yourself Out
Instead of kneading for ages, we use stretch and folds. Gentle, simple, and very effective.
Every 15 minutes or so, you:
-
Grab one side of the dough
-
Stretch it up a bit
-
Fold it over itself
-
Turn the bowl and repeat
Four stretches make one set. Do about 4 to 6 sets over a couple of hours.
You’ll notice the dough change. It gets smoother, holds together better, and starts to feel like, yes, actual bread dough.
This part isn’t about perfection. It’s about paying a little attention. Dough teaches you if you’re willing to watch.
Bulk Fermentation: Let the Dough Tell You When It’s Ready
After your folds, the dough needs time to rise.
How long? That depends on your kitchen. Warm rooms work faster. Cooler ones take their sweet time. That’s normal.
Instead of staring at the clock, look at the dough:
-
Has it puffed up?
-
Does it look lighter?
-
Is it close to double, but not quite there?
For baguettes, stopping just short of double helps with shaping later. Over-fermented dough can feel fragile and tricky to handle, especially when you’re still learning.
And yes, every baker over-ferments dough sometimes. It’s practically a rite of passage.
Shaping Without the Panic
This is where a lot of folks get nervous. Long loaves feel more complicated than round ones. But the steps are simple once you see them.
After dividing your dough into manageable portions (around 175 to 200 grams works nicely), you’ll pre-shape them into loose rounds and let them rest again. That short rest helps the dough relax so it doesn’t fight you during final shaping.
Then you:
-
Gently flatten the dough into a rectangle
-
Fold the top edge toward the center
-
Fold the bottom edge up and over
-
Use the counter to roll and tighten it into a long shape
No rushing. No squeezing. Just steady, calm movements.
If your baguettes come out a little uneven? Welcome to homemade bread. They’ll still bake up with crisp crusts and soft centers, and that’s what really matters.
Proofing, Then the Gift of the Fridge
After shaping, the baguettes sit at room temperature for a bit, then head into the fridge for their cold rest.
Cold fermentation does two wonderful things:
-
It develops flavor slowly
-
It gives you flexibility with baking time
This is where baking starts to fit into real life. You can mix one day, bake the next. Or even stretch it a little longer if needed.
And that slow rest? That’s where that subtle tang and deeper wheat flavor come from. It’s not loud or sharp, just pleasantly rich.
Baking Day: Steam, Score, and That First Crackle
When the oven’s hot and the dough is cold, that’s when the magic happens.
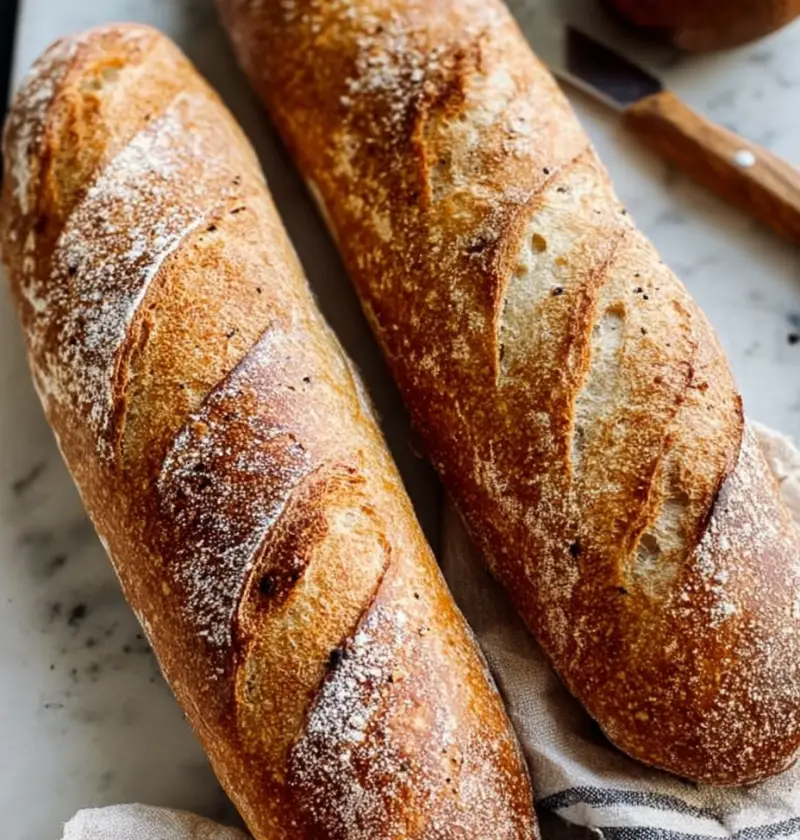
Scoring helps the baguettes expand where you want them to. Short, angled slashes along the top give that classic look and help the crust open nicely.
Using a covered cast iron pan traps steam around the bread at the start of baking. Steam keeps the crust flexible early on, so the loaf can rise fully before it firms up into that crunchy shell.
Halfway through, the lid comes off, the crust browns, and your kitchen starts smelling like a bakery. Honestly, that part alone is worth the effort.
And that soft crackling sound when the loaves come out? That’s the crust settling. It’s one of my favorite kitchen sounds, right up there with onions hitting warm butter.
Let’s Talk About What Goes on Top
Fresh baguette almost demands something good to spread on it.
Cultured butter is a classic for a reason. That gentle tang paired with warm bread is hard to beat. If you’ve never made your own, it’s simpler than you might think and feels oddly satisfying, like you’re getting away with something.
If you lean savory, olive cream cheese spreads are lovely too. A little garlic, a little salt, maybe some herbs if you’re feeling fancy. Spread thick, no shame.
And of course, baguettes shine next to:
-
Big bowls of soup
-
Simple salads
-
Pasta nights where everyone keeps tearing off “just one more piece”
Sometimes bread is the star of the meal. Other times it’s the quiet helper that makes everything better.
A Quick Word About Expectations
Here’s something I wish more people said out loud: your first few loaves don’t have to be perfect.
Actually, they probably won’t be.
You might get:
-
Uneven shapes
-
A crumb that’s tighter than the photos you see online
-
Crust that’s darker or lighter than you planned
And you know what? That’s still homemade bread. That’s still something you made with your hands and your time and a little bit of patience.
Every batch teaches you something. About your kitchen, your starter, your timing. And those small lessons add up faster than you’d think.
Why Sourdough Baguettes Are Worth the Effort
Yes, they take more time than grabbing a loaf from the store. No question there.
But they also give you:
-
Bread that stays fresh longer
-
Flavor that doesn’t need much help
-
A quiet sense of “hey, I made this”
And there’s something comforting about shaping dough into long, simple loaves. No fancy baskets, no elaborate patterns. Just good bread, made slow.
If you’re new to sourdough, baguettes are a wonderful way to practice:
-
Handling dough
-
Watching fermentation
-
Learning shaping without heavy tools
And if you’ve baked a few loaves already, they’re a nice change from round boules and sandwich loaves. Same skills, different shape. Keeps things interesting.
One Last Thought Before You Start
Don’t wait for the “perfect” day to try this.
Try it on a regular Tuesday. Try it when the kitchen’s a little messy and dinner still needs cooking. Bread fits into real life better than people give it credit for.
And if your baguettes aren’t picture-perfect the first time? Slice them, slather them with butter, and enjoy them anyway. That’s not failure. That’s supper.
When you’re ready, feed that starter, clear a little counter space, and give it a go. Long loaves, simple steps, good bread at the end of it all. That’s a pretty fine deal if you ask me.
Beginner's Sourdough Baguette
Ingredients
- 250 g bread flour strong, high-protein
- 160 g water
- 50 g sourdough starter active, fed and bubbly
- 6 g salt adjust to taste
Instructions
- Mix sourdough starter and water in a large glass or ceramic bowl. Add flour and salt, then mix to form a shaggy dough. Cover and rest for 1 hour.
- After autolyse, stretch and fold the dough from the edges toward the center until a smooth ball forms. Cover and rest for 30 minutes.
- Perform 4 to 6 sets of stretch and folds, 15 minutes apart. Stretch dough up and fold over itself 4 times per set.
- Cover dough and ferment until risen just under double in size. Time depends on room temperature.
- Turn dough onto counter, divide into 175–200g portions. Preshape into rounds, rest 30 minutes. Shape into baguettes using stretch, fold, and tension technique. Place into floured couche or cloth.
- Let shaped baguettes rest at room temperature for about 2 hours, depending on ambient temperature.
- Cover baguettes and refrigerate for 12–18 hours, or up to 36 hours for deeper flavor.
- Preheat oven to 230°C/450°F with cast iron bread pan inside. Preheat for 1 hour if possible.
- Remove baguettes from fridge, place on parchment. Score with a lame or razor. Bake 15 minutes with lid on at 230°C/450°F, then 10–15 minutes with lid off at 210°C/410°F.
- Remove baguettes from the pan and cool on wire rack before slicing.
Notes
Nutrition