
Save This Recipe
Have you ever noticed that certain comfort foods have their own kind of magic—like they can turn an ordinary Sunday into a little celebration? Scalloped potatoes were always that magical dish for me growing up. My mom would pull out all the stops and make them for a holiday or special family dinner, and I’m not ashamed to admit I’d shamelessly scrape the crispy, cheesy corners off the baking dish before anyone else got to it. Even now, I crave that creamy, buttery, golden-topped goodness, especially when the weather gets chilly… although let’s be honest, I’d eat them in July if given the chance! While meatloaf and ham are the usual go-tos, let me just say—these scalloped potatoes have star power all on their own. I’ve taken them to potlucks (they vanish before half the table is set), tucked them in beside roast chicken on rainy weeknights, and even snuck a bowl for lunch with nothing but a handful of green onion on top. There’s just something so cozy and nostalgic about a bubbling casserole of potatoes smothered in cheese sauce. Pure happiness in a dish. 
Why You’ll Love This Recipe
- Ultimate cozy, comfort food vibes—creamy, cheesy, and just a tiny bit fancy in that old-school way
- An insanely craveable, golden crust that everyone in the family fights over (there are never leftovers!)
- Uses simple, everyday ingredients: potatoes, cheese, butter, milk, and a bit of flour
- Perfect for making ahead and reheating—honestly, these are even better the next day
- Easy to customize! Dial up the spicy or garlicky notes, or keep it classic with just a sprinkle of green onions
Key Ingredients
Potatoes: Either russet or Yukon Gold will work beautifully. Russets get a little fluffier, while Yukon Golds hold their shape and bring that dreamy-creamy texture. Just slice them up thin—about the thickness of a quarter is perfect. Butter & Flour: This classic duo makes a simple roux, the backbone of that silky cheese sauce. Take your time here—you want a gentle, toasty flavor (no browning!). Milk: Whole milk is what I typically use, but if the fridge is looking random, a splash of half-and-half or even 2% will work. Not a dairy fan? No worries—unsweetened plant milk will do the trick, just watch the sauce thickness. Cheddar Cheese: Sharp cheddar is the classic, but I love swapping in a bit of Gruyère for that nutty flavor, or Monterey Jack if I want extra meltiness. Always save a handful for topping—it’s how you get that “fight-me-for-it” crust. Cayenne Pepper (Optional): My tiny secret weapon. It doesn’t make things spicy, just wakes up the flavors a bit. Green Onions (Optional): They add a bright, perky finish. Some days I grab chives, or toss in parsley, thyme, or rosemary—whatever’s loitering in the crisper works. Want exact amounts? Full recipe card is below, after the post!
Step-by-Step Instructions
Step 1: Preheat the Oven
Set your oven to 375°F (190°C). Don’t skip this—preheating is absolutely key for a bubbling, creamy center and a golden, picture-perfect top (not a sad, undercooked potato casserole… trust me, I’ve been there).
Step 2: Prepare the Baking Dish
Grab your favorite 9×13-inch casserole dish and give it a generous swipe with butter or a quick mist with nonstick spray. Not only does this help with clean up, but it keeps all those cheesy bits from sticking (so you can actually eat them, not scrape them off with a spatula… speaking from experience here).
Step 3: Make the Cheese Sauce
Melt the Butter: Start off with about 3 or 4 tablespoons of butter—just let it melt in your saucepan over medium heat. No need to rush—patience makes all the difference for flavor. Make the Roux: Whisk in an equal amount of flour (3 or 4 tablespoons). Keep it moving with your whisk—let it bubble for a minute or two, just until it’s blond and smells kind of nutty (you’ll know!). Don’t let it brown! Add the Milk: Slowly pour in your milk (about 1.5 to 2 cups), whisking constantly so the sauce stays smooth and lump-free. Bring to a gentle simmer. In 5 to 7 minutes, you’ll have a gorgeous, thickened base. Add the Cheese: Slide that pan off the heat and stir in your cheese. About 1 to 2 cups sharp cheddar works for most, but I always add a bit extra for luck. Throw in a pinch of salt and, if you’re feeling feisty, the tiniest shake of cayenne. Taste it! (Chef’s right, always.)
Step 4: Assemble the Potatoes
Layer the Potatoes: Lay down half the thinly sliced potatoes so they overlap like little roof tiles. It doesn’t have to be perfect—just cozy them in. Add Cheese Sauce: Pour half of your cheese sauce over that first layer, spreading it to the edges. Repeat with the rest of the potatoes and sauce. Give the pan a little jiggle—it’ll help all that luscious sauce find every nook and cranny.
Step 5: Add the Topping
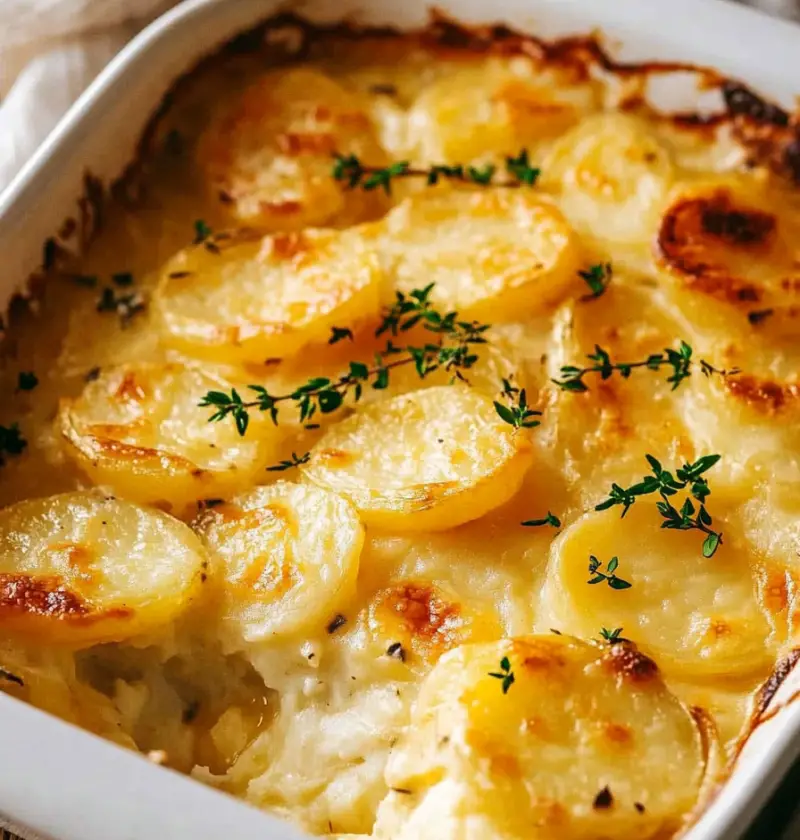
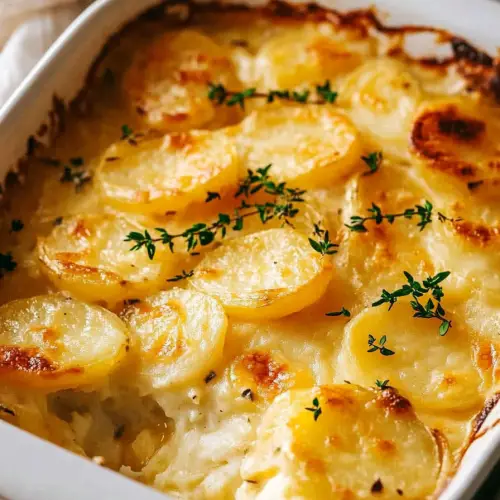
Now for the good stuff! Sprinkle about half a cup (who really measures?) of cheddar, Gruyère, or whatever’s hanging out in the cheese drawer right over the top. This is your ticket to a crispy, bubbling, can’t-stop-eating-it crust.
Step 6: Bake the Scalloped Potatoes
Cover and Bake: Top the dish with aluminum foil, nice and snug, and bake for 45 minutes. This lets the potatoes get all tender and lets those flavors meld just right. Uncover & Finish: Take off that foil, then bake another 15 to 20 minutes, or until the top gets as golden and bubbly as you crave. Some days, I pop it under the broiler for a minute to really push it over the top—just keep close watch so it doesn’t go from golden to, well, “uh-oh.”
Step 7: Rest and Garnish
Let It Rest: I know, it’s hard, but let these beauties sit for at least 10 to 15 minutes before serving. This way, the sauce sets up a bit and you get those pretty, cheesy squares instead of a scrambled mess (not that anyone would complain if they’re eating straight out of the pan… been there too). Garnish: Shower a handful of sliced green onions or fresh chives right over the top for color and brightness. If you managed to save any for leftovers, they look gorgeous in the fridge!
Serve and Enjoy
Dish up these creamy, golden-topped potatoes beside your favorite Sunday roast, an Easter ham, or honestly, just with a lemony pile of roasted asparagus. No shame if you eat them right from the pan—sometimes that’s when they taste the best!
Serving Suggestions
- Alongside classic honey-glazed ham (my favorite match!)
- With roast beef, chicken, or even pork tenderloin for an easy family meal
- Next to grilled salmon, steak, or a hearty veggie burger
- For balance—serve with a big, fresh green salad or simple roasted veggies
- They basically belong at every potluck, holiday table, or honestly, any “just because” dinner
Variations
Cheesy-Dreamy: Swap in smoked Gouda, Gruyère, or even parmesan for deeper flavor. Herby: Layer in fresh thyme, rosemary, or even a little tarragon for a springy note. Bacon Lover’s: Scatter cooked, crumbled bacon between your potato layers, because let’s be real—bacon makes everything better. Garlic Fiend: Sauté a bit of minced garlic in the butter right at the start for an extra savory boost. Extra Decadent: Replace half the milk with heavy cream if you’re feeling fancy or need extra comfort points. Vegan-Friendly: Go for plant-based butter, milk, and shredded vegan cheese. Don’t knock it till you try—it’s surprisingly rich (even meat-eaters go back for seconds!).
Storage Tips
Storing leftovers—on the off-chance there are any—is a breeze. Scoop them into a lidded container and keep in the fridge for up to four days. For longer storage, portion into freezer containers and stash in the freezer for up to three months. Pro tip: thaw overnight in the fridge for best texture. To reheat, just pop the scalloped potatoes in an oven-safe dish, cover with foil, and warm at 350°F (175°C) until bubbly (a splash of milk can save the sauce if it’s thickened up). For single servings, the microwave works just fine—still, an extra splash of milk makes all the difference for bringing back that creaminess.
Conclusion
Whether you’re preparing them for a family gathering or just when you want a little extra coziness on a weeknight, scalloped potatoes never let you down. They’re so easy to tweak—throw in your favorite cheese, sneak in some bacon, or use those fresh herbs you forgot about in the fridge. And truly, if you haven’t made them in years (or ever!), now’s the time. If you wind up making these—or you’ve got a family twist of your own—leave a comment below. I absolutely love hearing your stories and swapping comfort food secrets. Stay warm and happy cooking, friends!
Scalloped Potatoes
Ingredients
- 4 cups thinly sliced potatoes use russet or Yukon Gold
- 3 tbsp butter
- 1.5 cups milk
- 3 tbsp all-purpose flour
- 1 cup grated sharp cheddar cheese
- 0.5 cup grated cheddar or Gruyère cheese for topping
- salt to taste
- 0.5 cup sliced green onions optional garnish
- pinch of cayenne pepper optional
Instructions
- Preheat your oven to 375°F (190°C) to ensure even baking. This step helps create a golden-brown topping.
- Lightly grease a 9x13-inch baking dish with butter or non-stick spray to prevent sticking and make cleanup easier.
- Melt the butter in a medium saucepan over medium heat. Whisk in the flour and cook for 1–2 minutes until it turns a light golden color. Gradually pour in the milk, whisking constantly to avoid lumps. Bring to a simmer and cook for 5–7 minutes until thickened. Remove from heat and stir in grated cheddar cheese. Add salt to taste and cayenne pepper if desired.
- Arrange half of the thinly sliced potatoes in the greased baking dish, overlapping slightly. Pour half of the cheese sauce over the potatoes, spreading evenly. Add the remaining potatoes in an even layer, then pour the remaining cheese sauce on top.
- Sprinkle grated cheddar or Gruyère cheese evenly over the top to create a crispy, golden-brown crust during baking.
- Cover the dish with aluminum foil and bake for 45 minutes to allow the potatoes to cook through. Remove the foil and bake for an additional 15–20 minutes until the top is golden brown and bubbling.
- Let the scalloped potatoes rest for 10–15 minutes to allow the sauce to set. Optionally, garnish with sliced green onions for a fresh touch.
