
Save This Recipe
Let’s be real—some days, you just want the smell of fresh bread wafting through your kitchen without turning your entire afternoon into a flour-dusted marathon. I mean, who’s got the time? Between work, kids, errands, and trying to remember if you actually switched the laundry, baking bread can sound downright ambitious.
Good news, friend: this German-style bread recipe takes only 5 minutes of prep, yet it delivers that kind of golden, crackly crust and melt-in-your-mouth softness that’ll have you tearing off hunks before it even cools. Ask me how I know.
Whether you’re building the ultimate turkey sandwich, dunking hunks into a steaming bowl of tomato Soup, or just slathering on some butter while it’s still warm (and maybe sneaking a second piece—no judgment here), this rustic little loaf fits the bill—and then some.

What Makes This Bread So Special?
What Makes This Bread So Special?
German bread has a bit of a reputation, doesn’t it? It’s hearty. It’s honest. And frankly, it doesn’t mess around.
This quick version stays true to those old-world roots but skips the complicated proofing schedules and elbow-deep kneading marathons. Think of it like your grandmother’s bread recipe—if your grandmother also knew you had about twenty minutes of mental bandwidth left on a weeknight.
And the results? Oh, honey. You get a crackly crust that sings when you slice into it. A soft, chewy inside that hugs butter like it was born to. A flavor that’s rich, slightly nutty, and deeply satisfying.
You know how some breads feel “empty,” like they’re just a vehicle for toppings? Not this one. This bread shows up to the party.
Ingredients
You don’t need anything fancy. Just a few pantry staples:
-
3 cups all-purpose flour or bread flour
-
2 tsp instant yeast
-
1½ cups warm water (around 110°F / 45°C)
-
1 tsp salt
-
1 tbsp honey or sugar
-
1 tbsp olive oil (optional, but absolutely lovely)
How to Make It
Step 1: Stir Things Together
First things first—grab a big bowl. (You know the one—probably a little scratched-up but still kicking.) Throw in your flour, yeast, and salt. Give it a quick stir with a spoon… or your hand if you’re feeling wild. No judgment here.
Now pour in your warm water and honey (or sugar, if that’s what you grabbed first). Just stir everything around until it starts looking like, well, dough. Messy, sticky, kinda lumpy? Perfect. If you’ve got some olive oil on hand, drizzle a little in—it’s not mandatory, but it sure doesn’t hurt.
Step 2: A Quick Knead (Nothing Fancy)
Flour up your counter or table—whatever space you can find under all the other kitchen stuff. Scrape that sticky dough out onto it. Knead it just for a minute or two, like you’re gently coaxing it into behaving.
No need to beat it up. Just fold, push, turn, repeat. If it’s sticking like crazy to your fingers, toss a little more flour over it. It’ll feel soft, a little tacky—but it shouldn’t be a total mess.
(And hey, if it is a total mess? Add a little more flour and keep going. Bread’s forgiving.)
Step 3: Let It Rest (Briefly, I Promise)
Once it’s mostly together, plop your dough back into the bowl. Cover it with a towel—or a plate if you can’t find a towel because, let’s be honest, where do they all disappear to?
Set it somewhere warm-ish and just… leave it be for five, maybe ten minutes. Long enough to wipe the counter and maybe sip your coffee. No three-hour wait, no babysitting—just a little breather for the dough to puff up a tiny bit.
Step 4: Crank Up the Heat
While the dough’s chilling, go ahead and blast your oven to 425°F (or 220°C if you’re fancy like that).
If you’ve got a Dutch oven, stick it in there too so it gets nice and blazing hot. If not, a sheet pan will do just fine—don’t let the bread snobs scare you off. This is real-life baking, not the Food Network.
Step 5: Shape It and Bake It
Alright, the fun part: grab that rested dough and shape it into something loaf-ish. It doesn’t have to be perfect. Honestly, the rustic look has way more charm.
If you’ve got that hot Dutch oven, be careful (ask me how many times I forgot and nearly seared my fingerprints off)—drop the dough in, maybe on a piece of parchment to save yourself a panic attack.
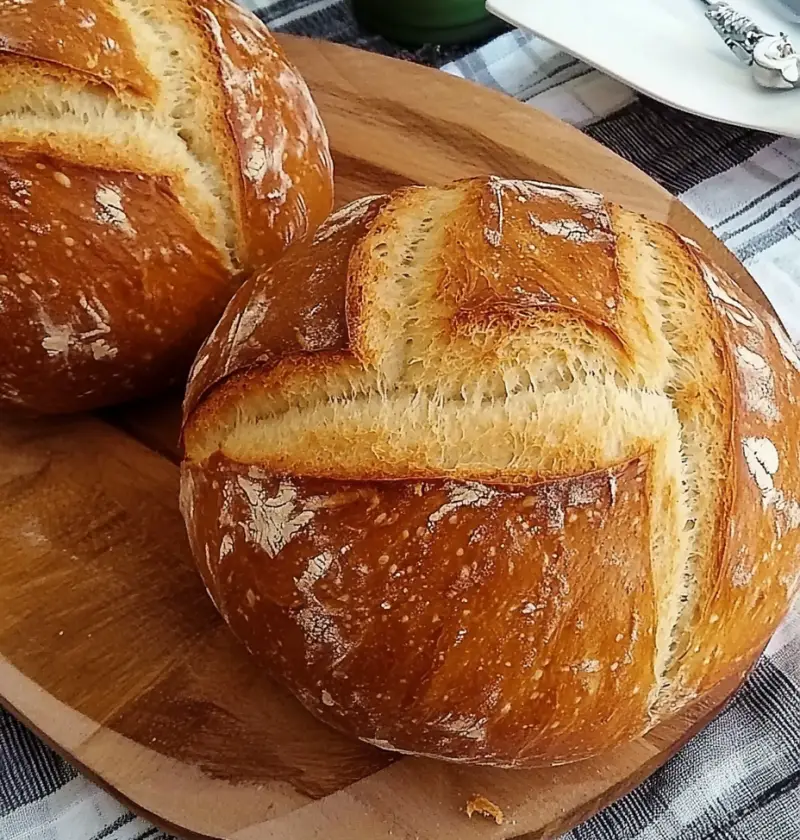
Take a sharp knife and slash a few lines across the top. It helps it puff up properly while baking—and it just plain looks cool.
Now bake it. Give it about 20–25 minutes. If you’re using a Dutch oven, pull the lid off for the last five minutes or so to get that gorgeous, deep golden top. You’ll know it’s ready when it smells like a bakery and tapping the bottom sounds hollow.
(Pro tip: If your kitchen smells like heaven, you’re doing everything right.)
Step 6: Cool It… If You Can
Once it’s out of the oven, plop your masterpiece onto a wire rack if you have one. If not, a wooden cutting board works too.
Let it cool for at least ten minutes—even though your whole body will be screaming to cut into it right away. Trust me, it’s worth the wait. Slice it up, slather on some butter, and just sit there for a minute, grinning like a fool at what you made.
Serving & Storing: What Now?
This bread’s so good, you might not even have leftovers. But just in case you do, here’s the deal.
If you’re lucky enough to slice into it while it’s still warm, spread on a thick smear of butter—or jam if you’re feeling fancy—and savor it just like that. No rules, just pure joy.
The next day? It makes the kind of sandwich that’ll make you sigh between bites—stack it high with turkey, tomatoes, whatever you’ve got tucked in the fridge. This bread’s not shy; it holds up.
And if it starts getting a little too “rugged” around the edges after a couple of days? Well, that’s just an excuse to cube it up for the best croutons you’ve ever had—or whip up a simple, cozy bread pudding.
To keep it happy, tuck it into a bread bag or airtight container. It’ll stay soft for about three days. Longer than that? Wrap it tight and freeze it. It’ll be waiting for you like an old friend—just give it a little time in a warm oven to crisp up again.
(Oh—and if you want a softer crust right out of the oven? Brush that baby with melted butter. It’s like giving it a little velvet jacket. Trust me.)
Add a Little Flair (Optional, but Totally Worth It)
Once you get the basic loaf under your belt, it’s hard not to start daydreaming about little tweaks.
Maybe you toss a handful of caraway seeds into the dough—suddenly it smells like a German deli at Christmas. Or you swap half the flour for rye or whole wheat, and you’ve got this deep, nutty flavor that’s downright addicting.
Feeling a little wild? Stir in some chopped olives, roasted garlic, or sun-dried tomatoes. The kind of add-ins that make a humble loaf turn heads.
Sometimes, right before baking, I’ll even sprinkle a little flaky salt across the top—or if I’m feeling real cheeky, everything bagel seasoning. (Because why not? Bread deserves a little glam too.)
The truth is, bread’s forgiving. A little wonky, a little imperfect—it just adds to the charm.
Advice from the Pros
Even the big-name chefs can’t resist the pull of a homemade loaf.
Paul Hollywood—you know, the silver-haired dreamboat from The Great British Bake Off—he swears by using the freshest yeast you can find and the best flour your budget allows. Makes sense, right? Good stuff in, good stuff out.
Ina Garten (my personal kitchen fairy godmother) will tell you a little extra honey goes a long way—makes the loaf sweeter, softer, and just a touch more golden.
And Jamie Oliver, bless him, Always reminds folks that baking inside a Dutch oven traps all that lovely steam, giving your bread that gorgeous, crackly, stone-oven crust without any fancy equipment.
Honestly, if it’s good enough for them, it’s sure as heck good enough for me.
FAQs: Because We Know You’ve Got Questions
You’re probably wondering a few things—and hey, so was I the first time I made this.
Can I use active dry yeast instead of instant?
Absolutely. Just wake it up first—stir it into the warm water and honey and let it sit about 10 minutes before you add it to the flour.
Can I make it gluten-free?
You sure can, but you’ll want a good gluten-free bread blend. Heads up though—it might be a little thirstier than regular flour, so you might need to splash in a bit more water.
Can I toss in nuts, seeds, or whatever’s in the pantry?
Heck yes. Stir them in right at the beginning with the flour. Makes every bite a surprise in the best way.
How do I get that real-deal crunchy crust?
Slip a shallow pan of water into the bottom of the oven while the bread’s baking. The steam works magic—no wizard hat required.
Can I double the recipe?
Oh, for sure. Just keep an eye on it when it’s baking—it might need a little extra time in the oven to finish up.
My dough is way too sticky! What did I do wrong?
Nothing, sweetheart. Just sprinkle a little more flour over it. It’s supposed to be a little messy. Sticky dough often makes the best bread.
Why is my bread dense?
A few things could be the culprit—yeast that’s seen better days, rushing the resting time, or manhandling it too much. Give it a few minutes to puff up during that quick rest. It really does help.
Can I use my bread machine for the dough?
You sure can. Let the machine do the mixing and kneading, but bake it in your oven for that crackly crust that makes you feel like a bakery goddess.
How do I know it’s really done baking?
Trust your senses: it’ll be deep golden brown, smell like the heavens opened up in your kitchen, and sound hollow when you thump the bottom. If all three are happening, you’re golden—literally.
Final Thoughts (and Bites)
Here’s the thing about homemade bread: it’s not just food. It’s a little piece of comfort you make with your own two hands.
It’s the smell that wraps around you when you walk back into the kitchen. It’s that first bite you tear off, still warm enough to melt butter right into the crumb. It’s proof that sometimes, the very best things are the ones you slow down for—even if it’s just for an hour on a regular Tuesday.
This German-inspired bread? It’s a little messy, a little rustic, and a whole lot of wonderful. And now it’s yours.
Rustic German Bread
Ingredients
- 350 ml water room temperature
- 1 tablespoon sugar
- 8 grams dry yeast
- 25 ml sunflower oil
- 500 grams flour plus extra for dusting
Instructions
- In a large bowl, pour 350 ml of water, add 1 tablespoon of sugar and 8 grams of dry yeast. Stir until dissolved, cover, and let sit for 5 minutes until frothy.
- Add 25 ml of sunflower oil to the yeast mixture. Gradually sift in 500 grams of flour, stirring to combine.
- Mix until a sticky dough forms. Cover and let rise in a warm area for 1 hour, or until doubled in size.
- Stir the dough to release air, cover, and let rest for another 30 minutes to develop gluten.
- Lightly flour a surface, roll dough into a rectangle, fold, and let rest for 10 minutes. Shape into a loaf, boule, or rolls.
- Place dough on a lined baking tray. Make decorative slashes with a knife. Preheat oven to 230°C (446°F) and bake for 30-40 minutes until golden brown.
- Remove from oven, cool on a wire rack, and enjoy warm or at room temperature.
