
Save This Recipe
Growing your own veggies? It’s kinda magical, isn’t it? There’s just something about watching a little green sprout turn into something hearty and edible that you actually grew with your own two hands. And cauliflower? Oh, she’s a fussy little diva — but when you get her right, goodness, she’s impressive.
Now, don’t go thinking you need a big ol’ garden To Grow cauliflower. Nope. You can totally raise one right on your porch, patio, or even that sunny patch by the back door — in a pot. You just need to know a few Tricks to get it going, and that’s what we’re doing here.
Step 1: Start with a Decent-Sized Pot (Bigger Than You’d Think)
Let’s not skimp here. Cauliflower needs room to stretch out. Grab a pot that’s at least 12 to 18 inches deep and wide. If you’ve got something bigger, even better. And don’t Forget drainage holes. Without ‘em? You’ll end up with soggy roots and a sad, mushy mess instead of a nice, firm head.
Pro tip? Put a saucer or tray underneath, especially if you’ve got it on a deck or balcony. Nobody wants water spots on their wood planks.
Step 2: Good Dirt Makes a Big Difference
Here’s the deal — cauliflower’s a bit of a diva, like I said. You can’t just shovel in some backyard dirt and hope for the best. You want loose, fluffy, nutrient-rich soil. I like to mix:
-
1 part potting soil (or decent garden soil if you have it)
-
1 part compost (like the stuff you’ve been tossing eggshells into)
-
1 part perlite or vermiculite (those white fluffy bits — Helps with drainage)
Mix that all together in a big tub if you have one. It should feel light when you dig your hands in, not clumpy or sticky.
Step 3: Pick a Cauliflower That’ll Actually Fit in a Pot
Not every cauliflower variety plays nice in containers. Look for names like:
-
‘Snowball’ – classic, reliable
-
‘Autumn Giant’ – takes its time but gets huge
-
‘Amazing’ – and it is, if you treat it right
You can start from seeds if you’ve got time and patience (start them indoors 4–6 weeks early). But honestly? Ain’t no shame in grabbing a healthy transplant from the nursery and skipping the babying stage.
Step 4: Plant the Thing Already
Alright, now we’re cookin’.
-
Fill your pot with that rich soil, leaving an inch or so at the top.
-
Pop your transplant in the center — not too deep, just so the base of the stem is even with the soil line.
-
Water it in. Really soak it, but gently. Think of it like tucking in a toddler — firm, but with love.
If you’ve got more than one pot, space ’em out a bit. Cauliflower doesn’t like being crowded. Honestly, who does?
Step 5: Sunshine & Water — But Not Too Much
This baby needs at least 6 hours of good sunlight a day. Morning sun is best if you can swing it. Afternoon heat in summer can be a bit much, depending on where you live.
And watering? Here’s my rule: stick your finger in the soil. If the top inch feels dry, water it. If it’s still damp, leave it alone. Overwatering is the fast track to root rot, and once that sets in, well… let’s just say your dreams of a big ol’ cauliflower head are cooked.
Step 6: Feeding Time
Cauliflower’s a bit of a glutton when it comes to nutrients. I like to use a balanced liquid fertilizer (look for a 10-10-10 or similar) every two weeks.
Once the head starts forming, give it a little extra nitrogen to help bulk it up. But don’t go wild — too much, and you’ll end up with a jungle of leaves and no actual cauliflower. Ask me how I know.
Step 7: The Blanching Secret Nobody Talks About
This part’s easy to forget, but it makes a huge difference if you want a white, pretty cauliflower. Once the head is about the size of a golf ball or a small egg, gather the big outer leaves and tie them over the top. Just like a little sunhat for your plant.
It keeps the sun off the head so it stays pale and lovely — not yellowed and bitter.
Use soft string, or heck, I’ve used a hair tie in a pinch. Just be gentle.
Step 8: Watch for Freeloaders
You’re not the only one who wants to eat that cauliflower.
Keep an eye out for:
-
Aphids (tiny green suckers)
-
Caterpillars (especially those fat green ones — they’re sneaky)
-
Slugs (they come out at night like little gremlins)
A little neem oil or insecticidal soap works wonders. Also, check under the leaves regularly. That’s where the troublemakers hide.
And remember — don’t let the pot sit in a swamp. Good airflow keeps mold and mildew from crashing the party.
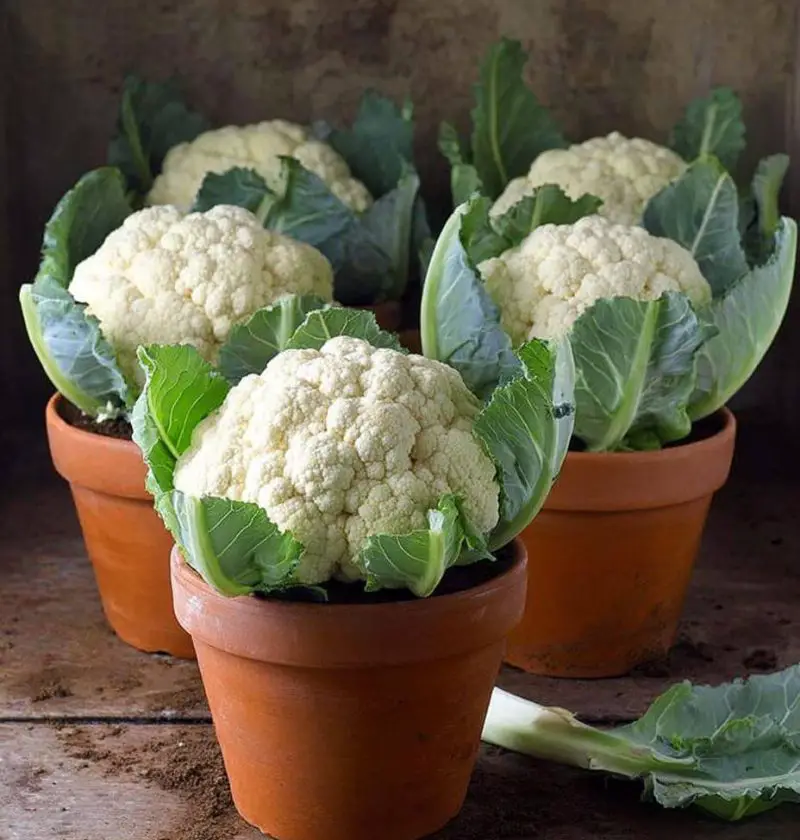
Step 9: Time to Harvest!
When the head is big, tight, and firm — usually 6 to 8 inches wide — it’s ready. Don’t wait too long or it’ll start to separate and lose that nice texture.
Take a sharp knife, cut it off low on the stalk, and leave a few leaves around it for protection. And then? Admire it. Take a picture. Send it to your sister. This is your moment.
A Few Final Thoughts (and a Friendly Nudge)
Look, growing cauliflower in a pot isn’t the easiest thing in the world. But it’s so worth it. When you cook that thing up — roasted with olive oil and garlic, or maybe mashed like potatoes? Oh honey, it just hits different when you grew it yourself.
Give it a try. Worst case? You end up with a funny-looking plant and a good story. Best case? Dinner is homegrown, delicious, and comes with a side of pride.
You’ve got this.