

Save This Recipe
You know those desserts that just feel like sunshine on a plate? Lemon Meringue Pie has been one of those soul-soothing treats in my family for as long as I can remember. My mom would always make it for Sunday suppers or whenever we had a reason (real or made-up) to celebrate—her secret was using extra lemon zest for that puckery-kiss flavor I still crave today. If you’ve ever been intimidated by the idea of meringue, trust me, this recipe is way more forgiving than it seems. It’s homemade comfort dessert at its finest—bright, nostalgic, and creamy as all get out.
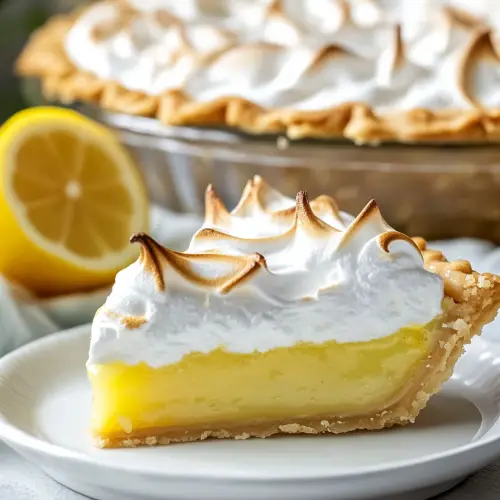
There’s something magical about that first slice: golden, fluffy meringue giving way to tangy lemon filling, all tucked into a tender-baked crust. And let’s be honest, bringing a Lemon Meringue Pie to any gathering? It’s like handing out slices of edible happiness. It never fails. Whether it’s for Christmas, someone’s random promotion at work, or just a Tuesday night when you want to treat yourself—this classic is always, always a hit.

Why You’ll Love This Recipe
- Sunshine in every bite: That tangy lemon filling is like a cozy hug with a little sass—a perfect mood-booster (even in the dead of winter!).
- Cloud-like meringue: So light and pillowy, you’ll want to sneak a taste while you whip it up (don’t worry, I do it every time).
- Simple, familiar pantry ingredients: Don’t worry—nothing fancy here. Bet you already have most of this stuff, just waiting for a little action in your kitchen.
- Versatile for any occasion: Holiday dessert, potluck favorite, or the answer to your late-night sweet tooth. (You deserve it, promise!)
- Make-ahead friendly: It’s actually better chilled, so you can prep ahead for zero-stress entertaining or just a lazy weekend.
Key Ingredients
Let’s chat through the stars of the show and a couple of Shortcuts I sometimes use—because easy and delicious are friends here.
- White Sugar – Balances all that bright, lemony tartness. You can use regular granulated, or sneak in half coconut sugar for a little twist (it’ll turn the filling a touch darker, but boy is it yummy!).
- All-Purpose Flour & Cornstarch – The dynamic duo behind that perfectly thick, sliceable filling. Do NOT skip the cornstarch, trust me here… unless you want a runny lemon puddle (been there, not cute).
- Lemons (Juice & Zest) – Real, fresh lemons only please! It’s worth the squeeze. Meyer lemons are lovely and less tart, if you spot them anywhere. But any lemons will still bring the zing.
- Butter – A little richness = pure luxury. I just use whatever’s in my fridge—usually Salted—so if yours is unsalted, toss in an extra pinch of salt.
- Egg Yolks – Magic for giving that filling its sunshine-yellow color and silky texture. And hey, we love not wasting—save those whites for the grand meringue finale.
- Egg Whites – Showstoppers for that fluffy, mile-high crown. If you let them warm up to room temp, they’ll whip even higher (science is wild, right?).
- Pie Crust – Store-bought or homemade, no judgment. Seriously, use what works. A gluten-free crust works just fine here too. Just make sure to bake it before you pour in the filling.
Find all ingredient amounts and details in the recipe card below if you like to see things lined up just so. But don’t be afraid to wing it a little—this pie loves you back, even if you’re not perfect.
Step-by-Step Instructions
Preparation
Crank up that oven to 350°F (175°C) so it’s ready to brown that glorious meringue topping. And if you’re as anti-sticky as I am, line your workspace with parchment for easier cleanup (definitely saves those sleeves later).
Making the Lemon Filling
Step 1: Combine Dry Ingredients
In a medium saucepan, whisk together 1 cup sugar, 2 tablespoons flour, 3 tablespoons cornstarch, and 1/4 teaspoon salt. My secret weapon? A big balloon whisk so you don’t end up with random flour blobs. No shame if you stand there whisking and just daydream about that first slice!
Step 2: Add Liquids and Heat
Add 1½ cups cold water, plus the juice and zest of two lemons—really get in there with a rasp zester for max flavor. Stir and set over medium-high heat. Now, this is where you dive into your favorite podcast or playlist while you babysit the pot: stir, stir, stir until it’s thick and little bubbles pop up to say hi! Don’t dare step away—unattended lemon filling loves to try and glue itself to the pan.
Step 3: Incorporate Butter
Take it off the heat and stir in 2 tablespoons of butter. Watch it melt and swirl—honestly, this part smells like a sunny kitchen memory.
Step 4: Temper the Egg Yolks
Here’s where you get just a tiny bit careful: Whisk your 4 egg yolks in a small bowl. Slowly ladle in a bit of that hot filling, whisking constantly (otherwise, you’ll have lemony scrambled eggs—no thanks). Pour it all back into the pot, still whisking. It’s a little back-and-forth dance, but you’ve got this.
Step 5: Combine Egg Mixture and Filling
Set the pan back on medium. Keep stirring until it’s thick and glossy, and coats a spatula in a dreamy yellow sheen. When it holds a gentle shape, you’re golden.
Step 6: Pour into Crust
Pour the warm filling straight into your baked pie crust. Smooth the top. Pause for just a second, and resist eating it with a spoon (I mean…maybe just a little taste?).
Making the Meringue
Step 1: Whip the Egg Whites
In a squeaky-clean bowl (super important—any grease can kill those peaks!), use an electric mixer to beat 4 room-temperature egg whites until soft, puffy clouds form.
Step 2: Add Sugar Gradually
Sprinkle in 6 tablespoons of sugar, one spoonful at a time, while beating. Now keep going until stiff, glossy peaks form—it should look marshmallow-y and light as air. Go ahead, swipe your finger through for a sample. It’s practically required.
Step 3: Spread the Meringue
Dollop that pillowy meringue right over the hot lemon filling, making sure the fluffy edges touch the crust all the way around (this seals it so the meringue doesn’t shrink back later). Swirl with the back of a spoon for those signature golden peaks yet to come. There’s no such thing as too much swoopiness here.
Baking the Pie
Step 1: Bake
Bake the pie for about 10 minutes, or until the meringue is golden brown like a summer sunset. Watch closely—those tasty peaks can turn from golden to, um, “extra toasted” pretty quick.
Cooling and Serving
Step 1: Cool Completely
Set the pie on a rack and let it cool all the way (yes, the most torturous part). The filling sets as it cools, making clean slices possible (I admit I sometimes “test” a messy one first—just for science).
Step 2: Refrigerate
Once cooled, pop the pie into the fridge for 1–2 hours—or overnight if you’re patient. Chilling makes everything marry together, and the flavors just sing. And hey, for perfect slices, warm your knife in hot water and wipe between cuts. Or, embrace the messy slice—nobody minds if it’s homemade with love.
Serving Suggestions
- With a cup of tea or coffee: That little citrus zing + something warm? Dreamy afternoon treat (let’s call it self-care).
- Fresh Berries: Top with a few raspberries or strawberries for a restaurant-y vibe—plus it looks extra pretty.
- Little extra whipped cream: Totally over-the-top, definitely not necessary, always welcome. Just saying.
And if you want slices that would make my mom proud, use a sharp knife dipped in hot water for swoon-worthy results!
Storage Tips
Refrigeration
Keep the pie in the fridge, loosely covered with foil or plastic wrap (just don’t let anything touch that fluffy meringue). It’ll stay lovely for about 2–3 days before the meringue starts getting soft and weepy. If there’s leftover pie after 3 days, please call me to help “dispose” of it—ha!
Freezing
Sad news here—Lemon Meringue Pie really doesn’t freeze well. The meringue gets weepy and the filling turns a little watery. Just enjoy leftovers in the fridge, eat that extra slice, and call it a happy accident.
Variations
- Orange Meringue Pie: Sub in oranges for the juice and zest—gentler, sweeter, and a serious kiddo-pleaser.
- Lime Meringue Pie: Switch to all lime if you want an even brighter, more tart pop. Key limes are especially fun if you spot them at the store.
- Coconut Lemon Pie: Try sprinkling sweetened coconut flakes over the meringue before baking for that toasty, tropical finish—so good.
- Mini Pies: Grab a muffin tin, line with pastry circles, and make adorable Mini Lemon meringue pies. You’ll have to reduce the bake time a bit, but it’s cute for parties or lunchbox treats.
Conclusion
If you’re wishing for a cozy, crowd-pleasing dessert, this Homemade Lemon Meringue Pie is your answer. Between the tart, luscious filling; that golden, swoopy meringue; and the flaky crust, you’ve got a slice of pure nostalgia every time. Don’t be intimidated—give it a try, and let me know if you find yourself sneaking extra bites from the fridge at midnight (no judgment here, I do it, too!). Leave a comment or send over your favorite twists—I Absolutely love hearing how these pies turn out in real-life kitchens. Happy baking, friends!
Homemade Lemon Meringue Pie
Ingredients
- 1 cup white sugar for lemon filling
- 2 tablespoons all-purpose flour for lemon filling
- 3 tablespoons cornstarch for lemon filling
- 1/4 teaspoon salt for lemon filling
- 1 1/2 cups water for lemon filling
- 2 lemons juiced and zested
- 2 tablespoons butter for lemon filling
- 4 egg yolks beaten, for lemon filling
- 4 egg whites for meringue
- 6 tablespoons white sugar for meringue
- 1 9-inch pie crust baked
Instructions
- Preheat your oven to 350°F (175°C) to prepare for baking the meringue.
- In a medium saucepan, whisk together sugar, flour, cornstarch, and salt. Stir in water, lemon juice, and zest. Place over medium-high heat, stirring frequently until the mixture comes to a boil. Stir in butter until melted. Gradually whisk a small amount of the hot mixture into the beaten egg yolks, then return the egg mixture to the saucepan. Bring to a boil again, stirring constantly until thickened. Remove from heat and pour into the pre-baked pie crust.
- In a large glass or metal bowl, whip egg whites until foamy. Gradually add sugar while whipping until stiff peaks form. Spread the meringue over the hot lemon filling, ensuring it touches the edges of the crust to seal.
- Place the pie in the preheated oven and bake for 10 minutes, or until the meringue is golden brown. Remove from oven and let cool completely on a wire rack.
- Refrigerate the pie for 1-2 hours before serving to allow the filling to set. Slice and enjoy!
