
Save This Recipe
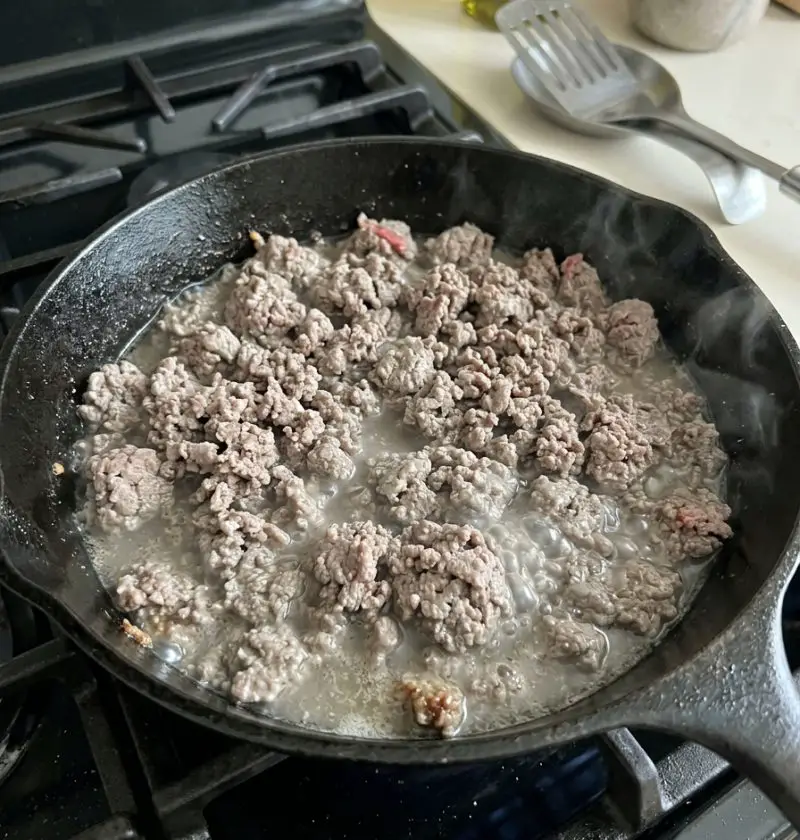
You know that moment when you toss ground beef into a hot pan expecting that rich, sizzling brown crust… and instead you get a puddle of gray meat simmering in its own juices?
Yeah. It’s annoying.
Especially because browned beef is the backbone of so many comfort foods — Tacos on a busy Tuesday night, a pot of chili bubbling away during football season, spaghetti sauce that smells like home. When the beef doesn’t brown properly, the whole dish can feel a little flat. Not terrible. Just… missing something.
The good news? Gray, watery ground beef usually isn’t ruined. It’s just reacting to heat, moisture, and timing in ways most home cooks don’t realize. Honestly, once you understand what’s happening in the pan, fixing it becomes surprisingly easy.
Let’s break it down.
Quick Look: Why Ground Beef Goes Gray Instead Of Brown
Before we get into the details, here’s the short version:
- Too much moisture = steaming instead of searing
- Crowded pans trap steam
- Cold meat lowers pan temperature
- Weak heat can’t trigger browning
- Wrong cookware loses heat too fast
- Frozen or partially thawed beef releases extra water
That’s really the whole story. But the little details matter — a lot.
First Things First: Is Gray Ground Beef Bad?
Not necessarily.
Gray cooked beef usually means the meat never developed a proper sear. Instead of browning through the Maillard reaction (more on that in a second), it essentially steamed.
If the beef smells normal, was refrigerated properly, and hasn’t been sitting out too long, it’s typically fine to eat. Safe, even. The problem is flavor and texture.
Gray beef tends to taste softer, flatter, and oddly bland compared to deeply browned crumbles. It lacks those savory, almost roasted notes that make tacos taste like taco night instead of cafeteria lunch.
And honestly? Once you taste properly browned beef side-by-side with steamed beef, the difference is wild.
The Science Sounds Fancy — But It’s Actually Simple
Here’s the thing: browning isn’t just color.
It’s chemistry.
The rich flavor you get from properly seared meat comes from something called the Maillard reaction. That’s the process where proteins and sugars react under high heat, creating hundreds of new flavor compounds.
That crusty brown layer? That’s flavor being built in real time.
But there’s a catch — the surface of the meat needs to get hot enough. Usually around 300°F or higher. Water prevents that from happening because moisture cools the pan down.
So instead of browning, the beef just sits there and releases liquid.
It’s less “sizzle” and more “sad simmer.”
Too Much Moisture Changes Everything
This is Probably the biggest culprit.
Ground beef naturally contains water. Some brands contain more than others, especially lower-quality supermarket packs that have been tightly sealed for days. Frozen beef can make things worse because melting ice crystals add even more liquid.
Once that moisture hits the pan, steam takes over.
And steam is the enemy of browning.
Think about it like this: you can’t get crispy roasted potatoes if they’re wet. Same idea here. The pan needs dry heat, not trapped moisture.
A few simple fixes help immediately:
- Pat the beef dry with paper towels
- Don’t add the meat straight from the fridge if it’s icy cold
- Let excess liquid evaporate instead of constantly stirring
- Use a wider pan so steam can escape
That last point matters more than people realize.
Crowding The Pan Is Basically A Guaranteed Disaster
A crowded skillet creates a tiny sauna.
Every piece of beef releases moisture at the same time, and if there’s nowhere for that steam to go, it stays trapped around the meat. The temperature drops fast. Browning stops almost instantly.
This happens constantly during big-batch cooking. People dump two pounds of beef into a medium skillet and wonder why it looks boiled.
Honestly, restaurant kitchens almost never do this. They cook in batches because they know space equals heat retention.
If you want deeply browned crumbles:
- Use a large skillet
- Spread the meat into a single layer
- Cook in batches if necessary
- Resist the urge to stir constantly
That last one is tough. I know. Everyone wants to move the meat around immediately.
But leaving it alone for a few minutes is what creates that crust.
Cold Meat Sabotages Browning Faster Than You’d Think
This one surprises people.
Ground beef straight from the refrigerator can dramatically cool the pan the second it lands. The colder the meat, the harder it is for the skillet to maintain enough heat for browning.
And if the beef is still partially frozen? Forget it. You’re basically adding ice cubes to the pan.
A better approach:
Let the beef sit out for about 15 to 20 minutes before cooking. Not hours — just enough to take the chill off.
Then dry the surface lightly with paper towels.
It sounds minor, but those two steps alone can completely change the outcome.
Your Pan Might Be Working Against You
Not all pans handle heat the same way.
Non-stick skillets are convenient, sure, but many don’t retain high heat well enough for a strong sear. Once cold meat hits the surface, the temperature crashes quickly.
Cast iron and stainless steel are much better choices because they hold heat longer and recover faster.
Cast iron especially shines here. There’s a reason diners and burger joints still rely on it. That heavy surface builds incredible crust.
And don’t rush the preheat.
A properly heated skillet should already be hot before the beef goes in. You should hear an immediate sizzle — not a weak hiss.
If the pan isn’t hot enough at the start, the beef never catches up.
Fat Content Plays A Sneaky Role Too
Lean beef and fatty beef each create different challenges.
Very lean ground beef — like 93/7 — can dry out quickly and sometimes struggles to develop flavor because there’s less rendered fat coating the meat.
On the other hand, very fatty beef releases more grease and moisture during cooking. If the heat isn’t high enough, the meat essentially boils in rendered fat and water.
For most recipes, 80/20 or 85/15 tends to hit the sweet spot.
Enough fat for flavor. Not so much that the pan floods instantly.
And honestly, tacos, burgers, chili — they usually taste better with a little fat anyway. That’s just reality.
How To Rescue Gray Ground Beef
Okay, so the damage is done. The beef is gray. Now what?
You can still improve it.
One trick is to simply keep cooking. Eventually the water evaporates, and browning can begin later in the process. It just takes patience.
Flavor boosters also help a ton:
- Worcestershire sauce
- Soy sauce
- Tomato paste
- Garlic powder
- Smoked paprika
- Onion powder
A spoonful of tomato paste cooked directly in the pan for a minute or two can add surprisingly deep flavor. Same with Worcestershire sauce — it brings that savory, almost steakhouse-style richness.
Another smart move? Add aromatics.
Onions, garlic, shallots — they help build complexity even if the meat itself didn’t brown perfectly.
So no, gray beef doesn’t necessarily ruin dinner. It just means you may need a recovery plan.
The Foolproof Method For Deep Browned Ground Beef
Here’s the method professional cooks rely on over and over:
Step 1: Heat The Pan First
Use cast iron or stainless steel.
Preheat over medium-high heat for several minutes until fully hot.
Step 2: Add A Small Amount Of Oil
Especially for leaner beef.
Wait until the oil shimmers slightly.
Step 3: Add Beef In Chunks
Don’t immediately break it apart into tiny crumbles.
Larger chunks brown better at first.
Step 4: Leave It Alone
Seriously.
Don’t stir constantly. Let the underside brown deeply for 2–4 minutes.
Step 5: Flip And Continue Browning
Now break the meat apart gradually.
Allow new surfaces to contact the pan.
Step 6: Season Toward The End
Salt is important, but adding too much early can draw out moisture too quickly.
A little patience here changes everything.
The result? Rich brown crumbles with real texture and flavor instead of pale mush.
Tiny Browning Tricks That Actually Work
Some kitchen hacks sound ridiculous online. A few genuinely help.
One of the best? A tiny pinch of baking soda.
Not enough to taste — just a small amount mixed into the beef beforehand. It raises the surface pH slightly, helping the Maillard reaction happen faster.
Restaurants use this trick more often than people realize.
Deglazing is another underrated move.
After browning, add:
- broth
- wine
- beer
- balsamic vinegar
That loosens the browned bits stuck to the pan — and those bits are packed with flavor.
Honestly, those caramelized fragments at the bottom of the skillet are culinary gold.
When Gray Beef Actually Is A Problem
Sometimes gray beef is harmless.
Sometimes it isn’t.
Throw the beef away if you notice:
- sour or unpleasant odor
- slimy texture
- sticky surface
- discoloration paired with spoilage smell
- extended time left at room temperature
Trust your senses.
Fresh beef smells mild. Spoiled beef does not.
And while color alone isn’t always a danger sign, texture and smell usually tell the real story pretty quickly.
The Bottom Line? Browning Is Mostly About Moisture Control
People often assume cooking ground beef is automatic. Toss it in a pan, stir it around, done.
But great browning is really about managing heat and moisture at the same time.
That’s the secret.
A hot pan. Enough space. Dry meat. Patience.
Once you get those pieces working together, ground beef changes completely — richer flavor, better texture, deeper color, and honestly a much more satisfying meal overall.
And after you nail it once, it becomes second nature.
Suddenly your tacos taste better. Your chili tastes fuller. Even a quick weeknight spaghetti sauce feels more like something you’d order at a cozy neighborhood Italian spot on a cold evening in late fall.
Funny how something as simple as browning meat properly can do that.