
Save This Recipe
My Aunt Lorraine used to pull these Little round loaves out of tin cans every time we visited her in Connecticut — I want to say it was around Thanksgiving, or maybe it was Christmas, . Memory’s funny that way. I was probably nine or ten, standing in her kitchen that always smelled like wood smoke and something sweet, watching her slide a knife around the inside of a can and just… pop this dark, dense little loaf out onto the counter like it was the most normal thing in the world.
I didn’t think much of it back then. I was a kid. I wanted rolls from a tube. But somewhere in my forties — it might’ve been when my youngest moved out and I suddenly had all this quiet and all this time — I started thinking about that bread again. The way it was almost sweet but not dessert-sweet. The raisins that were soft all the way through. The way it held butter like a sponge holds water.
Boston brown bread. Apparently it’s a whole thing in New England and most of the rest of the country just… doesn’t know about it? Which seems like a genuine oversight.
Why You’ll Love This
- It’s unlike any bread you’ve made before — baked right in tin cans, which sounds strange but gives it that perfect round shape and keeps the inside so moist
- The molasses flavor is deep and rich without being overwhelming — it’s sweet in a grown-up way
- The raisins get all plump and soft because you soak them first, so you’re not biting into little dried-up pebbles
- It’s dead simple to make — no yeast, no kneading, no fussing
- It tastes even better the next day, which is basically a miracle in the bread world
A Few Notes on Ingredients
The flour situation here is a mix of whole wheat and all-purpose, and I think that balance matters. Some recipes use rye flour too — Debbie swears the version she found online uses rye — but I tried it once and it came out a little too earthy for my taste. Maybe I’m just not a rye person. The whole wheat gives it enough nuttiness without going too far.
Buttermilk is non-negotiable for me. It keeps everything light and tender in a way that regular milk just doesn’t. And honestly, if you don’t have buttermilk on hand, that Trick where you add a tablespoon of white vinegar to regular milk and let it sit for five minutes actually works. I use it more than I’d like to admit.
The molasses — get the good stuff. Not blackstrap, which is bitter and will throw the whole flavor off. Just regular unsulfured molasses. Grandma’s is what I usually grab, it’s fine, nothing fancy.
And the raisins. You’re going to soak them in boiling water for about ten minutes before they go in the batter. Don’t skip this. The difference between a plumped raisin and a dry raisin in this bread is the difference between a nice surprise and something that just tastes like an afterthought.
Ingredients
- About 2½ cups whole wheat flour
- ½ cup all-purpose flour
- 2 cups buttermilk
- ½ cup molasses
- ½ cup sugar
- 1 cup raisins
- 1 egg
- 2½ teaspoons baking soda
- 1 teaspoon baking powder
- 1 teaspoon salt
- 1 cup boiling water (for the raisins)
- Butter or cream cheese, for serving — don’t even think about skipping this part

Let’s Make It
First things first — get your oven going at 350°F and deal with your cans. You want four or five clean 15-ounce cans (the kind beans or tomatoes come in), well-sprayed with non-stick spray. Save your cans ahead of time — I keep a little pile of them in the pantry now, which my husband finds mildly concerning. If you don’t have cans or just don’t want to deal with it, a greased 9×5 loaf pan works, though it’s not quite the same. There’s something about the round shape. I can’t fully explain it.
Put your raisins in a bowl and pour that cup of boiling water over them. Let them sit for ten minutes or so while you do everything else. They’ll puff up and get soft and honestly they look so much happier after a good soak. I don’t know why I find that satisfying but I do.
In a big bowl, whisk together your two flours, sugar, baking powder, and salt. Beat in the egg — I just use a fork, I’m not getting out the mixer for this.
In a separate bowl, stir the baking soda into the buttermilk. It’ll foam up a little, which is normal and somehow still delights me every time. Stir in the molasses. The whole thing turns this gorgeous dark brown color.
Pour the wet into the dry and fold it together until it’s just combined. Don’t overmix — the bread will get tough and you’ll be sad. Drain your raisins and fold those in too.
Fill your cans only halfway. I know it’s tempting to pile them a little higher but resist. The bread rises and if you overfill it, you’ll end up with mushroom tops that overflow, which is a mess and also somehow tragic-looking. Put all your filled cans on a baking sheet.
Now here’s the part I think is genius — you can put a second baking sheet on top of the cans while they bake. This keeps the tops flat and stops the bread from doming up too dramatically. I don’t always bother with it, to be honest. Sometimes I forget and it’s fine. But when I remember to do it, the loaves come out more even.
Bake for 50 minutes with the top sheet on (if you’re using it), then remove the top sheet and bake another 10 minutes or until a toothpick comes out clean. My oven runs a little hot so I usually check at 55 minutes total. Your oven is your oven — you know it better than I do.
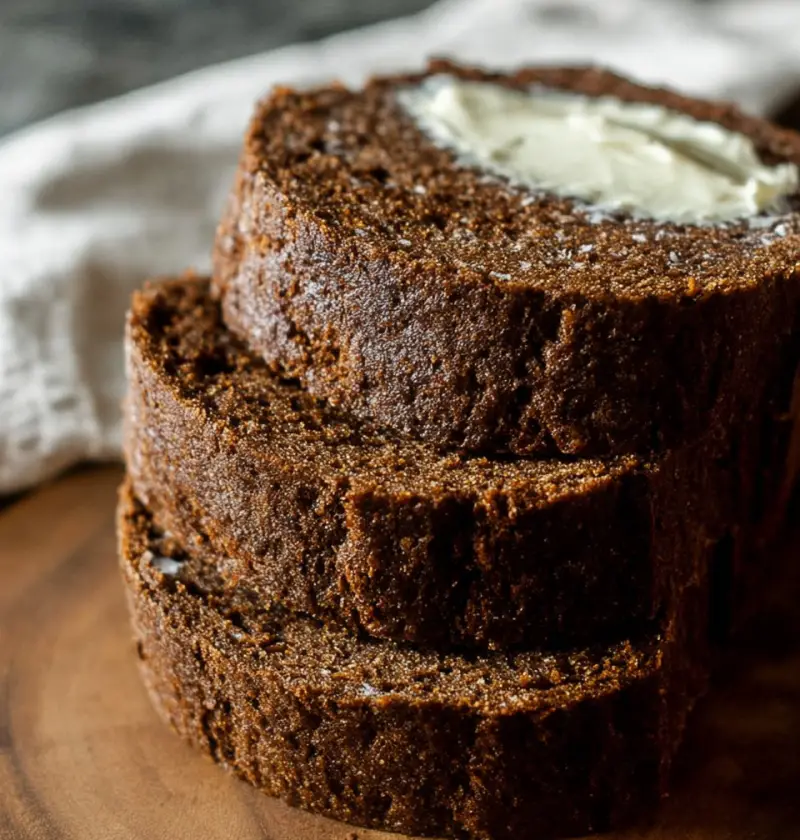
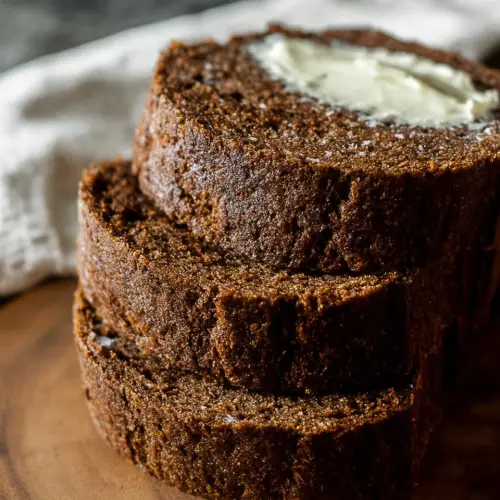
When they come out, run a knife around the inside of each can and gently coax the loaves out. They should slide out pretty easily if you greased the cans well. Let them cool on a rack — or at least pretend to, while you cut into one immediately because the smell is unbearable and patience is not a virtue I’ve ever actually possessed.
Variations
- Add orange zest — about half a teaspoon gives it a subtle brightness. Totally optional but worth trying.
- Skip the sugar — if you prefer less sweet, leave it out and let the molasses do all the work. The flavor is deeper and more intense.
- Swap the raisins — dried cranberries work great here if that’s what you have on hand. A little tarter, but still delicious.
Storing It
This bread keeps well. Wrap it in plastic wrap or stick it in a zip-top bag and it’ll stay good on the counter for a couple days. After that, fridge. It also freezes beautifully — I’ll sometimes make a double Batch, freeze half the loaves, and forget about them until I’m desperate for something that feels like a hug in bread form.
Warm it up before you eat it if at all possible. Even just thirty seconds in the microwave. You want the butter to melt into it, to get into all those little pores. Room temperature is fine but warm is better.
Serve it with baked beans if you want to be traditional about it. Apparently that’s the classic New England move — Saturday night beans and brown bread, something I never grew up with but can absolutely get behind. Or have it in the morning with cream cheese and a cup of coffee, which is my preferred approach on weekends when I don’t have anywhere to be and I’m feeling a little nostalgic for a kitchen in Connecticut that doesn’t exist anymore.
I keep meaning to call Debbie and tell her I finally got it right. I should do that.
Boston Brown Bread
Ingredients
- 2 1/2 cups whole wheat flour
- 2 cups buttermilk
- 1/2 cup all-purpose flour
- 1 cup raisins
- 1/2 cup granulated sugar
- 1/2 cup molasses
- 2 1/2 tsp baking soda
- 1 egg
- 1 tsp baking powder
- 1 tsp salt
- 1 cup water boiling
- butter for serving
Instructions
- Preheat the oven to 350°F (175°C). Grease 4–5 cleaned 15-ounce cans or a 9x5-inch loaf pan with nonstick spray.
- Place the raisins in a bowl and pour boiling water over them. Let them sit for about 10 minutes until plumped, then drain.
- In a large bowl, mix together the whole wheat flour, all-purpose flour, sugar, baking powder, and salt. Beat in the egg.
- In a separate bowl, whisk the baking soda into the buttermilk, then stir in the molasses.
- Fold the wet mixture into the dry ingredients until just combined, then gently fold in the plumped raisins.
- Pour the batter into the prepared cans or loaf pan, filling them only halfway. Tap gently on the counter to remove air bubbles.
- Place the cans or loaf pan on a baking sheet. Optionally place another baking sheet on top to prevent the bread from rising too high.
- Bake for about 50 minutes. Remove the top baking sheet if using and continue baking for another 10 minutes, or until a toothpick inserted in the center comes out clean.
- Remove from the oven and run a knife around the edges to loosen. Carefully remove the bread and cool on a wire rack.
- Slice and serve warm with butter or cream cheese.
