
Save This Recipe
Some recipes are “nice.” Then there are recipes that make your whole kitchen smell like you’ve got your life together.
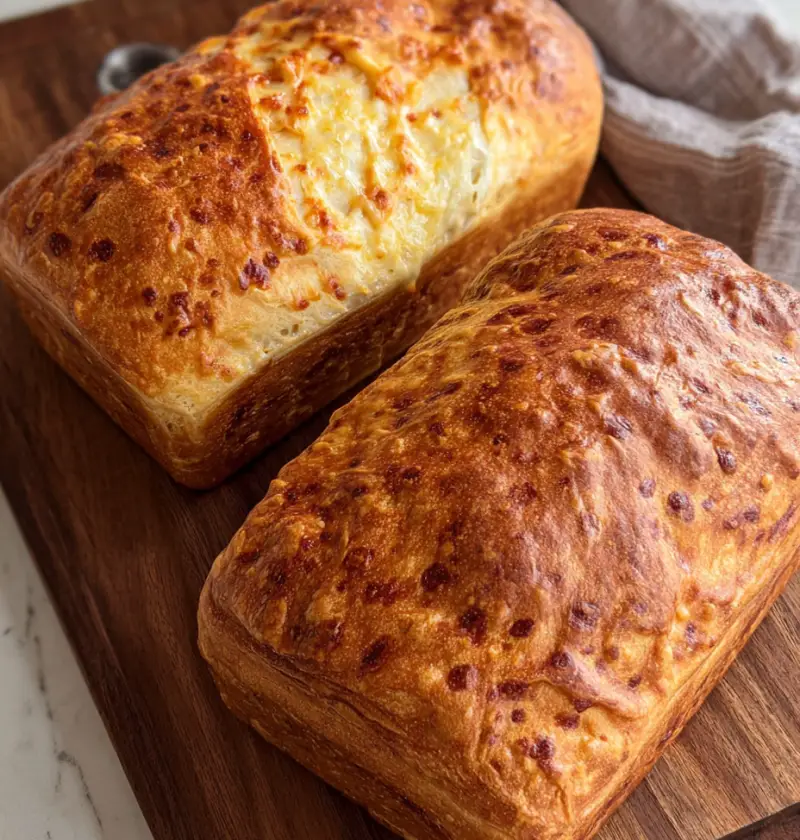
This golden sourdough Cheese bread is the second kind.
The outside bakes up a deep, toasty brown—almost like it’s wearing a little jacket. Inside, it’s soft and tender with cheese threaded all through the crumb, so every slice feels like it’s been blessed. And the best part? It’s not a fussy, high-maintenance bread that needs special gear or ten different techniques you’ll forget the moment you close the tab.
It’s bowl. Scale. Loaf pan. Done.
I love a gorgeous free-form boule as much as anybody, but you know what? Some days you don’t want a “rustic showpiece.” You want sandwich bread that slices cleanly and holds up to lunch duty. You want a loaf your kids can make without you hovering like a nervous stage manager. You want something that can become grilled cheese later, because grilled cheese is basically a love language.
And this loaf? It delivers.
Why this loaf feels like a cheat code
Let me tell you what I like about this bread: it behaves like an easy, everyday sandwich loaf, but tastes like something you’d pay too much for at a cute bakery.
-
No kneading. None.
-
No fancy shaping. You roll it up like a log and set it in the pan.
-
No special equipment beyond what most sourdough folks already have.
-
Soft crumb that doesn’t fight your knife.
-
Cheesy flavor without being greasy or heavy—assuming we keep a couple things in mind.
And yes, it’s beginner-friendly. Not “beginner-friendly” in the way some recipes claim while secretly requiring the instincts of a French baker. I mean genuinely doable, the kind of bread that teaches you confidence.
The cheese question: what works best (and what’s overhyped)
Any cheese you actually like eating can work here. That’s the honest truth. I’ve made cheese breads that were a careful blend of fancy cheeses… and I’ve made them with whatever was in the fridge when it was grocery day tomorrow.
Both were good.
Still, the best results usually come from pairing a melty cheese with something sharper or saltier.
A few combinations that never let me down:
-
Cheddar + parmesan (classic, bold, dependable)
-
Mozzarella + parmesan (milder, stringier, very kid-friendly)
-
Gouda + cheddar (rich and buttery tasting)
-
Asiago + mozzarella (a little grown-up, still Cozy)
-
Feta + mozzarella (salty pockets, softer vibe—just go easy on extra salt)
If you want to make it “pizza-ish,” you can toss in bits of pepperoni or cooked bacon. I’m not mad about that at all. But keep it reasonable. Bread dough isn’t a casserole.
Shred it yourself. I know, I know.
Pre-shredded cheese works in a pinch, but it’s usually coated with anti-caking agents. That coating can keep it from melting smoothly, and sometimes it leaves you with weird little dry specks in the crumb. If you can shred it fresh, do it. It takes maybe two minutes, and it’s worth it.
And if you’re using crumbly cheese (like feta), just crumble it. No need to overthink it.

Starter or discard? You’ve got options
This is one of those recipes that meets you where you are.
Option 1: Active starter (classic sourdough route)
Use bubbly starter and follow a normal sourdough rhythm: mix, fold, ferment, shape, proof, bake.
This version has that gentle sourdough depth. Not sour-sour, just fuller and more complex.
Option 2: Discard + a bit of yeast (quick route)
If you’re sitting on a jar of discard and want bread sooner, you can swap the 100g active starter for:
-
100g sourdough discard + 7g Instant yeast (or active dry yeast)
This makes the timing much faster, because yeast moves like it has someplace to be. If you go this route, you can’t follow an overnight-style sourdough timeline. You’ll watch the dough and bake as soon as it’s proofed properly.
Is one “better”? Depends on your day. That’s my kind of recipe.
What makes cheese dough a little different
Here’s the thing. Cheese adds flavor, sure, but it also changes the dough.
-
Cheese brings fat, which can soften the crumb (good) but can also Slow gluten development (fine, we fold).
-
Cheese brings salt, so you may not need to go wild with extra salt.
-
Cheese can leak, especially if it’s in big chunks or the loaf overproofs.
-
The loaf can feel richer, so you want a good bake time to set the inside.
None of this is scary. It just means you treat the dough with calm confidence and don’t rush the fermentation.
How this bread comes together (without making it complicated)
I’m going to walk you through the flow the way I’d explain it to a friend standing in my kitchen.
1) Premix the dough
In a large bowl, make a well in your flour and add:
-
starter (or discard + yeast if using that version)
-
water
-
Shredded cheese
-
salt
Mix until you’ve got a shaggy dough. It’ll look a little dry at first, then it starts to come together. Cover it and leave it alone for about an hour.
This rest is doing more than it seems. The flour hydrates, the dough relaxes, and you’ll have an easier time building structure later.
2) Form it into a smoother ball
After that first rest, pull the dough into a ball by folding the edges toward the center. It’ll feel stickier than sandwich dough but not like a puddle. Once it tightens up a bit, cover it again and let it rest another 30 minutes.
This is where the dough starts to look like dough.
3) Stretch and folds (the “no kneading” part)
Over the next couple hours, do about 4–6 sets of stretch and folds, spaced roughly 15 minutes apart.
You don’t need a stopwatch. If you’re making lunch, answering a text, switching laundry… it’s fine. Just keep the general rhythm.
Each set is simple:
-
grab the dough
-
stretch it up
-
fold it over itself
-
rotate the bowl and repeat until you’ve folded all sides
The dough will get smoother and stronger. You’ll feel it.
4) Bulk fermentation (first rise)
Once folding is done, cover the bowl and let it rise at room temperature until it’s increased by about 50%.
This isn’t the stage where you want to push it to the edge. Cheese dough can go from “perfect” to “over it” if you ignore it too long. You want it puffy, jiggly, and visibly expanded—not exhausted and collapsing.
And one important note: this bulk ferment stays on the counter, not in the fridge.
Shaping: the easiest part, truly
When the dough has risen, ease it out of the bowl (a silicone scraper helps). Set it on the counter so the smoother side lands down and the stickier side faces up.
Then roll it up into a log. That’s it.
You can tuck the ends in if you want a neat loaf. Or you can leave it a little rustic. Either way, the loaf pan will handle the shape.
Lift it into your loaf pan with the seam on the bottom.
If you’re using a truly nonstick pan, you may not need to grease it. Also, cheese has its own richness, and too much butter or oil can make the loaf feel heavy or slightly greasy. If your pan tends to stick, a light buttering is plenty.
Proofing: flexible, like real life
This loaf can proof in two phases:
-
a little on the counter
-
then in the fridge if you want to pause
I like letting it rise on the counter until it’s clearly puffed and nearing the top of the pan, then chilling it if baking later makes sense.
If you’re using a standard 1.5-pound loaf pan, a good visual goal is the dough rising just over the lip without going crazy.
If you refrigerate it, bring it back out and let it finish rising before baking. It should look airy and ready—like it’s holding a deep breath.
Baking: where it turns into real sandwich bread
Preheat the oven to 200°C / 390–392°F.
Bake about 40 minutes.
If you want a softer crust, you can brush the top with melted butter when it comes out. It’s optional. But it does feel a little like tucking the loaf in with a blanket.
Then cool it fully on a wire rack. Yes, fully. I know. Waiting is annoying. But slicing hot bread is a common way to end up with a gummy middle, and nobody wants that.
The sandwich potential is honestly ridiculous
Once cooled, this loaf slices beautifully. It’s soft but not fragile, and it holds fillings without turning into a soggy mess.
A few ways I love it:
-
Simple turkey sandwich with crisp lettuce and mustard
-
Egg and cheese breakfast sandwich (yes, even more cheese)
-
Tomato soup + grilled cheese using this bread… which is basically comfort on a plate
-
Ham + pickles + a little mayo (salty, tangy, perfect)
-
Leftover roast chicken with something crunchy like cucumber or slaw
And toasted? Oh honey. Toasted is where it shines.
Troubleshooting (because bread has opinions)
“My loaf turned out dense.”
Common causes:
-
starter wasn’t active enough
-
bulk fermentation was cut short
-
dough didn’t proof enough in the pan
-
oven wasn’t fully preheated
Fix: give it more time next round and make sure the starter is lively. Dough should look puffy before baking.
“It rose, but didn’t spring much.”
Likely overproofed in the pan, especially if it sat too long warm.
Fix: bake when it’s just over the pan’s rim, not when it’s towering and wobbly.
“Cheese leaked out and burned.”
Usually from big cheese chunks or too much cheese near the surface.
Fix: shred finer, mix thoroughly, and keep an eye on proofing. If it overproofs, cheese tends to migrate.
“The loaf tastes bland.”
Use sharper cheese (cheddar + parmesan is a winner) and don’t forget the salt. Cheese helps, but salt still matters.
Storage and freezing (my practical side speaking)
If you’re eating it fresh, it’s best within 24 hours. After that, it’s still good, but it’s happier toasted. That’s just sandwich bread being sandwich bread.
For freezing:
-
slice the loaf once it’s cool
-
place slices in a freezer bag
-
freeze up to 2 months
Then you can pull out slices as needed, toast straight from frozen, and feel like a person who plans ahead. Even if you don’t.
A little closing truth
This loaf is the kind of recipe that makes kids feel proud and grown-ups feel relieved. It’s cozy, practical, and just special enough to feel like you did something wonderful—without spending the whole day doing it.
And once you’ve made it once, you’ll start thinking of variations. A little herb. A little jalapeño. Maybe a swirl of pesto. Maybe not. Sometimes plain cheddar is exactly what the week needs.
So go ahead and bake it. Let the crust turn golden. Let the house smell like comfort.
And if the first slice disappears before it ever makes it to a sandwich… well, I understand completely.

Golden Sourdough Cheese Bread
Ingredients
- 500 g bread flour
- 350 g water
- 100 g sourdough starter active or discard
- 10 g salt
- 200 g cheddar cheese shredded
Instructions
- Weigh out your flour and make a well in the center. Add sourdough starter, water, shredded cheese, and salt.
- Mix together to form a dry, shaggy dough. Cover with cling film or a damp tea towel and let rest for 1 hour (autolyse).
- Bring dough into a smooth ball by folding edges toward the center. Cover and let rest for 30 minutes.
- Perform 4–6 sets of stretch and folds over 2 hours, resting 15 minutes between each set.
- After folds, cover and bulk ferment at room temperature until dough has risen by about 50%.
- Shape dough into a batard. Roll into a log and place into a loaf pan seam side down.
- Allow dough to proof on the counter briefly, then place in the fridge for cold fermentation overnight.
- Preheat oven to 200°C (392°F). Place the loaf directly into the oven from the fridge.
- Bake for 40–45 minutes until golden and crusty. Remove from oven and cool on a wire rack.
- For a softer crust, brush the top with melted butter while the loaf is still warm.
Notes
Nutrition