
Save This Recipe
(Because Everyone Deserves a Little Fresh Mint—Even if You Don’t Have a Garden)
You know those moments when you’re making iced tea or some pasta with lemon, and you think, “This would be perfect with a little mint!” But then you realize you’ve got none, and the stuff at the store looks tired before it even hits your fridge?
Yeah—been there. That’s why I started growing my own. And let me tell you: mint is one of the easiest plants To Grow. Honestly, it almost grows too well. Once it gets going, it’ll take over if you let it. So growing it in something contained—like, say, an old soda bottle hanging outside your window? Game-changer.
No backyard? No problem. Let’s get into it.
First, Why Bother Growing Mint at All?
Besides making your kitchen smell amazing, mint has a ton of perks. It’s a perennial, which means it comes back every year without much fuss. It also repels pests like mosquitoes and ants (take that, summer porch invaders), and you can use it in everything from mojitos to foot soaks.
Oh, and it’s a digestive helper. I drink mint tea after dinner sometimes and it feels like a little belly hug.
Picking Your Mint Soulmate
Mint isn’t just… mint. There’s peppermint, spearmint, apple mint, even chocolate mint (yep, that’s a real thing).
-
Want it for tea? Go with peppermint.
-
Making tabbouleh or mojitos? Spearmint is your bestie.
-
Want something fun and fragrant? Chocolate mint is so dreamy.
You can usually find fresh bunches at the grocery store or local farmers’ markets—and if they still have stems, you can use those To Grow your own.
Here’s What You’ll Need (No Fancy Supplies)
-
A few empty plastic bottles (2-liter soda bottles work great)
-
Scissors or a craft knife
-
String, wire, or twine to hang them
-
Potting soil
-
Fresh mint cuttings (4–6 inches long)
-
A sunny-ish spot
-
And a little patience (but not much—mint is fast!)
Step-by-Step: Turning Trash into a Tiny Hanging Garden
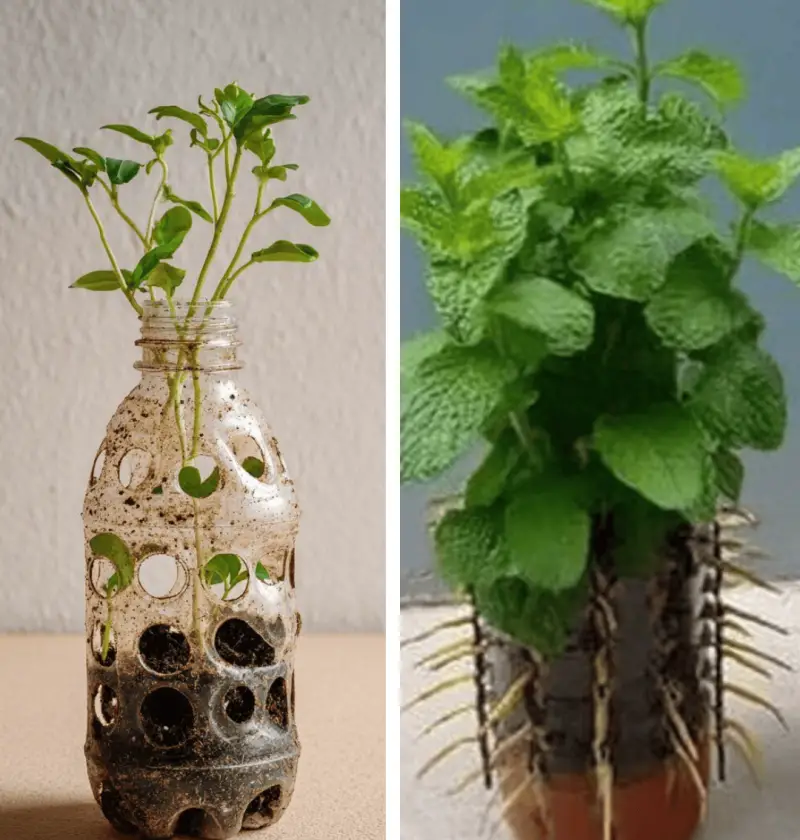
1. Clean those bottles
Give ’em a good rinse—no one wants mint that smells like cola.
2. Cut the bottle
Slice the bottle in half horizontally. You’ll use the bottom half as your mini planter. If you’re extra resourceful, save the top part and use it as a funnel or watering scoop.
3. Make some holes
Use a nail or the tip of your scissors to poke a few drainage holes in the bottom. You can even heat up the tip of a metal skewer if you want it to go through like butter (just be careful, please!).
Then poke two holes near the top edge so you can string it up later.
How to Turn Mint Cuttings into Real, Growing Plants
4. Get your cuttings
Snip healthy stems from a mint bunch—about 4–6 inches long. Cut right below a set of leaves. Strip off the bottom leaves (leave a few at the top) so there’s a nice bare section for roots to sprout.
5. Root them in water
Stick those little stems in a glass of water and leave them in a sunny window. Change the water every few days. Within a week or two, you’ll see roots growing. It’s honestly kind of magical.
Time to Plant!
6. Pot ’em up
Once the roots are about an inch or two long, fill your bottle planter with potting soil, leaving some room at the top. Poke a little hole, tuck your cutting in, and gently press the soil around it.
Give it a drink of water—not too much, just enough to moisten everything.
7. Hang ’em high
Thread your string or wire through the holes you made and hang your planter somewhere sunny. Railings, fences, porch hooks—heck, I’ve even seen folks hang them on an old ladder propped against the wall.
Mint likes sun, but not blazing hot afternoon sun. Morning sun is perfect.
Keeping Your Mint Happy
-
Water regularly, especially in hot weather. Mint likes moist soil, but not soggy swamp vibes. If the soil feels dry an inch down, it’s time to water.
-
Pinch it back often. Seriously—don’t be shy! The more you pick, the bushier it gets. Win-win.
-
Fertilize gently every month or so if it starts looking pale or slow.
Common Mint Mishaps (And How to Fix Them)
-
Yellow leaves? You’re probably overwatering—or the bottle doesn’t have good drainage. Let it dry out a bit.
-
No new Growth? Snip the top leaves. This tells the plant to Stop growing up and start growing out.
-
Bugs? Every now and then, mint might get aphids or spider mites. A gentle spray of soapy water usually clears it up. Or just rinse the leaves off in the sink. No big deal.
Final Thoughts From Someone Who Accidentally Became a Mint Farmer
Listen. I started this project on a whim with two empty bottles and a grocery store mint sprig. Now I’ve got a little mint jungle hanging outside my kitchen window, and let me tell you—it brings me more joy than it probably should.
It smells amazing, it tastes better than anything you’ll buy in a clamshell package, and every time I pluck a few leaves for tea or lemonade, I feel like a dang garden witch.
You don’t need a yard. You don’t need a green thumb. You just need a bottle, a sprig, and a little sun.
And trust me—once your friends see it, they’re gonna want one too.
Let me know if you try it! Tag me in your photos or send me a message. I love seeing your minty masterpieces. And if you find a new use for hanging bottles, well—don’t keep it to yourself. Sharing is caring.