
Save This Recipe
Some recipes just take me right back to my childhood kitchen, and this Old Fashioned Strawberry Pie is one of those! There’s something so magical about a shiny, jammy strawberry filling nestled in a buttery crust that just feels like summer at Grandma’s. You know the kind of day I mean—when you’d sneak an extra scoop of ice cream on top and maybe make a mess all over your Sunday dress (sorry, Mom). Every time the strawberries start looking plump and rosy at the market, I start craving this pie. It’s such a comforting, sunny-weather dessert, perfect for bringing a little old school, backyard-barbecue kind of happiness right to your table.
If you love desserts that are a bit of a showstopper yet absolutely simple to put together (you do, right?), this is your kind of recipe. You get sweet, fresh berries piled high, a glossy homemade glaze, and that perfect flaky crust—all with barely any fuss or fancy ingredients. There’s just something about the way those strawberries shine in the pie dish that makes me downright giddy.

Why You’ll Love This Recipe
- Fresh and Fruity Goodness: Every bite is loaded with the juiciest ripe strawberries—sweet, slightly tart, and totally nostalgic (like a bite of summer vacation in every forkful).
- Quick, No-Sweat Glaze: The glaze comes together in minutes and absolutely transforms those berries. It’s like a touch of kitchen magic and you’ll feel so clever for making it from scratch.
- Totally Versatile: This pie is at home at Sunday lunch, backyard barbecues, or when the kids are begging for something “special” after school. I’ve even been known to sneak a slice with my morning coffee (shhh, don’t tell!).
- Make-Ahead Friendly: Pop it in the fridge a few hours ahead and cross dessert off your list. No last-minute panic, no sticky hands as guests arrive.
- Customizable Extras: Go wild with whipped cream or a big scoop of vanilla ice cream. (I usually do both—no judgment, just happiness!)
Key Ingredients
Fresh Strawberries: The true star of the show! Go for really red, fragrant berries at their peak—trust me, you can taste the sunshine if you grab them at a local farm stand. (Frozen berries turn watery, so don’t bother this time!)
Sugar: This sweetens up the glaze and is especially important if your berries have a little zing. If your strawberries are already super sweet, you can nudge the sugar down just a bit.
Cornstarch: This is your thickener and ensures that beautiful jammy glaze hugs every last berry (instead of making a run for it when you slice the pie).
Pie Pastry: Store-bought or homemade both work—whatever makes pie-making feel do-able for you. I’m an all-butter crust fan for extra flavor and golden, flaky edges, but if you have a favorite recipe or shortcut, use it!
Cold Water: You’ll mix this with the cornstarch to keep things lump-free and kid-approved-smooth.
Pinch of Salt: Don’t skip it—it helps those berry flavors pop and keeps things from tasting one-note sweet.
Red Food Coloring (Optional): Just the tiniest touch gives the glaze that pie-shop pop of color. Totally optional, totally fun!
Whipped Cream or Vanilla Ice Cream (Optional): For serving! You won’t regret that cloud of whipped cream or a melty scoop of vanilla to catch every dribble of syrupy strawberries.
For the full ingredient amounts and a printable version, just scroll to the recipe card at the end—makes life easier, right?
Step-by-Step Instructions
Step 1: Prepare the Strawberries
Give those strawberries a really good rinse—they grow close to the ground and always seem to sneak in just a hint of dirt. Hull them (that’s just chopping off the green tops and any tough core) and then slice them in half. If you find a giant one, go ahead and quarter it.
Measure out six cups of halved strawberries. Don’t worry, this doesn’t have to be science-class exact. Hold one cup aside and set the rest aside—those are going into your pie as-is. The reserved cup will be for the magical glaze.
Step 2: Make the Easy Strawberry Glaze
Toss that reserved cup of strawberries into a little bowl and mash them up. Fork, potato masher, or even the back of a spoon—whatever does the trick. You want a chunky mash (not a fine puree), so no need for perfectionism here.
Now, in a medium saucepan, stir your sugar and cornstarch together first, before adding any liquids. This helps prevent lumpy glaze—trust me, worth it! Add your cold water and the pinch of salt, followed by your mashed strawberries. Give everything a good stir to combine.
Set the pan over medium heat and bring the mixture to a boil, stirring constantly (don’t walk away—this part goes fast!). Once it bubbles, keep stirring and let it simmer for 2-3 minutes, or until the glaze turns clear and thick—like shiny strawberry jam.
If you’re feeling fancy, add a couple drops of red food coloring here for that irresistible window-shop look. Pull the pan off the heat and let the glaze cool for about 10 minutes so it doesn’t wilt your fresh berries later.
Step 3: Assemble the Pie
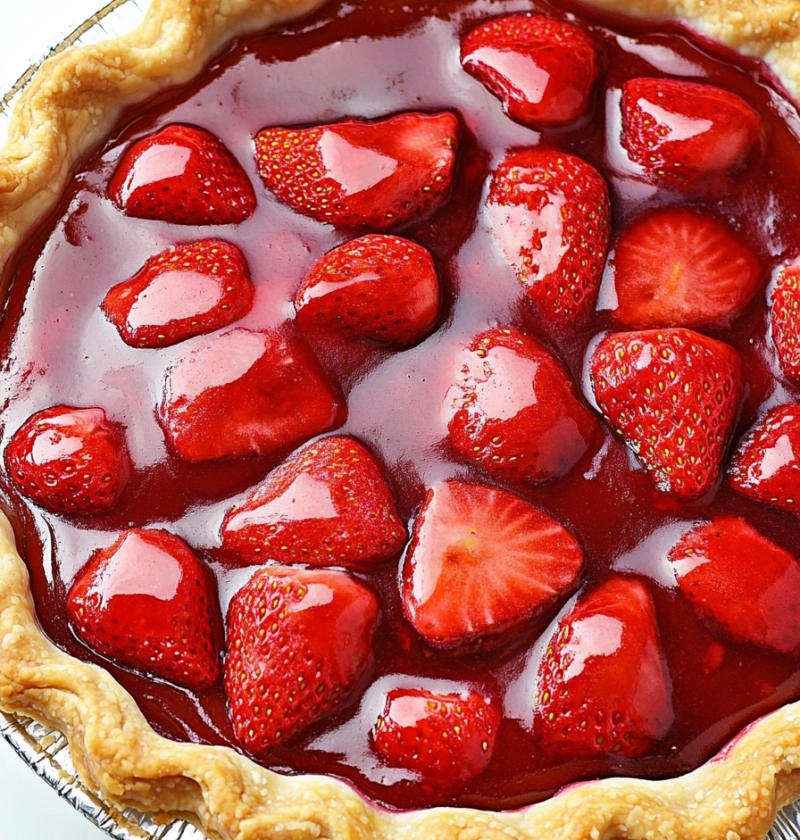
Arrange your remaining five cups of halved strawberries in the baked pie shell. I like to nestle them in there cut-side down for a pretty mosaic, but honestly, you can just pour them in if you’re short on time or patience. This is comfort food, not fine art!
Pour your slightly cooled strawberry glaze right over the berries. Use a spatula to gently spread and coat every berry in glossy goodness—making sure the glaze seeps down between them and fills all the gaps. (Don’t be stingy—get every last bit out of that saucepan!)
Step 4: Chill and Set
Here comes the hardest part: patience. Pop your pie in the fridge for at least 1-2 hours so the filling sets up. I know, it’s an exercise in self-control! But chilling helps everything slice neatly, and it’s oh-so-refreshing on a warm day.
Step 5: Slice & Serve
When your pie is cold and beautifully set, it’s go time! Top with plenty of whipped cream, a generous scoop of vanilla ice cream, or both if you’re feeling truly decadent (been there, highly recommend). That first slice is always a heart-stealer, and don’t worry if things get a little messy—nobody minds strawberry syrup on a summer day.
Serving Suggestions
- A Pile of Whipped Cream: Just dollop it on—clouds of creamy goodness make every bite a little celebration.
- Vanilla Ice Cream: Let it melt just a bit to swirl with the glaze. I dare you not to swoon!
- Iced Tea or Lemonade: The ultimate front-porch combo—extra points if you actually make time to sit outside for pie o’clock.
- Fresh Mint Leaves: Sprinkle a few for color and that sweet herbal freshness. It makes your pie look straight out of a Southern summer party.
Storage and Meal Prep Tips
Refrigeration: Any leftovers (ha!) will keep, covered loosely with foil or plastic wrap, for 2-3 days in the fridge. The crust softens a bit after the first day—but somehow, nobody in my house has ever complained.
Freezing: I don’t recommend freezing this pie. Fresh strawberries just aren’t cut out for it—they turn a little soggy, and you lose that juicy, sunny texture. Best to treat yourself while it’s fresh!
Make Ahead Tips: You can bake your pie crust and make the glaze a day in advance. Store them separately, and then assemble and chill the pie the morning you want to serve. So easy, especially for holidays or potlucks.
Reheating: None needed! This pie is best eaten cold, straight from the fridge. (And, I mean, who wants to wait for pie to reheat, anyway?)
Variations
- Berry Mix-Up: Swap in a handful of raspberries, blueberries, or blackberries for a “wild berry” pie that’s extra colorful. So fun and summery!
- Gluten-Free Pie: Just use your favorite gluten-free pie crust (store-bought or homemade—do what works for you).
- Sugar-Free: Substitute with your favorite no-calorie sweetener (like erythritol). It comes out lighter, but still just as craveable.
- Chocolate Drizzle: Melt a little semisweet chocolate and zigzag it over the cooled pie for a chocolate-covered-strawberry twist. Seriously, wow.
- Lemon Zest: Add a teaspoon to your glaze for a punchy, citrusy brightness. It gives each bite that little “Oh!” moment.
Conclusion
Old-Fashioned Strawberry Pie really is pure, happy comfort food—the kind of dessert that somehow gets people lingering around the table for just one more sliver (or a second helping, let’s be honest). Those glossy, jammy berries, the flaky buttery crust, and maybe a swoosh of whipped cream—there’s just nothing like it, especially when sunshine’s pouring through the window. Share it with friends at a barbecue, tuck it in the fridge for a sweet weeknight treat, or keep it simple and eat a big forkful right out of the pie dish (zero shame, it’s called “chef’s privilege”). If you give it a whirl, let me know how it went in the comments or if you put your own spin on things. Here’s to simple pleasures, messy fingers, and making old favorites feel brand new. Happy baking, friends!

Old Fashioned Strawberry Pie
Ingredients
- 1 9-inch deep-dish pie crust baked
- 6 cups fresh strawberries hulled and halved, divided
- 1 cup sugar
- 3 tbsp cornstarch
- 3/4 cup cold water
- 1/4 tsp salt
- red food coloring optional, for vibrant color
- whipped cream or vanilla ice cream optional, for serving
Instructions
- Wash and hull the strawberries. Halve them and set aside 1 cup for mashing.
- Mash 1 cup of strawberries. In a saucepan, mix sugar and cornstarch. Stir in water, salt, and mashed strawberries. Cook over medium heat until the mixture thickens and clears. Cool for 10 minutes.
- Place the remaining 5 cups of strawberries into the baked pie crust. Pour the cooled glaze over the strawberries, ensuring they are evenly coated.
- Refrigerate the pie for 1-2 hours to set the glaze.
- Slice and serve cold, optionally topped with whipped cream or vanilla ice cream.
