
Save This Recipe
If you’ve ever found yourself standing in your kitchen, panic-setting in because you’ve promised chocolate cake and somehow the frosting part fell off your to-do list, please know—you are so not alone. I can’t tell you how many times a naked cake has stared me down with those “are you ready yet?” vibes, only to be saved (again!) by this trusty, old-fashioned fluffy 7-minute frosting. Around here, we call it “the hero in a mixing bowl.” It’s one of those retro comforts that’s always there for you: glossy, cloudlike, and almost alarmingly quick to make. I’ve reached for it on late-night baking whims, right in the middle of birthday chaos, and on those random Wednesdays when you just really need cake. (No judgment! You’re in good company.)
What really gets me is how this humble recipe turns a plain ol’ cake—or even store-bought cupcakes—into something you suddenly have to show off. It’s pillowy-soft, perfectly sweet but not cloying, and has this gorgeous shine that just begs you to take one more swipe with your finger (and maybe one more after that). Most days, I swear I make it because I’m “out of butter,” but between you and me, I just love the way it piles up like a marshmallow blanket. My mom always said it was lighter than air—and honestly, she wasn’t wrong.

Why You’ll Love This Recipe
- Light and Fluffy Texture: Just melt-in-your-mouth goodness—think marshmallow cream but softer and somehow even dreamier.
- Glossy Finish: So shiny it looks like you spent hours on it, but honestly, your secret is safe with me.
- Classic, Subtle Flavor: No heavy aftertaste here—just sweet, gentle vanilla that plays well with everything.
- Ready in a Flash: Start to finish in about seven minutes (it’s not lying!).
- Super Adaptable: Goes with chocolate cake, lemon cupcakes, coconut layers, or—don’t laugh—a spoon right from the bowl.
Key Ingredients
The best part? No fancy-pants shopping list needed. This recipe’s probably waiting right in your kitchen, and you have a little wiggle room, too. Here’s the lowdown—and some hard-earned tips:
- Granulated Sugar: Just regular white sugar—don’t get fancy here. Turbinado gets gritty, and brown sugar’ll muddy up the fluff and color.
- Egg Whites: A couple of fresh egg whites are best. If raw eggs make you nervous, pasteurized ones work fine! (Skip the boxed “egg substitutes”—they just flop. Trust me, I’ve tried. More than once…sigh.)
- Cream of Tartar: A pinch helps keep your peaks proud and not droopy. I’ve swapped in lemon juice when I had to, and it does the trick! But really, cream of tartar’s your friend here.
- Vanilla Extract: If you have real vanilla, use it. I’ll crack open my “good vanilla” for this. Sometimes I sneak in a droplet of almond extract for a twist. You do you!
- Cold Water: Not warm, not hot—just regular cold tap water. It melts the sugar so everything whips up light.
- Salt: The tiniest pinch makes the sweetness pop and rounds everything out. Don’t skip it!
Tip: Want the full ingredient amounts and a print-friendly version? Scroll on down to the recipe card below. Don’t worry, you’ll get a cheat sheet for next time.
Step-by-Step Instructions
If you’ve never tackled a double-boiler frosting before, take a deep breath! It’s way less fussy than it sounds, and you definitely don’t need a fancy set-up (mixing bowl plus saucepan = perfection). Here’s what works for me:
Preparation
- 1 1/2 cups granulated sugar
- 1/3 cup cold water
- 2 egg whites
- A pinch of salt
- 1 teaspoon vanilla extract
- 1/2 teaspoon cream of tartar
Before you even turn on the burner, measure everything out. Crack those eggs, set your vanilla nearby, and line up your sugar and salt like you’re hosting a tiny, sugary parade. It’ll help you get the timing just right and avoid overcooked eggs (never a good look in frosting!).
Step 1: Initial Mixing
In a heatproof glass or ceramic bowl (think Pyrex, not plastic), stir together the sugar, cold water, egg whites, salt, and cream of tartar. Give it a quick whisk—nothing fancy, just until the sugar is a bit dissolved and everything looks like a cloudy puddle. That’s perfect!
Grab your hand mixer. On low, give it about 30 seconds of mixing. This is just to get things cozy—no need for peaks yet.
Step 2: Set Up the Double Boiler
Fill a medium saucepan with a couple of inches of water and set it on the stove over low heat. Bring it up to a gentle simmer—think soft bubbles, NOT a rolling boil. Place your mixing bowl right over the pot, making sure the base of the bowl isn’t touching the water. If your bowl sits too low, just pour off a splash of water. Easy fix, crisis averted!
Step 3: Cook the Frosting
Now for the arm workout! Turn your mixer to high and start beating the mixture while it’s propped over the simmering water. You’ll want to move the beaters all around the bowl, scooping in air. Keep this up for about 7 minutes. The mixture will go from foamy to thicker, silkier, and shiny with those gorgeous stiff peaks. (Pull out the beaters—if the frosting stands tall, it’s ready!)
The magic happens right here: the gentle heat makes the egg whites safe and transforms the whole thing into marshmallow fluff. Smell that warm vanilla steam? That’s your cue—it’s almost done!
Step 4: Final Touches
Take the bowl off the heat (careful, steam rush!). Drizzle in your vanilla, then beat for another minute or two, until it looks pillowy and a bit cooler. At this point, you’ll want to taste it—just once, I promise. (Okay, maybe twice. We don’t judge here.)
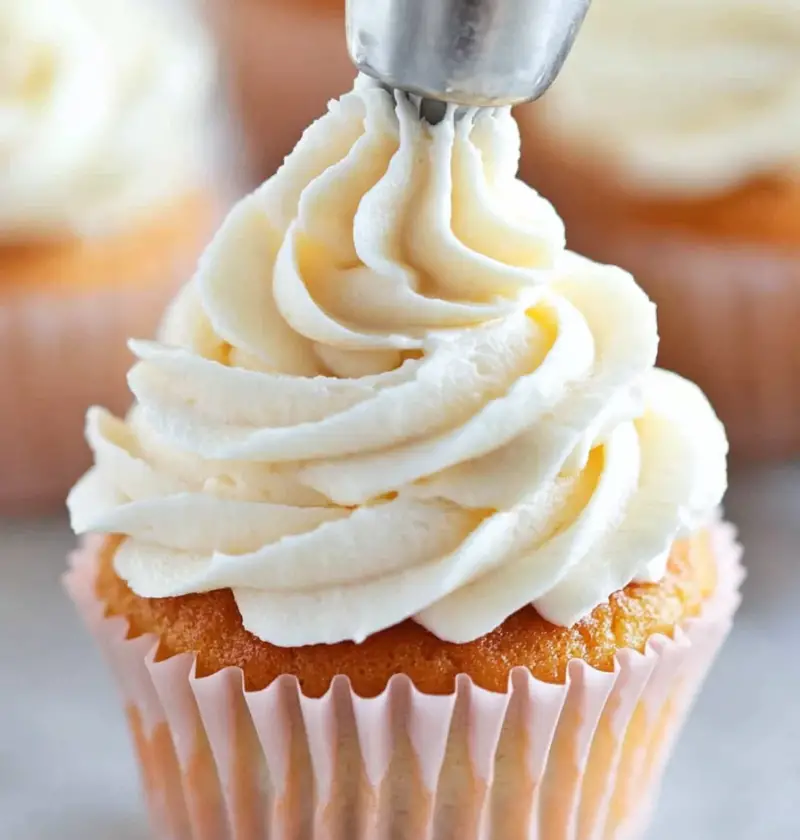
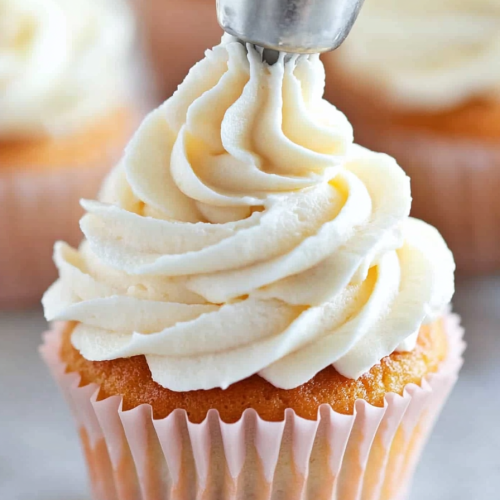
Step 5: Frost Quickly
This frosting is a “right now” kind of treat—it sets up fast, so slather it on your cake or cupcakes ASAP. Use a spatula, spoon, or even the back of a butter knife to create swoopy, dramatic peaks. If you’ve got helpers, let them take over; kids especially love swirling this stuff around. After a few minutes, the outside will set into a delicate, marshmallowy crust, while the inside stays soft as a cloud. (If you’re a corner-of-the-pan snacker, this part is for you!)
Doubling the Recipe
Baking for a crowd or taking on a triple-layer cake? Just double up all the ingredients. You’ll want the biggest bowl you’ve got, and maybe a friend willing to take over the mixer. Trust me, you’ll never regret making extra. (The bowl always seems to get mysteriously “emptier” with every frosting break.)
Serving Suggestions
- Classic comfort: Slather it high on a chocolate cake that tastes like every birthday you ever loved. Red velvet? Oh yes, it’s a dream combination.
- Cupcake magic: Use a piping bag (or even a zip-top bag with a corner snipped off) for bakery-style swirls. Top with sprinkles if you’re feeling fancy.
- Coconut party: Sprinkle the frosted cake with shredded coconut, and suddenly it’s Easter—or a luau—in your kitchen.
- Lemon meringue moment: Spoon it over lemon pie and hit it with a kitchen torch if you want to impress. Even a few toasty bits make it extra gorgeous!
- Layer it up: Spread a cloud of fluff between cake layers for bonus gooeyness. Try adding a little citrus zest to the cake for fresh contrast.
Storage Tips
Honestly, this frosting is at its utter best the same day you make it—super soft, glossy, and dangerously lickable. If you do have frosted leftovers (ha!), store them in an airtight container in the fridge, and enjoy within 24 hours. The texture will be a smidge less billowy from the chill, but it’s still sweet, silky, and tastes just like nostalgia.
Freezing doesn’t really work here—it’ll defeat all that fluffy effort. Just one more reason to share with friends, neighbors, or anyone in need of a midweek pick-me-up.
Variations
- Citrus zing: Swap the vanilla for lemon or orange extract for a bright, sunshiney twist. My grandma used to sneak orange in for “birthday surprise” cakes.
- Almond twist: A touch—a drop or two!—of almond extract adds a soft, nutty flavor. Perfect with chocolate or cherry cakes.
- Chocolate drama: Drizzle melted chocolate on top of your frosted layers for that swirly, fancy-patisserie look.
- Colorful fun: Stir in a few drops of gel food coloring before your final mix and swirl it in for a pastel ombré or bold stripes. Easter brunch will never be the same.
- Peppermint holiday: Add a wee bit of peppermint extract and shower crushed candy canes on top for the coziest winter treat.
7 Minute Frosting
Ingredients
- 1 1/2 cups sugar
- 1/3 cup cold water
- 2 egg whites
- 1 pinch salt
- 1 teaspoon vanilla extract
- 1/2 teaspoon cream of tartar
Instructions
- Measure out sugar, cold water, egg whites, salt, vanilla extract, and cream of tartar. Having everything ready will make the process smoother.
- In a medium heatproof bowl, combine sugar, water, egg whites, salt, and cream of tartar. Stir gently until the sugar starts to dissolve, then use an electric mixer on low speed to beat for about 30 seconds.
- Bring a medium saucepan with a few inches of water to a simmer. Place the bowl with the egg white mixture over the saucepan, ensuring the bottom of the bowl does not touch the water.
- Using an electric mixer on high speed, beat the mixture over the simmering water for 7 minutes, or until it becomes thick, glossy, and forms stiff peaks.
- Remove the bowl from the heat. Stir in vanilla extract and beat for an additional 2 minutes to ensure the frosting is smooth and silky.
- Spread the frosting immediately over cakes or cupcakes, creating decorative swirls or peaks. The frosting will set quickly, forming a delicate crust.
